Showing posts with label Thank You. Show all posts

Sunday, March 30, 2014

Thank You!

I recently won a gorgeous flower embroidered Mexican blouse for an 18-inch doll and since Jen lovingly handmade it, I just had to create a handmade garment-themed thank you card for her. Go check out her blog and her Etsy pattern store (link @ top of her blog) for many fabulous doll patterns in many sizes/styles, including lots of free ones and many historical patterns. You'll not be disappointed!

My card was made using Spellbinders' A-2 Fancy Ribbon Threader and Decorative Dress Forms dies and tiny Tim Holtz hanger, as was this previous one. I hand threaded embroidery floss through the frame's edges and ribbon along the bottom. The simple dress is adorned with narrow ribbon and a treasured little pearl-bedecked bow that was given to me by my SIL. It's a treasure because it belonged to my sweet MIL who passed away this month at the age of 97 1/2. I shall miss her sweet face and her plethora of sewing knowledge. As she was ever-present on my mind when I made this card, I wanted to share something from her that made me smile.  :`)

Saturday, November 9, 2013

My Sheri Crafts Challenge #123: Thanksgiving

Our challenge @ My Sheri Crafts asks simply that you create a project that's Fall or Thanksgiving related -- so let's see yours!

Simplicity ruled for me, as a family emergency consumed several days. All ended well, so that's ALL that matters in the end and I now need this card for a neighbor that helped me in my time of need. I designed this card with him in mind and kept it very simple and as masculine as I could. I chose Kraft CS and a deep red-orange Bazzill CS to add behind my Spellbinders' die-cut bottom edge. Using JustRite's stamp set (Give Thanks Nested Frames & Occasions - retired) and two coordinating Just Rite die sets (retired), I stamped my leaf/acorn frame and sentiment and popped them up with foam dots for dimension atop my brown ribbon. That's it for me now, but I'll be watching for your project @ MSC!!!

Saturday, November 10, 2012

My Sheri Crafts Challenge #098: Thanksgiving

A very fitting challenge this week @ My Sheri Crafts where our theme is Thanksgiving and we're asking you to create a card/project showing thanks!
I'm calling this my "vintage thanks" card since even though The Green Stack by DCWV that I used for this challenge was from 2008, I only recently spotted and purchased it, simply because the little animal characters therein are just too cute to resist -- LOL!!! This is one of my FAV papers from the stack and I decided to keep it simple, first merely stamping my 'thanks' sentiment from a 'vintage 2007' Stampendous set ("Mega Thanks") right onto the BG paper.  Next I stamped the letters on 3 different papers from the stack, fussy cutting them individually and pop dotting them in place over my stamped image. I added the 'many' stamp from the same set and 3 Dew Drops  (The Robin's Nest circa 2008) along the paper's border strip, roughed up my edges, then sponged a bit of Walnut Stain distress ink to all edges. Simple, fun and another thank you card to put in my ready to finish and mail stack -- YAY!!!

Why don't you post a thanks project to our My Sheri Crafts' challenge?!  We'd LOVE to see your ideas!!!

Tuesday, May 15, 2012

JustRite Friday Challenge #072: 3D Project

My project for JustRite's 3D Challenge is a recycled plastic International Coffee container turned thank you gift holder. My sweet friend, Marilyn, saves these for me, as I only drink black coffee -- don't these just make the greatest little boxes?


I up-cycled some corrugated cardboard from my stash, peeling off one layer and brushing on Making Memories Manila scrapbook paint -- love the contrast/depth it adds! One cardboard piece was taped onto the body of the container and a top and bottom die cut with Spellbinders' Grand Labels Four.


To create a border around the bottom I first cut cream CS and lavender shimmer strips with Spellbinders' RicRac Edgeabilities die and then stamped a decorative JustRite stamp from With Sympathy beneath each point. Once my border was taped in place I attached a vertical strip to the back, then across the top to secure my lid. That strip is embellished with the same stamp and closes with a small magnet in front.


My circular Thank You sentiment from JustRite's Spring Words was stamped on a Labels Eighteen die and added to the lid, along with a rose created from Spellbinders' Spiral Blossoms One and Want2Scrap gem flourish that I colored lavender with Copic V17. Now it's all ready to fill with a little thank-you surprise.


Friday, February 10, 2012

Papertrey Sketch Challenge


I chose this very simple Papertrey Ink Fifth Anniversary sketch to create a thank you card I needed, using Papertrey's Vintage Cream, Dark Chocolate and Spring Rain CS, and a sentiment from Iconic Images stamped in Dark Chocolate. Side tabs were cut from Spellbinders' Nested Lacey Pennants, Making Memories square buttons were sewn on with DMC embroidery floss and a line of holes was pierced below my sentiment for added interest. That's it -- short & sweet!

Monday, November 14, 2011

JustRite Friday Challenge #062: Give Thanks

For this JustRite Friday Challenge to make and give or send a thank you card or gift I kept my card fairly CAS to let the sentiment and fall frame take center stage!
My sentiment (Baroque Nested Frames) and frame (Give Thanks Nested Frames) are die cut using JustRite's Nested Frames and Nested Sentiment custom dies that are so fun to work with! I used the small additional die flower piece to back the cream frame and then cut an additional orange frame from a slightly larger Nested Frames' die to back the whole piece before mounting it over my ribbon. I LOVE that this adds just a smidge of border color in the background -- so many possibilities with these awesome custom dies.
My cream layer's border was cut/embossed with a combination of Spellbinders' Classic Bracket and Classic Ric Rac Edgeabilites and I ran machine stitching just above them. The little acorn accent piece was cut from shrink plastic (Spellbinders' retired die) and colored with Copic markers before shrinking.
I'm so happy you stopped by today and hope you'll make and send a thank you card to someone too. It's always so nice to discover a card in my mailbox and this card will be mailed right after our Thanksgiving celebration.

Wednesday, August 10, 2011

Mehndi Medallion Thank You

If you've not yet seen this fabulous Mehndi Medallion acrylic stamp set by Papertrey Ink, you are truly missing out. It consists of the large medallion used here on my CAS card, 2 medium-sized medallions, a small one and 2 tiny ones, a total of 6 stamps for a mere $5 investment! I'd have purchased it even if it had been $15 or $24 just because the samples I've seen on Nichole's blog and the Papertrey Forum are amazing, but for such a teeny price tag, it's beyond a bargain. I think this is one set I may "wear out" in a short time -- LOL!
Today I've paired the medallion stamped in Aqua Mist ink with a sentiment from Giga Guide Lines stamped in True Black ink on white CS. For finishing touches I used PTI's Edgers #3 die along the card's opening, dabbed with Aqua Mist ink, and Martha Stewart seam binding in an absolutely perfectly-matched color IRL -- if only my camera could capture that -- sigh! Today Nichole's peek into this month's release revealed an impression plate of this very medallion -- be still my heart -- which almost makes me wish I had a job so I could purchase more often (big sigh)!

Friday, May 20, 2011

Simplicity


I took a little break from paper crafting recently and wanted to begin my first day back in the craft room after my "stay-cation" (spent at home enjoying our son's visit!) by posting a sweet little simple card I created recently that is perfect when you need one ASAP!

Using LifeStyle Crafts (formerly QuicKutz) Nesting Rectangles die (CC-RCTANGLES-01 available at Creating Everlasting Memories) I cut my Bazzill CS frames and flower (discontinued QK die) and added my Papertrey Ink sentiment (Everyday Button Bits). Keeping it simple, I merely added a row of ZVA Creative Pearls to my main image frame and additional leaf and pearls to embellish the sentiment.

Just add your handwritten message inside -- a "grab and go" handmade card that shows you care!

Wednesday, March 30, 2011

JustRite Friday Challenge 51: Act of Kindness

For this JustRite Friday challenge, I chose a colorful glittery paper by Piggy Tales, so kept my card and gift tin embellishments to a minimum. For my International Coffee tin, to which I plan to add some sweet candies, I chose the "You're So Sweet" sentiment from JustRite's stamp set by that name. It is mounted on a Spellbinders' Fleur de Lis Accent die cut from Spellbinders' craft foil and merely accented with Stickles. I then added a handle by punching holes in my tin with my Crop-a-dile and attaching it with brads.
Every gift needs an accompanying card, so mine is a simple Thank You. Again letting my bright glittery paper take center stage, I used the same foil die cut as my tin, just switching to a Thank You So Much sentiment from the same stamp set, one of my FAVS from JustRite which I'll be using a LOT!!!
Thanks for coming by today -- I'm scrambling to get this posted (again) and then I'll try to visit some other challengers' posts tomorrow!

Monday, March 21, 2011

Thank You Note: Lifestyle Crafts Letterpress Style


Are you like me and never seem to have enough Thank You's? Since it's a rare cloudy/rainy day here in AZ, I thought this was the perfect day to play with my Lifestyle Crafts Letterpress system again!
After inking up the Everyday BG printing plate in black ink I decided to add a splash of hot pink to my black and white card. I inked the smaller thank you from the Wedding plate set for this card with Hot Pink ink, added  2 black pearls from Queen & Co. next to the sentiment, some punched detail and CS strips to keep it very simple!
For a great selection of Lifestyle Crafts' letterpress supplies, be sure to visit Creating Everlasting Memories, where you'll find the starter kit and all the necessary accessories (currently on SALE at 25% off) so you can start creating your own unique letterpress creations. There are also many colors of pearls from Queen & Co. and decorative punches for all your crafting needs, so be sure to check those out while you're there!

Tuesday, March 8, 2011

Classic Thank You Note: Lifestyle Crafts Letterpress Style

Lifestyle Crafts Letterpress System
All the designers at Creating Memories in Time are using the Lifestyle Crafts L Letterpress machine, inks and plates, which make such elegant, classy cards which truly look like you purchased them at a stationery store! I kept my first Thank You card simple, using Teal Green ink for both the graphic and sentiment and mounted it on matching teal CS, leaving just a narrow border. My sentiment is found in the set of Wedding (L-PP-010-WD) printing plates. I wanted a bold sentiment for this first simple card.
I just love the classy, elegant feel of the beautiful paper and this card in person!
The beauty of the Letterpress machine is that you can very easily create one or many of the same design (i.e.: party, shower or wedding invitations or thank-you's) in your desired color so quickly and easily! For a great selection of Lifestyle Crafts' letterpress supplies, be sure to visit Creating Everlasting Memories, where you'll find the starter kit (currently on SALE) and all accessories to start creating your own unique letterpress creations! Then -- have fun!!!

Monday, February 28, 2011

JustRite Friday Challenge 049 - Technique: Direct to Rubber

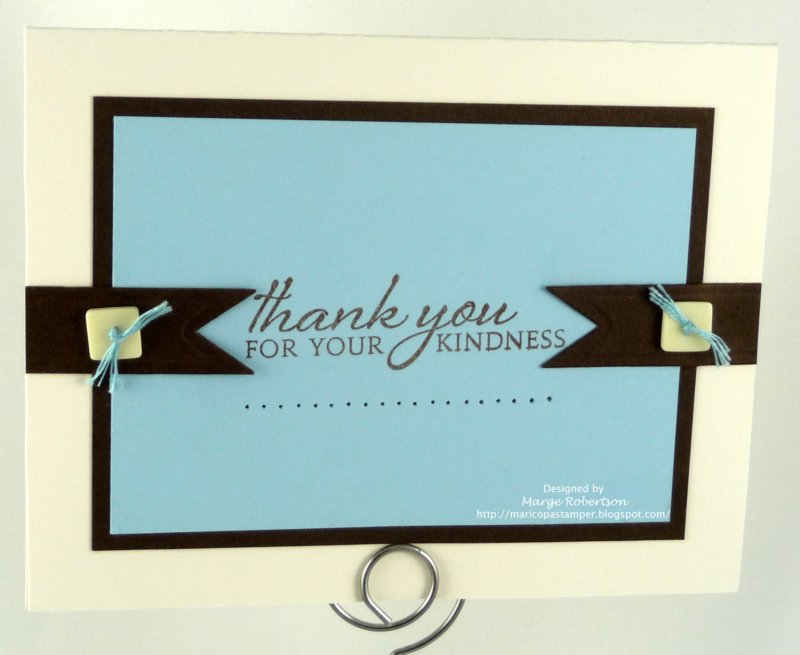
Needing a masculine thank-you card, I decided on the Direct to Rubber inking method, one of the techniques for the current JustRite Friday Challenge. Using a Marvy marker, I inked my centered sentiment (created with JustRite's Myriad Pro 50 pt. Font) and the thank you border from JustRite's You're So Sweet stamp set and stamped both on white CS cut from a Spellbinders' circle die.
For a little "fun" I next cut a Spellbinders' Eyelet Circle in red CS and then cut it again with another circle die to remove the outer eyelet edge for a more "masculine" look!!! Then I cut an Inverted Scalloped Circle in green to back my red/white focal layers. A bit of distress inking, a zig zag embossed edge and brown ric-rac finish off my simple "guy" card.
I love "double-cutting" with my dies, as well as combing my JustRite stamp sets to find more ways to make my dies and stamps work together to create the look I'm going for -- more "bang for the buck", a must in today's economy! Thanks for stopping by today!!!
EDITED to add: This card also fits the "All About Boys" prerequisite for My Sheri Crafts challenge so I'm linking it to her weekly challenge also! ;-)
Papers: Basic Grey's Mellow DP; Papertrey Ink's Poppy Red CS; white CS
Stamps: JustRite's You're So Sweet (border) and Myriad Pro 50 pt. Font (center sentiment)
Ink: Marvy LePlume #18 Dark Brown marker; Tim Holtz Antique Linen Distress Ink
Spellbinders dies: Eyelet Circles S4-304 (Die #3); Standard Circles S4-116 (Dies #3 & #4); Inverted Scalloped Circles S4-194 (Die #5)
Embellishments: Martha Steward Embossed Zig Zag punch; brown ric-rac from stash

Saturday, October 9, 2010

JustRite Friday Challenge 039: Give Thanks

This week's theme for the JustRite Friday Challenge is Give Thanks. I definitely need to get some thank-you cards in the mail, so this was a great opportunity to check some things off my ever-growing To-Do List while entering a challenge along the way -- LOVE it when it works out like that! This week I've used my new JustRite Baroque Nested Frames & Occasions Set, along with Basic Grey's Sultry DP. For embellishment, I've added wool felt cut with Spellbinders' Jumbo Scallop Border Petites -- one of the Honorable Mention prizes this week -- above my sentiment and along the bottom of my card, plus velvet brads. Thanks so much for your visit here today & come again soon!
Paper: Basic Grey's Sultry 6x6 Paper Pad; White CS from stash
Stamps: JustRite's Baroque Nested Frames & Occasions (sentiment & frame)
Ink: Memento's Rose Red & Bamboo Leaves
Embellishments: Creative Imaginations: Velvet Brads; Papertrey Ink: Wool Felt; ribbon from stash
Tools: Spellbinders' Wizard, Jumbo Scallop Border Petites & Rectangle Dies

Tuesday, August 10, 2010

JustRite Friday Challenge 030: Inspiration Photo


A photo inspired our 30th challenge for JustRite this week and for me it was the gorgeous
reds/pinks/greens that caught my attention. Needing a few thank-you cards, I decided to make a "sentiment slider" note card using my JustRite 15-pt. Times New Roman alphabet to create my slider (shown in action in photos below). I then popped my center flower up on thick foam tape so that my sentiment tab will easily slide left & right to easily read all three sentiments stamped on it.
Paper: PTI's Vintage Cream CS; K&Company's Margo & McKenna Paper Pads
Stamps: JRS 15-pt. Ti
mes New Roman Alphabet
Ink: PTI's Ripe Avocado
Embellishments: Michael's Ribbon; Creative Imaginations' brad
Tools
: Making Memories Slot Punch; Spellbinders Wizard & Inverted Circle Die; PTI's Beautiful Blooms II die

Saturday, July 17, 2010

Vintage Thank You Card


Our craft group took a class with Terre (Terre's Scrap Therapy) recently and we made these fabulous vintage cards. Our focus was the great grunge flower made with Spellbinders' peony die, scrunched & crunched up and misted with 2-3 shades of Glimmer Mist! I just LOVE how easy/fun these are to make and wanted to share this today while I work on a couple other projects.
Paper: Core'dinations CS; Vintage paper (Terre's stash)
Embellishments: Ribbon & Various Glimmer Mists (all Terre's)
Tools: Spellbinders' Wizard & Dies: Peony, Fancy TagsLabels 8, & leaf (unknown name/all Terre's)

Monday, July 12, 2010

Thanks Just Doesn't Seem Like Enough


Has your mojo gone on hiatus? Mine has, as of a couple days ago. I know it's hard to believe, but I struggled all day to figure out how to incorporate the four colors into a card for the Color Throwdown #100 challenge. Now, mind you, there are 330 entries at this very moment, so it's not like it should be difficult to come up with one little card! Do ya think?!!! After many struggles and messing up repeatedly, it's come down to this very basic CAS card for my entry! Thanks for your visit today -- apparently I need all the support I can muster -- LOL!
Paper: PTI's White CS
Stamps: PTI's Turning a New Leaf & Autumn Abundance (sentiment)
Ink: PTI's Spring Moss
Embellishments: PTI's & Making Memories Buttons
Tools: Spellbinders' Double-Ended Tags

Wednesday, May 19, 2010

Cute Card Thursday Challenge 112 - Someone Special Card with PTI Anniversary Set

I need several thank you cards for several special people in my life, so I've been playing with Papertrey Ink's 2009 Anniversary set! In my seemingly never-ending struggle to create lately, I thought I'd follow the lead of one of those very special friends, Gwen, and add this card to the Cute Card Thursday challenge. This set provides many versatile options for layering and sentiment choices. I used the largest Spellbinders' Labels 3 die to frame the main swirly "frame" image, buttons on the focal sunflower image and lots of Tea Dye duo distressing. As a finishing touch, I used Copic markers and colorless blender to color my seam binding & pearl. I then pinched, wadded and smushed it into aged loveliness -- LOL! I'm sooo happy with the end result!
Paper: Papertrey Ink's Vintage Cream CS & Dotty Biscotti DP
Stamps: PTI's 2009 Anniversary Set
Ink: PTI's Raspberry Fizz & Dark Chocolate; Tea Dye Duo
Tools: PTI's Mat Stack 1 and Spellbinders' Label 3 & Ribbon Trio dies; Copics: RV14, RV19
Embellishments: Hand-dyed (by me!) seam binding; PTI's Spring Mix Buttons; pearl from stash

Thursday, March 25, 2010

PTI March, 2010 Blog Hop: Buttons


My card for this month's Papertrey Ink Blog Hop is basically a CAS card, employing only two stamps and three colors plus cream. I simply stamped the curlique branch from Turning a New Leaf in Ripe Avocado. LOVE this stamp set!!! I then added various sizes of button "flowers" in Ocean Tides and Aqua Mist, tied alternately top and bottom with cream crochet thread. I punched and attached a strip of Aqua Friends 'Til the End flowered paper to the left edge, embellished with more crochet thread. Finally, my Giga Guide Lines sentiment and rounded corners finish off this simple Thank You card, which will soon be on it's way to friends!
Paper: PTI's Vintage Cream CS; Friends 'Til the End DP
Stamps: PTI's Turning a New Leaf & Giga Guide Lines
Ink: PTI's Ripe Avocado & Ocean Tides
Embellishments: PTI's Holiday Mix Vintage Button Collection
Tools: Fiskars' Apron Lace Punch; WeRMemoryKeepers Corner Rounder

Monday, February 8, 2010

PTI's "Paint" by Number Challenge


Nichole's Anniversary Celebration Day 8 challenge was to create a card using a color palette assigned by the first letter of your online username, as shown to the right. I honestly found it nearly impossible to use Raspberry Fizz in this palette, so ended up using very little! Because a sketch is a jumping-off point to inspire creation, I took "creative license" with not only that color, but the card/layer sizes (as I had no Orange Zest or Terracotta Tile PTI papers). After many attempts/struggles, I do like the resulting card.
Paper: PTI's Ripe Avocado, Raspberry Fizz, SS White CS; SU Pumpkin (???) & Bazzill Scalloped-edge CS; PTI's Friends 'Til the End DP
Stamp: PTI's Mixed Messages
Ink: PTI's Raspberry Fizz
Tools/Accessories: EK Success Scalloped Punch; Offray Ribbon; a-Muse Creative Candy (gems) colored w/Copic RV19

Friday, February 5, 2010

PTI's Emboss Resist Challenge

For my first-ever attempt at emboss resist for PTI's challenge today, I decided to follow Nichole's lead. Just received Turning a New Leaf & coordinating DP yesterday and wanted to play with them. I could use a bit more practice at this technique, but it's a fun one to try! I grabbed VersaMark Champagne Dazzle instead of plain VersaMark, so went with it! I like the way it left creamy embossed leaves on my Vintage Cream cardstock, very close to the leaves on the DP I used! Can't wait to see what all you seasoned Emboss Resist crafters come up with -- thanks for popping by today!
Paper: PTI's Vintage Cream & Spring Moss CS; Turning a New Leaf DP
Stamps: PTI's Turning a New Leaf & Autumn Abundance (sentiement)
Inks: PTI's Spring Moss & Ripe Avocado
Tools/Accessories: Fiskars Upper Crest Punch; Heat Tool; Clear Embossing Powder

LinkWithin

Blog Widget by LinkWithin