Showing posts with label Christmas. Show all posts

Saturday, January 10, 2015

My Sheri Crafts Challenge #148: Let it Snow!

Sheri chose the theme for our challenge @ My Sheri Crafts, asking that we use a snowflake on our project! Normally, this wouldn't be hard, but after having 'cold' weather by my 'desert-dwelling' standards, we had a record-breaking high of 81 in Phoenix Wednesday, so creating a card with snow was a bit difficult!  I so dislike being cold that I'll honestly take 110 degrees over cold any day!


Today I'm sharing a CAS card and envelope.  I began with an A2-size card base of blue Bazzill CS, then a layer of DP to which I added a foil snowflake. My sentiment is from Our Craft Lounge, a clear acrylic set from many years ago that I love still!  I stamped it in Papertrey Ink's Enchanted Evening onto a Spellbinders' Ribbon Tag die (retired) and tied with a silver ribbon.

I guess my post today is 'a blast from the past' as everything on this card is from awhile ago, but still perfectly relevant for our Let It Snow challenge, so let's see what you can find in your craft room for your snowflake project to post @ My Sheri Crafts! ;)


Saturday, November 22, 2014

My Sheri Crafts Challenge #147: Oh Christmas Tree

For our final challenge before taking a holiday break, we're asking you to create a Christmas card which MUST include a tree!


In my never-ending attempts to create pretty, but simple-to-mail cards for the holiday that are Post Office friendly, I created a card for this challenge! You see, most of my cards make my husband fret and worry that they'll never arrive or instead arrive in a plastic bag containing torn shreds of a formerly lovingly hand-made, signed and addressed personal card -- because that's happened once or twice. One dear friend saved his lovingly handmade birthday card and brought it from several states away to share w/us on a trip to AZ -- all contained in a plastic bag after being painstakingly put back together as best his wife could so that they could even begin to tell what it had possibly once actually looked like -- LOL!!!

Sooo, today's clean and simple card is one of those basically flat, unobstructed and easy-to-mail cards that my Hubby prefers and will likely go to one of our children.  I used Rubber Stampede's
"Evergreen" from 2001 stamped in Papertrey Ink's Ripe Avacado.  After first coloring just the trunk with a Tombow Mocha marker, I used a stamp positioner to stamp it onto my oval die cut. Then I inked it up in green and stamped again, following that with gold Stickles.  A piece of ribbon from Target's $1 bin ties through my Spellbinders' Grommet Tag, which I stamped with Papertrey Ink's Painted Poinsettias stamp set.

Sooo, create your very own simple or not-so-simple Christmas tree card and join in @ My Sheri Crafts Challenge!  ;)

Monday, October 27, 2014

Papertrey Ink: Painted Poinsettias in Neutral Shades

Just playing around today with my new PTI Painted Poinsettias and inks I recently purchased.  Wanted to take Nichole Heady's suggestion in the set's included 'tips' to try unconventional colors. Always a few on my list I know will appreciate non-traditional shades more than reds/greens.

I had neutral colors in mind, but added a hint of soft pink to my flower by embossing the stamp's petal layer in Desert Tapestry EP.  LOVE how it turned out!

From there I first stamped my sentiment in PTI's Classic Kraft ink, then VersaMark ink, offsetting it just a bit so when I heat embossed the Kraft would still show.  Like the effect that technique gave and how it ties in with my petals. My leaves were cut from PTI's Fine Linen CS and then the 'shading' inked in VersaMark and heat set. Next, the veins were stamped in Classic Kraft.

Finishing it off are a few Hero Arts sequins I've had forever (found when adding shelving in my craft closet) and a baker's twine bow from The Twinery.

I'm entering my card @ Christmas Card Challenges for Challenge #48 -- Anything Goes.

Saturday, October 25, 2014

Papertrey October Blog Hop Challenge

After a much too long hiatus from PTI's Blog Hop, I'm jumping back into the fun today with Painted Poinsettias paired with Holiday Double Cuts dies. Nichole had me @ poinsettia, but  when I saw these fabulous Double Cuts, I knew I had to place a much overdue order.  I seriously needed ink pads and it's pure bliss being surrounded by stacks of luscious colors today!

I finally settled on the 2nd color recipe of Pure Poppy, Raspberry Fizz, Hawaiian Shores and New Leaf.  After much deliberation, I actually worked in Hawaiian Shores in two areas -- can you tell what they are?

The leaf veins are pretty obvious, but my flowers' veins not so much!  To create the leaves without adding a non-palette color, I die cut the leaves from Vintage Cream CS, inked the whole leaf stamp in New Leaf, stamped off once, then huffed and stamped my BG.  Next I stamped just the vein using Hawaiian Shores -- I rather like them this way.

Gold or silver for the holidays is always nice, so I used Danielle Flanders' gold-dipped leaves from a recent MIM, gold on my flower center and gold paper for backing 'Merry'.  A sprinkle of red sequins finishes this holiday card.

It was an early-to-rise day @ our house, so not sure I can make it through the whole hop today, but I will soon, as I'm anxious to drink in all the inspiration I know awaits there!  ;)

Saturday, August 16, 2014

My Sheri Crafts Challenge #140: Be an Angel

Our latest challenge @ My Sheri Crafts is to create a card/project featuring an angel(s).  Since I still need more Christmas cards (who doesn't?), I decided to do a very CAS card using various shades of gold.


This is an A2 card that I die cut using Spellbinders' (retired) Jumbo Scalloped Border Petites along the right edge. I added a darker gold band just along the inside edge of my card for contrast. My sentiment is from JustRite's (retired) Christmas Joy Set stamped in VersaMark and embossed in DeNami's Gold EP and layered onto a larger Spellbinders' Oval die cut in the same dark gold CS.
Finishing off this holiday card are Bazzill gems, my three angels (delicate gold stickers from my stash) and a narrow gold ribbon.
Hope you'll join us by creating your own angelic greeting/project and posting it here!

Tuesday, August 5, 2014

JustRite Friday Challenge #126: Don't Be So Negative!

For the current challenge @ JustRite Sheri asked us to use a "negative" piece (the part that is left after you cut something out) somewhere in your project. This was an easy decision, as I still had a green negative piece cut using Gold Majestic Circles. I loved the beautiful embossed edges I was left with and what a lucky break to have saved it!


I decided I wanted to do a rather unique Christmas card using yellow/gold instead of the traditional red/green.  First I embossed my yellow card with Gold Majesty Circles. Then to make it more festive, I threaded my sewing machine with Sulky Holoshimmer and stitched around the negative piece before attaching it to the yellow card. My sparkly greeting is from JustRite's Festive Poinsettia clear stamp set. Some gold gems and a textured gold bow complete my simple, sparkly Christmas card and I'm one card closer to having them done for 2014!


Tuesday, July 22, 2014

JustRite Friday Challenge #125: Non-Traditional Christmas

JustRite's Friday Challenge (ending tomorrow 6PM CDT) requires us to use non-traditional colors -- 'the majority of your project must contain NO RED or BURGUNDY'. I always enjoy this challenge sooo much because I have a few 'special' cards I hand deliver each year and this card/matching envelope will be one, so I had fun making/decorating my envelope too.
Using Spellbinders' Layered Poinsettia dies, I cut my poinsettia flower petal layers/leaf using lusciously-thick Curious 'Nude' CS (a lovely gift from my sweet friend, Marilyn). Next, I stamped JustRite's Festive Poinsettia clear stamps using VersaMark ink and embossed with Squash Blossom EP.  For my leaf, I stamped/embossed a sentiment from the same set and detail embossed the leaf's edges.  I nestled it under the flower and mounted all onto Spellbinders Gold Majesty Circles -- LOVE that die!  Sheer ribbon bow and gems finish off the card.
My A2 envelope is cut from the same CS and lined w/the coordinating metallic paper, using We R Memory Keepers Envelope Punch Board. Since it won't be mailed, I die cut/embossed a poinsettia leaf on the flap and added gems for a little sneaky peek of what's inside before it's opened -- LOVE doing that for a few special cards!

Saturday, November 23, 2013

My Sheri Crafts Challenge #124: Funky Christmas!

For our final challenge of this calendar year, our DT member, Raquel, has asked that we create any project using NON-traditional Christmas colors -- no typical green / red / white combinations or white / blue combination.  You can use those colors but MIX it up!


I started out thinking this would be really hard OR that I'd not really like what I created, but in the end I LOVE this non-traditional teal and pink card totally!!!  Michaels recently had stamps on sale, BOGO (buy one / get one free), so how could I resist, PLUS I had a 25% off entire purchase coupon -- WOO-HOO!  I chose two Hero Arts Christmas stamps, mainly because I liked the large A2-card-filling sentiments on one and the mistletoe branches on the other. Then, as luck would have it, a couple days later I happened upon the card on the right (perhaps Pinterest?) by Shari Carroll!

Changing up the colors and greeting using the 2nd Hero set, I started with PTI's Hawaiian Shores CS for my top-fold A2 card, adding a DP layer (7gypsies 'Venice' 6x6" variety pack). My large ornament is stamped using Encore Ultimate Metallic "Pink" ink, the smaller one & sentiment in Encore's "Teal" and all embossed in Martha Stewart Clear EP. After stamping my mistletoe in Memento Tuxedo Black, I colored my leaves using Copic #'s YG41 and BG11. A small teal seam binding bow and a sprinkling of pink Bazzill gems finishes it off.  Best part of all, I know exactly who's receiving this card -- another important one crossed off my list!

Saturday, November 2, 2013

JustRite Friday Challenge #109: It's WOW!

Guess you could say, I'm dreaming of a White Christmas' with this card that I created for JustRite's current Friday Challenge to create a 'white-on-white' card and sponsored by Spellbinders.
This was such a FUN Christmas scene to design! My favorite thing about this card is that you can see light through it along the Radiant Rectangles open edges. I lined it with vellum and then cut a large rectangle out of my card front. For this card today I've used various white card stock and vellum pieces from my stash, lots of pearls, several Spellbinders' dies and my sentiment from JustRite's Antique Christmas Tags: One.
The gifts under the tree were difficult to capture with all the white, so I've added a close-up of them below. Thanks so much for stopping by to visit!


Dies Used:  Radiant Rectangles, 2012 Holiday Tree, Frosty Forms (pkg & bow) and various rectangle dies.


Tuesday, October 29, 2013

JustRite Friday Challenge #108: Sketch

Needing Christmas cards, I thought this JustRite Friday Challenge #108 would be the perfect time to knock another one out, following Sheri's fabulous sketch!

Think this card is pretty simple construction-wise, so I'll simply list the 'ingredients' used below. Any questions, just comment and I'll be happy to reply and thanks for stopping by today!!!

Paper: Papertrey Ink's Vintage Cream and Pure Poppy CS; October Afternoon's Holiday Style 8x8 Paper Pad
Stamps: JustRite's Christmas Antique Labels One and Just Because Set (retired) for the From Our Family tag
Dies: JustRite's Vintage Labels Four and Antique Labels One and (retired) Nested Sentiment Dies

Sunday, September 1, 2013

JustRite Friday Challenge #104: Clean and Simple Sketch

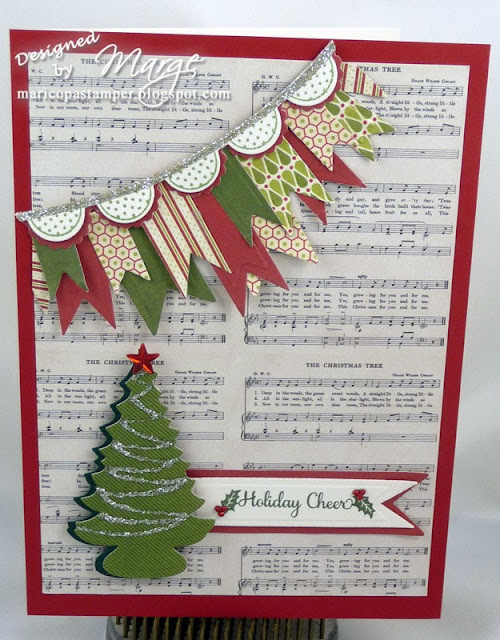
For JustRite's "Clean and Simple Sketch" challenge, I decided to make it complicated -- LOL! Not really, but the banner I chose to do across the top was a bit 'fiddly', but I do love the result AND I have another Christmas card done -- YAY!!!

Edited to add: My tree is decked out with MS glitter (just like my banner), but I can't seem to photograph it so it looks as fabulous as it does IRL!!!  ;-(
Also entered into this challenge: Moxie Fab World: http://www.moxiefabworld.com/2013/08/holiday-cards-more-week-holiday-card.html

Products Used:
Stamps: JustRite's Buntings and Banners, Noel Christmas Ornaments (greeting) and Antique Christmas tags One (holly)
Dies: JustRite's Buntings and Button Dies; Spellbinders' 2013 Holiday Trees and Nested and  Lacy Nested Pennants
Papers: Echo Park's Very Merry Christmas 6"x6" pad; PTI's Pure Poppy CS
Inks: Memento's Bamboo Leaves and VersaFine Olympia Green
Miscellaneous: Martha Stewart White Gold glitter; star and gems from stash; Copic R29 on gems

Saturday, January 19, 2013

My Sheri Crafts Challenge #102: Got Snow?

Our new challenge today @ My Sheri Crafts asks that you include a snowman or snow 'girl' in your project. I chose to use a retired JustRite stamp set (Vintage Christmas) and follow the current Sketch Challenge at JustRite Papercraft, where Sheri is Challenge Hostess.

I stamped the darling snowman in Memento Tuxedo Black ink and colored with Copic Markers, adding Stickles to the snow.  Using Spellbinders Standard Circles I die cut Mr. Snowman and another red circle backing. I then stamped the snowflake border from this same set onto a small card cut from Labels Twelve and added more Stickles. A stamped sentiment, border and snowflake from JustRite's Antique Christmas Tags: One were added inside the small card, which I attached to the front of my larger card following Sheri's sketch. I'll stamp inside the large card next Holiday Season when I know who'll receive this. It's only January 19th and my first 2013 Christmas card is done -- YAY!!!

I'm also entering my card at: JustRite Friday Challenge #88: Sketch

While contemplating this challenge, I saw this FUN melting snowman project here. After 5 nights here in the desert SW well below freezing, to see a snowman melting seemed fitting to me -- Hee!  I hate cold weather -- give me 110-degree summers over this any day!!! I used the small rock (plentiful in our 'yard') for his head, but my paint was a bit 'yellow', so I covered it in felt instead by just running a basting stitch around a piece of white felt. Then I grabbed a couple sticks from a bush in our 'frozen' back yard and finished decorating my melting snowman with product from my stash.  Hope he brings you a smile!

Saturday, December 29, 2012

Christmas Card - Spellbinders' and JustRite Style II


Catching up on my Christmas cards not previously posted, here is a bit different version of this card I previously posted -- another Spellbinders'/JustRite Papercraft Christmas card. This time I've used the same mix of gold papers, but substituted Labels Sixteen for my tree's layer.

I also stamped a gold glittered JustRite border from their retired Vintage Christmas stamp set to surround my foil tree die cut and added pink gems to my tree and border.

Finishing it all off is a gold mesh bow at the bottom. I really like how this fairly simple card turned out and gave it to our DD/her fiance' since I know she likes non-traditional holiday colors.

Wednesday, December 26, 2012

Christmas Card - Spellbinders' and JustRite Style


Needing a few more last-minute Christmas cards I decided to play with various shades of gold CS and some Spellbinders' foil and dies: Grand Labels Twenty-three, Labels 24, Ribbon Banners and Fanciful Holiday from 2011. Starting with medium gold CS, I embossed it with the Polka Dots embossing folder for my card base and then added the darker gold die cut with Grand Labels Twenty-three. Topping that is Labels Twenty-four in the lightest and medium shades. For my sentiment I've used Antique Christmas Tags One curved to fit Spellbinders' Ribbon Banners die.

My Christmas tree die cut with gold foil takes center stage and it's finished off with red gems/star and a red velvet ribbon.

Monday, December 17, 2012

JustRite's Magical Christmas Wish

This is the fairly CAS card I'm using this year for the majority of my recipients. In years past I'd made up to 50 of the same card, but the last couple of years I just made a lot of different cards. However, then I never know to whom I sent what -- doubt I'd ever repeat one, but who knows? This year I've not made quite as many ahead as I'd hoped, so now have about 20 of these and will fill in with a few special ones to complete my reduced Christmas list.

For this card I used holly embossed paper purchased at the annual Bazzill warehouse clearance sale.  Last fall I forgot to check ahead for the date and remembered it on a Sunday, only to find it had ended the previous day -- sigh! This year, I scoped out the date early and then emailed two dear friends to help me remember it and we met there and shopped -- it's always fun to see what they have and stock up on their wonderful papers, etc. This JustRite stamp is from their now discontinued original grid system, also purchased on clearance. I thought it was perfect to use with the holly paper and have added little touches of red and green Spica glitter to the holly/berries, which I only wish would show up in my photo! A simple ribbon finishes off this CAS Christmas card for this year.

Sunday, December 9, 2012

Christmas Card: Heartfelt Creations & Spellbinders' Style


This is a very CAS A2-size card I made late last year for a few friends/relatives, but never posted. Using Heartfelt Creations stamps I'd borrowed from a friend and my corresponding Spellbinders 2011 Heirloom Ornaments dies, I cut the ornament from vellum, stamped it in VersaMark ink and embossed in gold. Next I colored with Copics, adding it to my Ice Silver card.

My card's front edge was cut/embossed using Spellbinders Classic Ric Rac Edgeabilities. To finish it off, I added a gold sticker to hang my ornament from and another along my bottom edge, and a small bow.

Love this clean, simple card with the elegant gold and that gorgeous poinsettia on shimmery CS!

Saturday, November 24, 2012

My Sheri Crafts Challenge #099: Tis the Season

Creating a card/project that represents what you (or someone you know) celebrate during this time of year (Hanukkah, Christmas, Kwanza, etc.) is our current biweekly challenge at My Sheri Crafts beginning today.

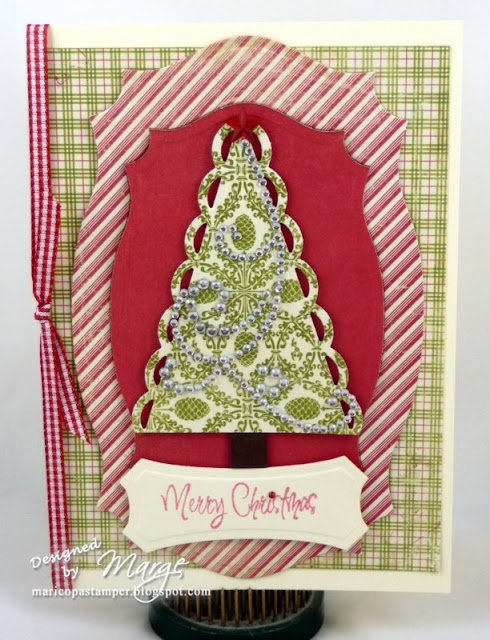
My simple Christmas card today is made out of the necessity to create something that's easy to mail and will hopefully arrive in one piece! It consists of three patterned papers, a Spellbinders' die for my tree, as well as another die for my BG mat layers. A simple sentiment, star gem, gem flourish and ribbon finish it off.

We'd really LOVE it if you'd take a moment from your busy schedule and link your holiday project to our challenge @ My Sheri Crafts -- thank you and Happy Holiday preparations to one & all!!!


Papers: Authentique's Festive 6x6 Bundle; Cream CS
Stamps: Recollections
Ink: VersaFine Satin Red
Dies: Spellbinders' Labels Twenty-five, Nested Lacey Pennants; JustRite Custom Antique Labels One Dies (sentiment)
Embellishments: Want2Scrap flourish

Tuesday, November 13, 2012

JustRite Friday Challenge #085: Happy Holidays

The challenge for JustRite Friday is sponsored by Spellbinders so we are to use at least 2 die cut elements on our Holiday project. Certainly a no-brainer as far as the dies are concerned for me -- I rarely make any project without one or more.

Today I took a break from working on wedding invitation ideas to create a Christmas card with this gorgeous music paper and an adorable Cardinal in the corner and some yummy red wool felt. Hope you have a better head start on your cards than I do, but there's just under 24 hours left to enter this challenge, so grab your JustRite stamps and Spellbinders' dies and join in!

My card uses the following items:

Paper: Authentique's 6x6 Festive Bundle, PTI's Pure Poppy and Vintage Cream CS; Bazzill green CS
Stamps: JustRite's Noel Christmas Ornaments (ornament) and JustRite's Antique Christmas Tags One (sentiment and holly)
Ink: VersaFine Satin Red; PTI's Ripe Avacado
Dies: Spellbinders' 2010 Ornaments (CS & felt ornament), Foilage (greenery); JustRite Custom Antique Labels One Dies by Spellbinders (felt cut-out)
Embellishments: Want2Scrap's Black Finesse Swirl Rhinestones, miscellaneous gems from my stash

Can't wait to see all the entries up close and personal!

Saturday, September 1, 2012

My Sheri Crafts Challenge #93: Last Day to Wear White!

Since we live in the 'warm' SW desert, I don't really follow the 'last day to wear white' is Labor Day 'rule',  BUT our current challenge - to create a 'white-on-white project' - seemed like the perfect excuse to whip up a wintery snowflake card! This was totally challenging project, as I kept wanting to add a bit of color somewhere, but in the end LOVED how it turned out!
My snowflake was built using a combination of Spellbinders' 2010 Snowflake pendants, Create-a-Flake Three dies and even one cut from Snowflake Wonder, an early Spellbinders' die that cuts 5 snowflakes from one plate.
After cutting/embossing my die cuts, I hit the embossed areas with Glossy Accents, sprinkled on Martha Stewart's Crystal Coarse Glitter and secured the layers with a crystal brad.
I mounted my snowflake onto white 4 1/4" x 5 1/2" CS that I'd embossed with SB's Elegance M-Bossabilities Folder, Side A. I then cut 1/2" from the bottom front and as shown in the photo below, embossed the back inside edge with a Provo Craft "Frills" border, added a strip of Scor-Tape, sprinkled with more coarse glitter. To complete my card, I then repeated this process with a 3/4" strip of CS and used Scor-Tape to atttach it inside my card front. A simple ribbon tied in a bow completes my white-on-white project!
What will you create for your white-on-white project -- a wedding card, a Christmas project or a snowflake ornament?! Please make one and upload it for us all to enjoy @ My Sheri Crafts -- you may just be our next Guest Designer!

Tuesday, August 7, 2012

JustRite Challenge #078: Christmas in July

Christmas in July with JustRite gives me a chance to begin plans for our Christmas dinner this year! I know I want place holder decorations and napkin rings, so began there.
Using Tim Holtz tutorial, I cut five rosette strips in cream w/gold metallic paper to create a decorative tree for place setting decor. Next I stamped them with the various JustRite Lace Borders stamps, some 'upside down' for variety, and embossed in gold. After folding them, I varied how much they flared while hot gluing to achieve my tree's shape. Using Spellbinders' Lacey Circles I cut a tree skirt in chipboard, one in cream/gold paper and then a smaller one in burgundy. The cream circle is stamped/embossed with a holly border from JustRite's Christmas Ornament 3 1/4" set. This set is AWESOME and still available for a mere $8, at JustRite's Super Sale, while they last! To finish, I cut a dowel for the trunk and the smallest star die from JustRite's Charm Dies for a tree topper and added burgundy pearls for holly berries.
To create my napkin holder I used the same process on the smallest rosette strip, adding a chipboard strip with score tape underneath for strength. My ring is topped with a Nested Oval Medallion Labels Die, a coordinating rosette and burgundy Lacey Circle. I added my guest's name with JR's retired Curlz font (if you HURRY, there are still a few fonts here), folded and slipped my napkin through -- inexpensive, but pretty, I think, and each one can be personalized!
My final piece today is our Christmas dinner invitation created by first cutting Spellbinders' Nested Pennants from cream CS on the fold for my card base. Then I cut a Lacey Pennant from cream/gold paper, again embossing Lace Borders in gold and attached to the card front. My sentiment from Christmas Nested Frames is stamped onto a tag die cut from JustRite's Nested Sentiments (retired die), a single 'loop' is added to each end from Lacey Pennants and then it's tied to my card with a small bow. Inside I added my dinner invitation wording typed in Microsoft Word in the shape of a tree which fits the card's shape perfectly -- sooo FUN and a nice chunk of my Christmas prep is already figured out!
I hope you're also getting an early start on your holiday planning -- it will be here before we know it!

LinkWithin

Blog Widget by LinkWithin