Showing posts with label Pearls. Show all posts

Saturday, June 7, 2014

My Sheri Crafts Challenge #135: Three in a Row

Our latest challenge @ My Sheri Crafts is Three in a Row (aka Tic-Tac-Toe) and simply means you choose any 3 in a horizontal, vertical or diagonal row from the chart provided below to complete your project,

My simple card today uses embossed paper, pearls and flowers, so you can easily see that I used the 3rd vertical row to complete my card. I chose some Basic Grey rub-ons from my stash that I've had for many years, using the large one in the center of my Spellbinders Labels Thirty embossed BG. I also added the lady bug and sentiment rub-ons. Finishing off my card is a small bow, flowers, a pearl swirl and a few single pearls from my stash.

We're looking forward to seeing your Three in a Row creations!

Monday, November 5, 2012

Sympathy: JustRite Style

Sadly needing a quick sympathy card, I turned to not only some favorite Just Rite stamps, but also decided to emulate Sheri's recent sympathy card. Not only do we all need ease/simplicity when making this type of card, hers has such a fabulous focal image, why look any further? Hopefully, she won't mind my 'casing' it.

I stamped Just Rite's rose image from "With Sympathy" in VersaFine Onyx Black ink on white CS, as well as the sentiment from the same set onto vellum, heat setting it with my heat gun. I then stamped the medallion image from JR's Botanical Medallions & Banners in VersaMark ink on a dark grey Bazzill CS, heat set with Martha Stewart white embossing powder and die cut with JR's compatible Nested Medallion Label Die. LOVE the sentiment stamped on vellum placed over the rose image!!!

I used DCWV's LaCreme CS die cut along the right edge with Spellbinders' Classic Scallop Edgeailities to top my white stripe-embossed Bazzill CS that was edged with a tiny scalloped edge punch. Next, I placed a Winter White seam binding messy bow to the left and my focal image atop it to the right.  A few dark grey and white swirl pearls (Want2Scrap) finish the card. Hopefully it will bring a bit of comfort to our extended family members.

Tuesday, August 21, 2012

JustRite Friday Challenge #079: Opposites Attract

For this totally FUN JustRite challenge based upon the color wheel, I chose to work with orange/blue greens for my 'opposites attract'/complimentary colors' card.
Beginning with JustRite's Botanical Medallions & Banners stamp set I colored the poppy image with Copics, distressed with Antique Linen distress ink, framed with Spellbinders' Floral ovals and accented with pearls. The focal image was then mounted onto the medallion stamped in orange and die cut with JustRite's exclusive Nested Oval Medallion Dies. I then stamped JustRite's Merry Christmas background stamp onto aqua blue paper from Authentique's Gathering line, highlighted the lace with Copics and distressed it. I hand cut out the center Christmas words since I don't yet have the Spellbinders' Card Creator dies that coordinate with this BG stamp, but they're definitely on my Wish List!
A brad from my stash that I thought was the perfect touch!
Finishing off this card is my sentiment (also from Botanical Medallions), a seam binding crinkly bow hand colored with Copic inks and accented with a brad from My Minds Eye and a couple fabulous gem swirls from Want2Scrap.
If you get a chance to make an Opposites Attract card, you still have until tomorrow to post it at JustRite's Friday Challenge!

Sunday, May 27, 2012

JustRite's Friday Challenge #073: Anything But Square

Summertime is my time to catch up, since we're usually inside avoiding the desert heat, so I'm hoping to create/post more. One thing that I've wanted to do for a long while is the creation I'm sharing today and posting for JustRite's current challenge -- "Anything But Square". As you can see by my photo below, this card started out as elegant, lacy embossed-edge teapot stationery with matching envelope given to me by our dear friend/former neighbor, whom I'm hoping doesn't see this before I'm able to give her her card in person. Regardless, hope she likes my effort.
I cut her beautiful stationery sheet in half using Spellbinders' Grand Labels Four, as well as my Vintage Cream top-folded card's bottom edge only, thus allowing the white lacy top/sides to extend beyond my card. This embossed stationery is sooo gorgeous on it's own that I felt it merely needed an elegant sentiment to complete it's transformation. With my sweet friend Lucy in mind, I chose JustRite's Friendship Nested Sentiments (now on sale for only $5) for the front and encased "Friends are a Gift" with Want2Scrap's lovely Fancy Tags Two Pearl Nestabling. My buttery yellow CS not only blends well with these fabulous teapots, but reminds me of her sunny yellow-painted kitchen and teapots.
Inside of Card & Envelope Front
Again, VersaMark ink, gold embossing powder and pearls finish off the card's interior with another sentiment from the same JustRite set that truly reflects my feelings, not only in celebration of her upcoming birthday, but every day.
Happy Birthday, sweet friend, and I hope you're reading this after we've properly celebrated your special day!  ;~)
Original Stationery Sheet & Envelope Back


Saturday, April 14, 2012

My Sheri Crafts #83: Marvelous Monograms

Our challenge this week @ My Sheri Crafts is to create a card or special project using a monogram -- how FUN is that?!!!
Since I've had 5" wooden letters from Michaels now for waaay too long, I decided to put one to good use! When we moved into our current home a few years ago, I was able to have my own craft room and had great plans for how I wanted to decorate it, but then the economy tanked and so did my plans. Though I still have the 'new home' white walls, I am slowly getting a few decor items and will use this "M" (my first initial) somewhere in the mix.
I first repainted my white letter with green Making Memories paint from my stash, covered it with some now long ago retired SU cardstock, added pearls and a tiny bow from my fiber stash. Green & browns are my decor color choices for this room and I've toyed with painting the walls a buttery shade of yellow to keep my room bright, so I think this will work beautifully once that goal is accomplished. In the meantime, I can enjoy it on a nearby shelf!
So put your own monogram ideas in action and join us for this fun & creative challenge here!

Monday, March 19, 2012

JustRite Friday Challenge #068: Color

I totally LOVE this JustRite Friday Challenge: to use black & white & a pop of color -- always a fabulous combo! A pop of color, such as with my Raspberry Fizz felt flower (Spellbinders' Spiral Blossom One), just seems to totally set off a black/white design!
For a bit of texture I used white letterpress paper to die cut my Spellbinders' Lattice Rectangle. Next I added Want2Scrap's Black/White Pearl Nestabling to the edges. My JustRite Loving Thoughts sentiment (Heart to Heart Set) is stamped inside a border from Hugs to You Set on vellum and heat embossed with black embossing powder. The vellum centerpiece is mounted onto a white Labels Eighteen die cut and another black hand-cut one. A few more pearls for my flower center and sentiment label and a beaded hat pin finish off this card. You have until 8 PM on Wednesday to add your project for this challenge if you'd like a chance at some lovely JustRite stamp sets!

Tuesday, March 6, 2012

JustRite Friday Challenge #67: Birthday Bash

The current challenge at JustRite Stampers is to create a Birthday card -- pretty simple, huh? I created a spring birthday card in pinks/greens using paper I've had in my stash for a long time!
I was thrilled to have the new JR Spring Words and With Sympathy clear stamps I won on the last challenge to help me create today. I just LOVE this sentiment and think it will work well for masculine birthdays also! I added a little decorative element from the Sympathy set below to compliment it and tie in my colors. Also LOVE Spellbinders' Edgeabilities and used those for my edging detail along with some decorative trim. Hand-colored crinkled seam binding and a pearl flourish complete this one.

Stamps:  JR's Spring Words and With Sympathy
Inks: VersaColor Opera Pink & Memento Pear Tart
Paper: Basic Grey's Sultry; PTI's White & Ripe Avocado CS
Embellishments: Want2Scrap Pearl/Flourish; Hobby Lobby trim; Hug Snug Winter White Seam Binding (colored with Copics)

Saturday, June 25, 2011

Papertrey Ink June 2011 Blog Hop: Color Inspiration


I took my inspiration for Papertrey Ink's June 2011 Blog Hop from the colors in the wall and the tulle on the dance wear in the inspiration photo. Using various widths of PTI CS and DPs, I zig-zag stitched them together to form my card's BG.

I next cut 2 white tags from Tag Sale #1 die and after stamping my sentiment and decorative details and adding pearls to one tag, I ran a basting stitch through a piece of tulle, gathered it and folded it to create two layers. Then I adhered the tulle with Scor-Tape along the back edges of the stamped tag and used Scor-Tape to adhere the 2nd tag to the back to finish it. Ribbon and tulle through the tag's top finish it off.

I'm very anxious to see what fabulous creations everyone else posts today!

All CS/DP, stamps, ink (Papertrey Ink)
Pearls (ZVA Creative)
Ribbon & Tulle (from stash)

Friday, May 20, 2011

Simplicity


I took a little break from paper crafting recently and wanted to begin my first day back in the craft room after my "stay-cation" (spent at home enjoying our son's visit!) by posting a sweet little simple card I created recently that is perfect when you need one ASAP!

Using LifeStyle Crafts (formerly QuicKutz) Nesting Rectangles die (CC-RCTANGLES-01 available at Creating Everlasting Memories) I cut my Bazzill CS frames and flower (discontinued QK die) and added my Papertrey Ink sentiment (Everyday Button Bits). Keeping it simple, I merely added a row of ZVA Creative Pearls to my main image frame and additional leaf and pearls to embellish the sentiment.

Just add your handwritten message inside -- a "grab and go" handmade card that shows you care!

Monday, March 21, 2011

Thank You Note: Lifestyle Crafts Letterpress Style


Are you like me and never seem to have enough Thank You's? Since it's a rare cloudy/rainy day here in AZ, I thought this was the perfect day to play with my Lifestyle Crafts Letterpress system again!
After inking up the Everyday BG printing plate in black ink I decided to add a splash of hot pink to my black and white card. I inked the smaller thank you from the Wedding plate set for this card with Hot Pink ink, added  2 black pearls from Queen & Co. next to the sentiment, some punched detail and CS strips to keep it very simple!
For a great selection of Lifestyle Crafts' letterpress supplies, be sure to visit Creating Everlasting Memories, where you'll find the starter kit and all the necessary accessories (currently on SALE at 25% off) so you can start creating your own unique letterpress creations. There are also many colors of pearls from Queen & Co. and decorative punches for all your crafting needs, so be sure to check those out while you're there!

Monday, March 7, 2011

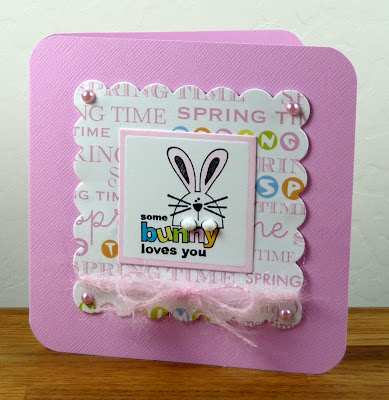
Some Bunny Loves You: QuicKutz Style

This sweet little bunny with it's little "fuzzy" paws and that soft-as-bunny-fur bow is definitely ready to brighten someone's day!!! I've used QuicKutz dies for both my scalloped BG (Journaling Block REV-0226-D) and my bunny, stamped on a Nesting Tag (CC-SHAPE-6-023). The Studio G wooden stamp was inked with Memento Tuxdeo Black ink, colored/edged with Copics, mounted to DCWV DP and Bazzill card and has q-tip tips for paws.

Wouldn't he/she be just the cutest little surprise tucked into a child's lunchbox?!

Please check out Creating Everlasting Memories for great bargains on the following products: QuicKutz/Lifestyle Crafts items, ZVA Creative Pearls, as well as many other fabulous crafting supplies!

Hope you're having a wonderful, crafty day today wherever you are in this great big world of ours!!!

Thursday, February 24, 2011

Celebrate Card: My Mind'e Eye Style

My Mind's Eye Lush (Blue) DP
This is the first card I've made using the Lush line of designer paper in blue  by My Mind's Eye  -- it's totally "luscious"!  :~)  My 4 1/4" x 5 1/2" card uses three of the gorgeous patterned papers from this line, as well as a brad and velvet scalloped ribbon.
Cream CS from my stash is first covered with Blue Diamonds double-sided DP and then topped in the center with velvet Polka Dot DP. Two large Prima Flowers at the top left are embellished with a large My Mind's Eye "Lush" brad and sit atop my Celebrate sentiment.
Across the bottom I cut the reverse side of the Blue Damask DP with the scalloped QuicKutz/Lifestyle Crafts Journaling Die (#REV-0226-D), tucked it underneath cream lace from my stash, then topped with MME's velvet scalloped ribbon and finished at the right side with another Prima Flower. All DPs and flowers were antiqued with Tim Holtz Antique Linen Distress Ink.
I colored my clear flower-shaped stick pin (Making Memories) with Copic BG11, added beads and stuck it through my ribbon and flower. Finally, a pearl from my stash was threaded with embroidery floss for stamens and attached with a glue dot to complete my card.
Check out Creating Everlasting Memories for great bargains on the following products:  My Mind's Eye; QuicKutz/Lifestyle Crafts; Tim Holtz, Prima Marketing, as well as many others!!! Hope you're having a wonderful, crafty day today wherever you are!!!

Monday, February 7, 2011

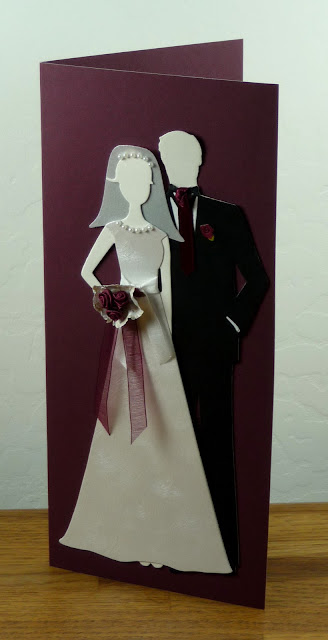
Bride and Groom: QuicKutz Style


As I cut and paper pieced this Bride and Groom QuicKutz die set, it reminded me so much of playing paper dolls when I was little -- a fond memory!
For a shower or wedding card, this set would be so sweet for making your card in the bride's chosen colors! I also think these would be the perfect dies for all your wedding scrapbooking and even for shower decorations!!!

I simply used papers, flowers, ribbons and pearls from my stash to dress my bride and groom. I cut my bride's dress in a textured white CS and her veil from vellum. I cut a small slit to slip the veil over her hair and then added pearls to it, as well as to her dress at the neckline and a ribbon sash at her waist. Her bouquet consists of small roses and  ribbon surrounded by a small doily circle cut from a larger doily.

The groom is dressed in his finest tuxedo and white shirt with "ribbon" tie and a boutonniere die cut from the set and Copic colored with R39 and YG95.

For this QuicKutz/Lifestyle Crafts die set #3-040 and numerous others at unbelievable prices, be sure to check out Creating Everlasting Memories today!!!

Saturday, February 5, 2011

My Favorite Papertrey Ink Project from the Past Year


NOTE: This originally posted on August 27, 2010, but is re-posted here today for the UNBELIEVABLY HUGE giveaway being sponsored by Nichole Heady at Papertrey Ink in celebration of her Fourth Anniversary this month. Be sure to go check it out by clicking on the above link. Good Luck!!!

Sheri's
challenge this week: create a 'Missing You' project. I chose "It's Been Too Long" from Everyday Button Bits stamp set, adding a little swirly image from Vintage Labels above and below my sentiment and tiny Kaiser Craft chocolate pearls. Stamps are all from Papertrey Ink.
I just LOVE this paisley print in russet browns, peony pinks and spring greens from Basic Grey's Sultry paper pad. My sentiment frame is die cut with Spellbinders' Ribbon Tags Trio Two. For accent I then embossed the die again and hand cut the outermost edge before lacing my sheer brown ribbon through both. I cut a strip of pale pink paper from the pad, misted it with water and embossed it with Spellbinders' Paisley Impressabilities. My paisley print and  brown papers were then both edge punched with Fiskars' Upper Crest punch.
Have a great day and I sincerely appreciate your taking time to come here!

Monday, January 17, 2011

Marge's Monday Card Corner for CMIT (January, 2011)

Happy 2011 and welcome to my Monday Card Corner for our Creating Memories in Time blog! Pennants are all the rage in paper crafting and scrapbooking right now, so I used the QuicKutz "Pennant" die to create my Love card. Designer papers used today are My Mind's Eye's "Love Nest", edge distressed with Tim Holtz "Antique Linen" ink. ZVA Creative pearls in a soft shade of pink were added atop my cream lace. This card was really fun to make and I LOVE how these dies worked perfectly for the look I was going for! This card fits a regular business envelope.
The die, pearls, ink and papers used are available at Creating Everlasting Memories, as well as many other wonderful products, so I invite you to visit our eBay store for all the unbelievable products/fabulous prices currently available.
If you'd like to follow this sketch and for a complete list of all products used, please check out our CMIT Blog. Thanks so much for coming by today!!!

Thursday, November 18, 2010

Sympathy Card: PTI CAS Style

I needed a quick, simple/easy-to-mail sympathy card today and turned to Papertrey Ink's "With Sympathy" set because it's so classy and has such perfect sentiments. Not being in a frame of mind to create an original work of art, I did what I often do: I took the easy way out and chose to "CASE" Debbie Olson's gorgeous card here. Why mess with perfection?
I changed the sentiment and positioned my pearls to better fit with it. I used cream wrinkled seam binding for my ribbon and "antiqued" just the edges with PTI's Chamomile ink, to tie in with my sentiment frame. I LOVE this ribbon and know that even after mailing, it will still look lovely!
Paper: PTI's Vintage Cream and black CS from stash
Stamps: PTI's With Sympathy
Ink: PTI's True Black and Chamomile; VersaMark
Embellishments: Queen & Co. Black Pearls; wrinkled seam binding from stash
Tools: Embossing Gun; Spellbinders' Wizard & Classic Ovals (S4-112) #4 die; WeRMemoryKeepers Corner Rounder

Tuesday, October 5, 2010

My Sheri Crafts Challenge #25: Breast Cancer Awareness


I'd always intended to make one of these bra cards from years ago, so My Sheri Crafts Challenge to create a card for Breast Cancer Awareness this week was perfect! The bra cups are die cut from Spellbinders' scalloped circle dies, then folded in half and a portion snipped off each end to achieve the matching center of your bra. Ribbon is used both for straps, for an accent at the bra's center and on my sentiment tag.
Paper: Flower-embossed Handmade paper from stash; PTI's Smokey Shadow & White CS
Stamps: JustRite's 25-pt. TNR Font
Ink: PTI's Charcoal
Embellishments: Grosgrain Ribbon, pearlsm rub-0n from stash
Tools: Cuttlebug Emboss Plus 5 x 7 Embossed Tags; Spellbinders' Petite Scallop Circles

Friday, August 27, 2010

My Sheri Crafts Challenge #19: Missing You


Sheri's
challenge this week: create a 'Missing You' project. I chose "It's Been Too Long" from Everyday Button Bits stamp set, adding a little swirly image from Vintage Labels above and below my sentiment and tiny Kaiser Craft chocolate pearls. Stamps are all from Papertrey Ink.
I just LOVE this paisley print in russet browns, peony pinks and spring greens from Basic Grey's Sultry paper pad. My sentiment frame is die cut with Spellbinders' Ribbon Tags Trio Two. For accent I then embossed the die again and hand cut the outermost edge before lacing my sheer brown ribbon through both. I cut a strip of pale pink paper from the pad, misted it with water and embossed it with Spellbinders' Paisley Impressabilities. My paisley print & brown papers were then both edge punched with Fiskars' Upper Crest punch.
Have a great day and I sincerely appreciate your taking time to come here!

Note: Click here: Sheri has a great selection of Spellbinders' dies and other great products available.

Sunday, August 8, 2010

Be Inspired #95 With Heartfelt Sympathy


I hadn't participated in a Cuttlebug Challenge in a long time, so decided I'd do a simple card for their Heartfelt Sympathy challenge this week. It's always a good idea to have a couple of these cards on hand. I wanted to keep it fairly simple, so chose to use my Provo Craft Textile embossing folder for the BG. I then simply added a couple of decorative stamps and pearls to my sentiment tag and secured it with a decorative braid I've had in my stash for forever.
Paper: Bazzill CS; SEI's Morning Meadow DP
Stamps: PTI's Round & Round (sentiment) and Vintage Labels
Ink: PTI's Dark Chocolate Palette
Embellishments: Kaiser Craft Chocolate pearls; Braid from stash
Tools: Spellbinders Wizard & Ribbon Tags Trio Two

Sunday, April 25, 2010

PTI April 2010 Blog Hop: Tissue Paper


April's Papertrey Ink challenge was to use tissue paper on a project. Quite a bonus is the fact that our PTI stamps arrive lovingly wrapped in tissue paper, so these could be "green" projects. I purchased an inexpensive candle, as we wanted a vanilla-scented candle for our home. I had previously seen various posts on stamping on candles, but had never tried making my own. I cannot tell you how easy/fun this is to do! Because I know everyone is wanting to hop on to other posts, I'll simply send you to the YouTube video I viewed before tackling my clean and simple project. There are several available, but the one I viewed is here: http://www.youtube.com/watch?v=twWA5G6oLP4
Hope you decide to try this fun stamping project that will also enhance the aroma of your home!
Paper: PTI's White Tissue Paper from stamp packaging
Stamps: PTI's Giga Guide Lines and Vintage Labels
Ink: PTI's Pure Poppy
Embellishments: Michael's Gold Flat-Back Pearls

LinkWithin

Blog Widget by LinkWithin