Showing posts with label Stickles. Show all posts

Wednesday, March 30, 2011

JustRite Friday Challenge 51: Act of Kindness

For this JustRite Friday challenge, I chose a colorful glittery paper by Piggy Tales, so kept my card and gift tin embellishments to a minimum. For my International Coffee tin, to which I plan to add some sweet candies, I chose the "You're So Sweet" sentiment from JustRite's stamp set by that name. It is mounted on a Spellbinders' Fleur de Lis Accent die cut from Spellbinders' craft foil and merely accented with Stickles. I then added a handle by punching holes in my tin with my Crop-a-dile and attaching it with brads.
Every gift needs an accompanying card, so mine is a simple Thank You. Again letting my bright glittery paper take center stage, I used the same foil die cut as my tin, just switching to a Thank You So Much sentiment from the same stamp set, one of my FAVS from JustRite which I'll be using a LOT!!!
Thanks for coming by today -- I'm scrambling to get this posted (again) and then I'll try to visit some other challengers' posts tomorrow!

Saturday, December 26, 2009

PTI December Blog Hop: Holiday Inspiration


Our dear friends from MN had us over for Christmas Eve dinner and I chose her gorgeous handmade placemats as my inspiration for Blog Hop. She was helping a friend who was in charge of a Holiday Bazaar, only to learn the placemats she purchased were made by the very friend she was there helping! They're not only gorgeous plaid, but reverse to solid red. Because I've always loved plaids, the Vintage Ornaments Addition's plaid stamp caught my eye. I just love this card's bright traditional holiday colors and I already have a jump on next year's card stash!
Paper: PTI Pure Poppy, Spring Moss & Gold CS
Stamps: PTI Vintage Ornaments, Vintage Ornaments Additions & Everyday Classics
Ink: PTI Spring Moss, Pure Poppy, Landscape
Embellishments: Gold Stickles; Stampendous Star Chain Holograph Gold Stickers

Sunday, December 20, 2009

PTI, LPS & Spellbinders' Quick/Easy Christmas Card


Papertrey Ink's 2009 Holiday Tag Collection and Spellbinders' Labels 5 dies made quick/easy cards! The tags could easily be switched out on this basic card sketch too! My Labels 5 were out from making Gwen's birthday card/box, so I ended up using them again here. Took red/green precut/prefolded cards I'd had forever and added two 1/2" PTI Gold CS strips for my "package". Then cut/embossed my Labels 5 shapes from PTI's Ripe Avocado/Gold, stamped my tree label, and added gold & red Stickles. My sentiment from Little Paper Shop's Christmas Tags set finished it off quick & easy!

Monday, December 1, 2008

"Festive" Seasons Greetings

This DP from the Festive line by My Mind's Eye reminded me of this previously uninked holly/berry stamp on the left that I got several years ago on a clearance rack! I'm afraid the subtle Perfect Pearls on my holly leaves won't show well in my uploaded photo. Some cards are just so much prettier IRL, aren't they?
I'm so thrilled that Michaels is now carrying paper by My Mind's Eye and Basic Grey, because I don't already have enough paper - LOL!!! Ironically, even after the 275 sheets of Bazzill I got at their warehouse sale, I struggled to find colors to compliment this DP! If I could figure out how to get paid for the time I spend searching for papers that coordinate, I'd be a wealthy woman!!! ;~)
Paper: Bazzill Green & PTI Vintage Cream CS; My Mind's Eye Festive Line DP
Stamps: Rubber Stampede (holly); Annette Watkins (greeting); Inkadinkado (small holly)
Inks: VersaMark & PTI Ripe Avacado
Embellishments: Ranger Perfect Pearls; Stickles; ribbon from stash

Monday, November 3, 2008

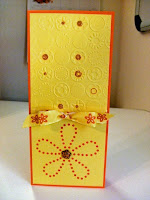
Bazzill Stitch'z Flower Card

I got this Bazzill Stitch’z Flower cardstock at their annual warehouse sale in September and had been wanting to try a card with it. I decided not to do any stitching this time. Instead I used my Cuttlebug Bloom Dots folder on the top of the card, added a bow, a little Stickles and a flower-shaped gem to the flower center -- easy!!! I wanted to use these #9 envelopes I've had forever & got the idea to emboss part of the envelope to match my card, since it's color doesn't. Hope the postal machine can handle it!!! **U**
Paper: Bazzill; Orange cardstock from stash
Embellishments: Orange Peel Stickles; flower gem from stash
Tools: Spellbinders' Wizard; Cuttlebug Embossing Folder


Friday, July 11, 2008

Distressed Scalloped Daisy Card

Sadly, I'm not one of those lucky people who sees a card design in their head and proceeds from there. Instead I start with an idea, a sketch or an embellishment I want to use and then things usually change many times before I'm finished. This card evolved from a sketch my friends Ilene & Deva had done. I'm not very talented at distressing, but I'm trying. . . .
Paper: Papertrey Ink's Text-style Pink Patterns
Ink: Papertrey's Spring Moss & Ranger's Antique Linen
Tools: Spellbinders' Wizard & Classic Scallop Circle Large Nesties & Daisy Delight Dies; sponge; sandpaper
Embellishments: The Robin's Nest Dew Drops; Fruit Punch Stickles; Joann's Craft Essentials Rub-On

Wednesday, July 9, 2008

Happy 20th Birthday Waterfall Card

Another fun, interactive waterfall card, as in my baby boy card 10 posts back on June 6th, but this one has 5 pieces that eventually spell out "happy" & slides out to reveal birthday with the 20th enclosed in the circle around the "y", shown in photo below. Another card for this Stampendous Stamp set is in my 5-26-08 post. This one (using the same background paper Designing Diva Judy used when she introduced us to this technique) is for a relative's upcoming birthday. I'm getting better about not waiting until the last minute to do my cards--finally! Just hope she doesn't check out my blog before then! ;-) I even know what I'm making for our Designing Diva's get-together later this month & actually have most of the pieces assembled already! Woo-hoo! Better be careful or I'll lose my procrastinator's crown, huh?!!!
Another darling way to do this waterfall card is vertically, if you have a vertical stamp to put on the pull-out piece. That tutorial is here: http://www.splitcoaststampers.com/resources/tutorials/waterfall_card. Very cute variation, I think! You'd then want your fold to be at the top for the card to open at the bottom, whereas with this horizontal style, you have a choice to have it open @ either the left side or bottom. Otherwise, you can just use that tutorial & orient your pieces horizontally instead! Either way, it's a very fun card to create, so enjoy!!!
Paper: DCWV DP & solid cardstock
Stamps: Technique Tuesday's Wild Vines (still a special favorite!) & Stampendous Circle Talk Birthday
Ink: Tsukineko's VersaColors: Lavendar, Lime, Canary, Baby Blue & Marigold & VersaFine Black
Embellishments: Darice Eyelets/Washers; Yellow Stickles; ribbon from stash
Tools: Crop-a-dile; SU's Horizontal Slot Punch


Wednesday, July 2, 2008

Celebrate July 4th Card


Hello fellow crafters; just had to post a quick Independence Day card since the holiday is almost upon us! I had these awesome acrylic star snaps from many years ago (seriously) in my stash which I thought would look smashing with Starry Night Stickles on them!!! Hope everyone here in the USA has a wonderful, safe 4th of July Holiday weekend with family/friends and that all my friends from other countries are safe/happy this weekend as well!!!
Paper: White, Red Speckle cardstocks from stash
Stamps: Studio G's Celebrate & July; Stampendous' 4th
Embellishments: Starry Night Stickles; Blue paint chip & star acrylic snaps from stash

Sunday, April 13, 2008

Designing Diva's Stamp Group Creations

It was long past my turn to have our crafty group, now fondly known as the Designing Divas, to my house for our monthly get together. Sadly two
members were unable to attend, but we had a wonderful time and these talented ladies once again wowed me with their creations:
Ilene shared 2 spring flower cards found through Hero Arts, www.heroarts.com/, incorporating sayings and flower stamps. We used colored pencils on them and added Stickles for a little pizzaz. I also changed my pink card up slightly by off-centering the stamped piece and adding a border on the edges of the green layer with my Scor-It. Simple cards, yet simply adorable!
Deva's creations (yes, she shared 2 also!) both incorporated flourishes, which we all LOVE! Her brown and blue card's flourish is a sticker from Dollar Deals! The oval scallop and Stampendous stickers just finish it off beautifully! Her citrus-colored card makes me think of warm weather & tropical flowers with the limey jewels adding just the perfect touch!

Caryn couldn't join us, but sent along her unique postcard to share. It very cleverly says, "just wanted to say..." on the front and "thanks for being so kind" on the flip side. Her black/pink plaid paper, ribbon and jewels just make this simple postcard fabulous!

Gwen's shirt/tie creation is awesome and would make a great Father's Day or birthday card for a lucky man in your life! She previously posted this along with a matching gift card tin @ www.mycraftydaysoff.blogspot.com/ on March 24th so I'll refer you there to see it! You won't be disappointed -- her site rocks!!!
The Designing Divas are each uniquely creative and their sweetness, kindness and willingness to share makes me feel truly blessed to have them in my life!!!

Tuesday, March 25, 2008

Felt Flower Spring All-Occasion Card


Another card using a felt flower from the Joann's $1 area and stamp from Michaels $1 bin. I used my COD to make a large hole in the center of the flower this time and wound Karen Foster's Scrapper's Floss around the blossom, as well as using it for the stem. I just love all the things you can do with these awesome thick felt flowers. My only regret -- there aren't more sizes, colors & styles! I so wish there were!!!
Paper: Pink & White Cardstock; My Minds Eye DP
Stamp: Studio G from Michaels $1 bin
Ink: Tsukineko's Lime Pigment Ink
Embellishments: Felt Flower & small flowers from stash, Scrapper's Floss, Lime Green Stickles

Sunday, February 3, 2008

Cards Made by my Clever, Crafty Friends

Yesterday was the most FUN -- as you can obviously see by the awesome array of creative craftiness displayed here. I have some very talented friends -- I'm so lucky!!! The multi-talented Gwen (www.mycraftydaysoff.blogspot.com) hosted our get-together and shared the clever criss-cross Love U card for some lucky male I know. I left my inside blank for now. She incorporated so many great ideas for a guy card -- the blue/brown colors, lots of metal brads, distressing, SU's Canvas background & perfect letters she cut on her Sizzix Big Kick!

Sassy Ilene's darling Le Cafe card was created using her Wishblade and a darling table and chairs stamp by Great Impressions. For a little "dessert", I added a tiny SU ice cream sundae stamp on mine! Yummm!!!
Deva's (yes, she's the "original" & that IS her real name -- lucky girl!) Cupid card incorporates the most adorable Cupid paper, rub-on and Sizzix cutout!!! The black ribbon & bling just make it even more precious, as did her inside phrase, "Cupid's got his eye on you. . . and so do I"!
Judy's sweet Valentine creation uses another ingenious fold, one of my favorite things! Her darling card should open when you untie the bow on the right side. I ended up "flipping" mine to open at the bottom when I realized I'd cut my heart background paper so the hearts would have been sideways! (I didn't sleep much the night before!) The unique fold is further enhanced by the cute circular Love stamp and pewter brads added on top of the stamped hearts! As a bonus, Judy gave us each another Valentine DP already cut to create a second card, which I can't wait to make!!!
Caryn's elegant card incorporating luscious S.E.I. papers, beautiful fibers, metal dots and a Cuttlebug "Love" phrase, sparkling with Stickles, is simply breathtaking! I think I know who the recipient of this gorgeous creation will be, but it's a secret!!!
Who could ask for a lovlier array of creations in one crafty day? Not me! You might ask where my shared card is -- well, I did share one, but due to a lack of sleep/lateness of the hour, I cut my only short length of ribbon wrong, leaving me with only 4 pieces to give to 5 ladies. So, I gave mine to one of them and need to redo my card, using another ribbon. I'll try to post it later today -- Super Bowl festivities permitting! ;-)

Saturday, February 2, 2008

All Dressed Up Birthday Card/Sketch Challenge #3


Happy Birthday to my sassy friend/fellow crafter, Ilene!!! She was very instrumental in getting me hooked on papercrafting nearly 12 years ago. For this card I used DCWV's All Dressed Up glittered flower and striped papers. This is also my entry for Sketch Challenge #3 posted by Nicola on http://www.mypaperworld.blogspot.com/. She has some fabulous cards for you to peruse, so stop by and enjoy!
Papers: DCWV All Dressed Up; black card stock
Embellishments: Silver Stickles; Making Memories Felt Flower & Crystal Brad; HB round tag from stash

Friday, January 18, 2008

Scalloped Oval Valentine's Card


My first simple Valentine's card, inspired by the darling Christmas card Gwen (link under SBS-8 & favorite blogs) sent me! I added just a touch of glitz, which barely shows up in my photo. Wish I'd had those great stickers Gwen used! ;-)

Paper: Natural Linen cardstock; Hero Arts Soft Rose Crepe Notecards
Stamps: Hero Arts Sketch Heart; Love from Love Set by All Night Media
Ink: Ash Rose by Tsukineko
Tools: Scalloped Oval Punch by MarvyUchida
Embellishments: Diamond Sparkles by PSX

Sunday, January 6, 2008

Sequin Pins Keep Stickles Tips Free-Flowing!


If you put a Sequin pin into the tip of each Stickles bottle when you first purchase it or when it's free-flowing and you're done using it, replace the screw-on cap & replace your pin after each use, you'll never have to waste time or product clearing a clog! Because they have a diminutive head, they lay flat enough to fit right under the cap. These pins are small and therefore easy to misplace, but they're also inexpensive. I purchased mine at Joanns for about $3 for 350. They are made by Dritz and are 1/2 inch long. Hope this helps some of you frustrated Sticklers become happy Sticklers! ;-)

Friday, December 21, 2007

Handmade Christmas Cards


I received two handmade cards from dear friends this week. Ilene's poinsettia card was created with embossed snowflakes on vellum & finished off with the greeting and a poinsettia cut from Wishblade, then matted all around in black -- very lovely!
My Stampin'Up demo, Kimberly, sent the simple & adorable tree card with corrugated red strip on a green card. Simple and yet, simply adorable! Love the way she tied her ribbon! Thanks so much ladies for sharing your creativity!

Wednesday, December 12, 2007

Figgy Pudding's Christmas Holly Card

After struggling to find my creativity these past few days, I've finally created a card that for me is more than "simple/easy", which I enjoy making. I've always made 40-50 of the same card & this year (partly because of the need to post here), I'd decided to make more cards & less of each, but I struggled to find any that "grabbed me". This card does that for me! Hope you like it too!

Paper: Basic Grey's Figgy Pudding - Toasty; Cream Linen; Red Speckle
Stamps: DeNami Design - both
Embossing Powder: DeNami Design Gold
Stickles: Xmas Red, Lime Green, Gold
Finished Card Size: 5" x 7"

Monday, December 10, 2007

Simple/Easy Christmas Cards & Stickles!!!


Some simple & easy cards for the holiday! All you need besides what comes in the paper stack is a little Stickles for excitement (thanks Ilene & Deva, the Stickles' Queens)!!! For other Stickles' Queens out there, I've discovered that once I get even my old bottles (you don't want to know how old, trust me) to flow easily ALWAYS, insert a "short" straight pin in the neck before you screw the cap back on. I believe I found the pins @ Joanns, but they're like straight sewing pins, except shorter & they have a smaller, flatter head, which allows you to put the cap back on & your Stickles will always be ready to use -- easy & very time-saving!!! Also, my original reason for purchasing them, obviously, was to secure the ends of ribbon & they work great for that too, assuming your eyesight is good enough to find them once you drop them, that is!

Paper: DCWV Christmas Scrapbook in a Stack (includes textured cardstock, tiny brads, alpha stickers & velllum quotes

Stamp: Merry Christmas - DeNami Design

Embelllishment: Stickles by Ranger Industries - Lime Green, Xmas Red, Green

Sunday, November 4, 2007

Two Thanksgiving Cards Shared by Friends


(Sorry, photo corrupted/lost!)
Deva's green Thanksgiving card includes gorgeous silk leaves that I believe she said were from Dollar Tree (they're magnificent), pretty ribbon, brads in fall colors and cute phrase stamp. She added orange & green Stickles to the leaves & acorn for added pizzazz -- truly a beautiful card "in person"! Ilene's card with pumpkins, swirly "vine", phrase and silk leaves all by Close to My Heart (I think) and added punched leaves, bow and Stickles glitz is a vision of fall loveliness also! Now you know why getting together to craft with these ladies is so much fun -- they never cease to amaze me!!!

LinkWithin

Blog Widget by LinkWithin