Showing posts with label QuicKutz. Show all posts

Saturday, June 9, 2012

My Sheri Crafts Challenge #087: Father's Day/Celebrate Men in our Lives

Our newest challenge at My Sheri Crafts is to celebrate the men in our lives for Father's Day or any reason you wish!

I started with striped masculine DP from my stash as a base and Washi tape from Target, cut to create my banner. I then used QuicKutz alpha dies to spell out 'Dad'. Spellbinders' Labels Eighteen forms the backdrop for letting him know that today we're celebrating him on his special day. I just love these new banner stamps from JustRite and couldn't wait to use them both together. Using the largest Labels Eighteen I cut my focal tan piece and again using red CS, I embossed it only in the Grand Calibur and hand cut a backing piece. My star is cut by hand also from a piece of turquoise leather.

Hope you'll whip up a masculine card(s) for a special man/men in your life and celebrate with us @ My Sheri Crafts!!!

I'm also entering this card @ this challenge:

Monday, March 7, 2011

Some Bunny Loves You: QuicKutz Style

This sweet little bunny with it's little "fuzzy" paws and that soft-as-bunny-fur bow is definitely ready to brighten someone's day!!! I've used QuicKutz dies for both my scalloped BG (Journaling Block REV-0226-D) and my bunny, stamped on a Nesting Tag (CC-SHAPE-6-023). The Studio G wooden stamp was inked with Memento Tuxdeo Black ink, colored/edged with Copics, mounted to DCWV DP and Bazzill card and has q-tip tips for paws.

Wouldn't he/she be just the cutest little surprise tucked into a child's lunchbox?!

Please check out Creating Everlasting Memories for great bargains on the following products: QuicKutz/Lifestyle Crafts items, ZVA Creative Pearls, as well as many other fabulous crafting supplies!

Hope you're having a wonderful, crafty day today wherever you are in this great big world of ours!!!

Thursday, February 24, 2011

Celebrate Card: My Mind'e Eye Style

My Mind's Eye Lush (Blue) DP
This is the first card I've made using the Lush line of designer paper in blue  by My Mind's Eye  -- it's totally "luscious"!  :~)  My 4 1/4" x 5 1/2" card uses three of the gorgeous patterned papers from this line, as well as a brad and velvet scalloped ribbon.
Cream CS from my stash is first covered with Blue Diamonds double-sided DP and then topped in the center with velvet Polka Dot DP. Two large Prima Flowers at the top left are embellished with a large My Mind's Eye "Lush" brad and sit atop my Celebrate sentiment.
Across the bottom I cut the reverse side of the Blue Damask DP with the scalloped QuicKutz/Lifestyle Crafts Journaling Die (#REV-0226-D), tucked it underneath cream lace from my stash, then topped with MME's velvet scalloped ribbon and finished at the right side with another Prima Flower. All DPs and flowers were antiqued with Tim Holtz Antique Linen Distress Ink.
I colored my clear flower-shaped stick pin (Making Memories) with Copic BG11, added beads and stuck it through my ribbon and flower. Finally, a pearl from my stash was threaded with embroidery floss for stamens and attached with a glue dot to complete my card.
Check out Creating Everlasting Memories for great bargains on the following products:  My Mind's Eye; QuicKutz/Lifestyle Crafts; Tim Holtz, Prima Marketing, as well as many others!!! Hope you're having a wonderful, crafty day today wherever you are!!!

Tuesday, February 15, 2011

Home is Where the Heart Is: QuicKutz Style

QuicKutz House Die #0213


Just a fun little twist on a Valentine, or a housewarming or welcome home card that was tons of fun to create with this QuicKutz/Lifestyle Crafts House die. This die plus many more by QK (and FlowerSoft in several colors) are  available at Creating Everlasting Memories at fabulous prices -- check it out!!!
 
Paper: Bazzill scrap CS and Cream CS from stash
Die: QuicKutz House #0213
Stamps: JustRite's Times New Roman 15-pt. Font; tree, sand, swirl from stash
Embellishments: Making Memories Ribbon; Sage FlowerSoft; heart sticker from stash
Tools: Stampin' Up Word Window punch

Monday, February 7, 2011

Bride and Groom: QuicKutz Style


As I cut and paper pieced this Bride and Groom QuicKutz die set, it reminded me so much of playing paper dolls when I was little -- a fond memory!
For a shower or wedding card, this set would be so sweet for making your card in the bride's chosen colors! I also think these would be the perfect dies for all your wedding scrapbooking and even for shower decorations!!!

I simply used papers, flowers, ribbons and pearls from my stash to dress my bride and groom. I cut my bride's dress in a textured white CS and her veil from vellum. I cut a small slit to slip the veil over her hair and then added pearls to it, as well as to her dress at the neckline and a ribbon sash at her waist. Her bouquet consists of small roses and  ribbon surrounded by a small doily circle cut from a larger doily.

The groom is dressed in his finest tuxedo and white shirt with "ribbon" tie and a boutonniere die cut from the set and Copic colored with R39 and YG95.

For this QuicKutz/Lifestyle Crafts die set #3-040 and numerous others at unbelievable prices, be sure to check out Creating Everlasting Memories today!!!

Monday, January 17, 2011

Marge's Monday Card Corner for CMIT (January, 2011)

Happy 2011 and welcome to my Monday Card Corner for our Creating Memories in Time blog! Pennants are all the rage in paper crafting and scrapbooking right now, so I used the QuicKutz "Pennant" die to create my Love card. Designer papers used today are My Mind's Eye's "Love Nest", edge distressed with Tim Holtz "Antique Linen" ink. ZVA Creative pearls in a soft shade of pink were added atop my cream lace. This card was really fun to make and I LOVE how these dies worked perfectly for the look I was going for! This card fits a regular business envelope.
The die, pearls, ink and papers used are available at Creating Everlasting Memories, as well as many other wonderful products, so I invite you to visit our eBay store for all the unbelievable products/fabulous prices currently available.
If you'd like to follow this sketch and for a complete list of all products used, please check out our CMIT Blog. Thanks so much for coming by today!!!

Tuesday, January 11, 2011

Creating Memories in Time: ATC Tuesday

It's ATC Tuesday again for Creating Memories in Time -- I really hope you'll join us by making your very own Valentine-themed Artist Trading Card and posting it to our CMIT Blog (click above link and scroll down for InLinkz to link yours). We'll be voting for our favorite ATC and if you win, you'll receive a lovely prize from Creating Everlasting Memories. Hope you're intrigued enough to join us!!!

My ATC uses the following products available from Creating Everlasting Memories:
Papers: My Minds Eye "Love Nest" 12" x 12" Paper Pad
Dies: QuicKutz "Pennant and "Love Birds" (hearts) dies
Ink: Tim Holtz Antique Linen Distress Ink
Embellishments: ZVA Creative Self-Adhesive Pearls

Additional products:
Papers: Cream CS (for ATC base)
Stamps: JustRite 15-pt. Times New Roman Alpha
Ink: VersaColor's Burgundy pigment ink
Embellishments: Hobby Lobby Cream lace (by-the-yard) and Lt. pink Decorative Trim (roll)
Tape: 1/8” double-sided tape

Full directions are listed on our CMIT blog for each ATC created by our Design Team.

Saturday, January 8, 2011

Campin' Out: QuicKutz Style


I thought this QuicKutz 'tent' die was the perfect mate to my wildlife and pines paper! My tent was die cut from Bazzill cardstock in greens and browns. I then cut the zipper pull and tent stakes from craft foil for accent. Using kraft cardstock for the hilly foreground my tent is staked to, I distressed it and all my paper's edges with Tim Holtz Tea Dye Ink.

This will be a perfect card for any hikers, hunters, campers, Boy Scouts or nature lovers in your life, as well as a great die to use for those future scrapbook pages you might be planning.

You can grab this die at Creating Everlasting Memories, along with a huge assortment of others for your 2011 paper crafting needs!

Thursday, December 23, 2010

Day in the Country: QuicKutz Style


It feels sooo good to make anything other than a Christmas card -- LOL! I'm assuming I'm not the only one who feels that way right about now?!!!
So I decided to do a completely different card, using this QuicKutz  barn and silo die and a sentiment that I think fits the "scene" perfectly! I think this would make a great masculine card for just about any occasion. Remember that Creating Everlasting Memories eBay store has many QuicKutz dies available at great prices all the time, so check it out! ;~)


Die: QuicKutz Barn
Paper: Making Memories 6"x6" 'Travel' pad
Stamps: JustRite's "A Day in the Country" and Pine Trees (source unknown)
Ink: Memento's Rich Cocoa
Other: Bronze Craft Foil (Spellbinders)

Monday, December 20, 2010

Marge's Monday Card Corner for CMIT (December, 2010)

Welcome back to my Monday Card Corner for our Creating Memories in Time blog! My card this month features QuicKutz dies ("House", "Trees", "Mini Van" -- used just the hub cap for my wreath!), combined with My Mind's Eye's "Where the Heart Is" designer papers. Not only did I have a lot of fun playing with the dies and fun papers, but I also used FlowerSoft for the first time -- SOOO fun!!!
I used a "plethora" of products that are available at Creating Everlasting Memories, so I invite you to visit our blog for a list of all materials used and detailed directions. Then please check out Teresa's store for all the unbelievable sale prices currently going on.
If you'd like to follow my little hand-drawn sketch, I'd love to see your creation, so leave me a comment with your link. Any questions, leave a comment & I'll gladly reply. Thanks for visiting here today!!!

Tuesday, December 14, 2010

Creating Memories in Time: ATC Tuesday

Bloggers, it's time once again for Creating Memories in Time: ATC Tuesday! With all the hustle and bustle to prepare for the holidays, I really hope you'll all take a break for yourself -- to not only visit our blog to see all the sweet ATCs our team has prepared this month, but also to make and post an ATC. YOU may be the lucky winner of a nice little prize this month -- a lovely surprise to look forward to! Entries will be accepted through midnight Friday, December 17th -- Good Luck!!!
This month I've chosen to leap right into a Valentine's Day theme. These sweet glittered  papers are My Mind's Eye 'Love Nest' -- aren't they fun?! You'll be seeing many more projects here soon using these. Full directions for my ATC are on our team blog.
Products used and all available at Creating Everlasting Memories (with many fabulous sale prices right now) are:
My Mind's Eye 'Love Nest' 12" x 12" Paper Pad
QuicKutz "Trees" 4x4 die
ZVA Creative Self-Adhesive Pearls
Tim Holtz Antique Linen Distress Ink
Thanks for stopping by today!

Monday, November 29, 2010

Christmas Tree Card: QuicKutz Style

QuicKutz Nesting Trees


Just a quick little Christmas card created using QuicKutz Nesting Trees (available at Creating Everlasting Memories #DC0016). I cut my tree's 5 suede paper layers, cutting die  #1 (smallest) through #5, securing each layer with foam dots for dimension, topping with a red star, adding a simple sentiment and red/green ribbon from my stash to finish it off -- quick, easy, merry and bright, just what I need right now!  ;-)
Paper: Papertrey Ink DP; White CS & Green Suede
Ink: Memento's Lady Bug
Stamps: PTI's 2009 Holiday Tag Collection
Embellishments: Star & ribbon from stash
Tools: QuicKutz Nesting Trees die; SU's Word Window punch

Sunday, November 28, 2010

Snowflake Tag Christmas Card: QuicKutz Style


I just love this shiny red snowflake cut with QuicKutz Sparkles die and the light blue ZVA Creative pearl center that echoes the colors in the QuicKutz Nesting Tag. Wanting to keep the rest of the card simple, I merely embossed the white BG paper with Provo Craft's Swiss Dots embossing folder. My tag slips in/out of the QuicKutz photo corner so that upon receipt it can be personalized on the back before attaching to a box or gift bag.
You can find the QuicKutz dies used here (Sparkles, Nesting Tag, Photo Corners) and lots of gorgeous colors of ZVA Creative Pearls at Creating Everlasting Memories.
Be sure to check out CEM's bargains from Black Friday running through 11:59 PM on December 3rd!!!

Monday, November 22, 2010

Fun Gatefold Christmas Card; QuicKutz Style

Created this fun gate fold Christmas card and tag from papers in my stash, ZVA Creative Pearls and QuicKutz dies (Nesting Diamonds and Nesting Stocking dies and pearls available at Creating Everlasting Memories).
Slip the ribbon off the front and inside is a stocking tag that can be removed and tied to a package or hung on a Christmas tree. I die cut a stocking in white CS and added to the back of the tag, so the recipient can add a  message.

Tuesday, November 16, 2010

Christmas Stocking Cards: QuicKutz Style


The largest die from this 4-piece QuicKutz Nesting Stocking available at Creating Memories in Time is sooo fun to play with! You can create stocking cards for boys/girls, teens and adults in any style that opens at the top and will fit into a #A9 envelope or #A10 envelope. You could add a child's name across the top in stickers, alpha stamps or use your own handwriting -- my head is just reeling with possibilities! What young girl/teen wouldn't love a furry-topped stocking card or how about some added tulle in her favorite color for your little ballerina? For boys/men a stocking in camouflage paper? Just from my stash of "winter" papers, I quickly came up with one for a skier and a classy/elegant/sparkly stocking with scalloped felt (cut with QK's "Journaling Block" set), gold Stickles and gold braid trim.

This stocking die actually measures nearly 8" from top to bottom and I happen to have some long, narrow CS over 16" -- however, you can still create one with an 8 1/2" x 11" piece of paper, as illustrated in my photos. I simply cut my paper to 4 1/2" x 9 1/2", folded it at 1 1/2" and placed the fold just below the top of the die, beneath the cut line to create my stocking card front. (Note: If your die-cut machine and mat aren't quite long enough, simply run your die through a 2nd time to cut the toe.) Then cut a single layer stocking from CS and glue the folded edge from your 1st piece to the back of this piece.

To create my toes/heels, I merely punched a circle from a 1 3/4" inch punch and then die cut the circle where desired to finish my stockings. For the skiers' stocking, I stitched the top/heel/toe first on my sewing machine before gluing in place.Hope this inspires you to try some stocking cards for those on your Christmas list! If you do, I'd love to see a photo, so leave me a comment and link so I can see your creations and HAVE FUN!!!

Monday, November 15, 2010

Marge's Monday Card Corner (November, 2010)

I'm so thrilled to have you stop by for my first individual post for Creating Memories in Time. I'll be hosting my Monday Card Corner the 3rd Monday of each month, my little "corner" of the CMIT Blog where I'll share a sketch and card. Each Design Team member will have a separate and unique spot monthly here on our blog, so don't miss any of these exciting upcoming posts! A sketch to me is just a "jumping-off point" for inspiration and can be followed exactly or you can simply be inspired to go off in any direction with the sketch, flipping it/turning it/making it "your own" -- just having fun and being creative!
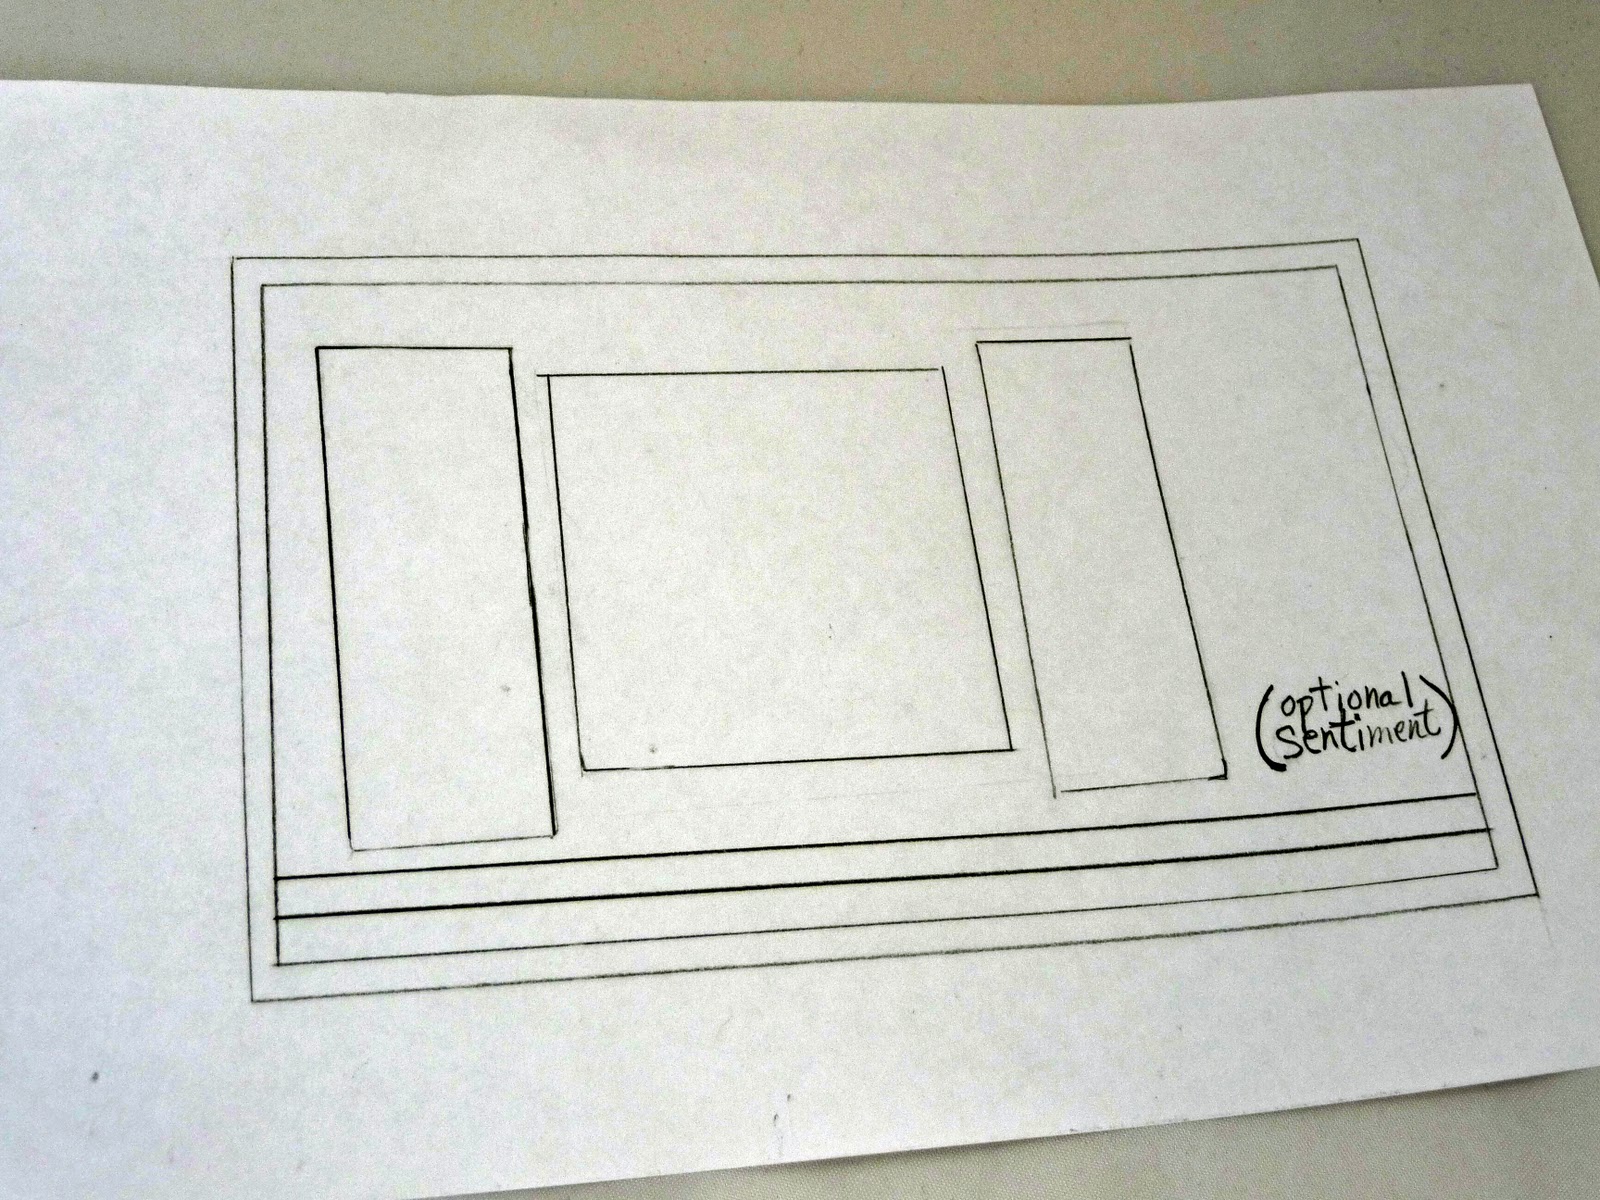
Sketch
All supplies used are available at Creating Everlasting Memories EBay Store, except solid CS and stamp. Finished card size is 5"x7". For my snowy BG, I used My Mind's Eye "Signature Christmas", distressing the edges with Tim Holtz Antique Linen Distress Ink and creating my main focal image using 6 of the 8 dies from QuicKutz Nesting Trees (#DC0016). These dies cut/emboss beautifully and are so fun to play with! I chose 3 complimentary blue-green CS colors, cutting/embossing dies 1-6 (1 being smallest) as follows, beginning with the darkest color: 6 and 3; medium: 5 and 2; light: 4 and 1, as shown below.
My Die Cuts
 ZVA Creative Self-Adhesive Pearls (#PE-02CB-110) in soft blue were adhered to my tree layers, gently curving them as I pressed them down and adding a large pearl to the tree top. Next, I assembled the layers by lining up the tree tops, using small foam dots near the bottom of layers for dimension. I ran a long basting stitch through the center of May Arts (C-1-04) "Sheer" 1" Teal Ribbon and ruffled it, adding it to the left side of my card, along with my sentiment and a gorgeous Tim Holtz (TH92873) Idea-ology "Fanciful Button" with small pearl added to it's center. Hope you find some inspiration and create a card after seeing mine today. If you do, leave me a comment/link so I can see yours and thanks so much for stopping by today!

Saturday, November 6, 2010

Happy Birthday, Erin

Happy 24th Birthday to you, Erin!!! Wish we could be there to celebrate, but this little card will have to suffice. The first time I saw this VW bug at Papertrey Ink, I thought of you and your car! Still haven't purchased this stamp set or the coordinating die for the VW myself, but luckily I could borrow the stamp set from a friend to make your card. Hope you enjoy it and that your birthday is totally fabulous!!!
Paper: PTI's Ripe Avocado & Spring Moss CS; Bazzill CS
Stamps: PTI's Enjoy the Ride; JustRite's 15 & 25-pt. TNR Alphabets
Ink: PTI's Spring Moss & True Black: VersaMark Dazzle (to give car a "metallic" finish!)
Embellishments: Clear Gems; 3M overhead transparency (for windshield); white embossing powder; Spellbinders' craft foil
Tools: Wizard Die Cut Machine; QuicKutz Sign 4x4 die; Copic Markers C-3 and Y-15 Versamark Pen

Sunday, October 31, 2010

Merry Christmas Snowflake Card with QuicKutz Dies


This card was sooo much fun to make! After embossing my BG with a Cuttlebug embossing folder, I used the Sparkles die by QuicKutz for my snowflake and their Nameplate die. I cut the Nameplate die first in wool felt for added texture and again in red CS so I could use just the narrow red border this die also cuts.
I added a red button to both my snowflake and 3 small ones along the felt curve. Baker's twine is tied through the large button and holds the vellum sentiment strip in place atop my nameplate, making me think of a yummy Christmas candy cane. This is one of my favorite Christmas cards so far.
For all your QuicKutz die needs, see Creating Memories in Time for an unbelievable selection!

Oh, Holy Night Christmas Card with QuicKutz Dies


To create this Christmas Nativity scene I simply cut the center only using the QuicKutz 12" Nativity die. This beautiful die has the 3 Wise Men and a camel to the left of the manger and shepherds, a sheep and Mary's donkey to the right -- perfect for both scrapbooking and card making. I'm going to be featuring a card with just the Wise men here on my blog in the near future! I love to take different dies and "make them my own" by just using a part of the die or combining several to create a scene different from the obvious intended application.
My card uses Bazzill CS, lightweight metallic paper and Stickles for stars. I stamped
my sentiment on lightweight paper, backed it with CS for strength, rounded the corners and punched notches to thread my Offray ribbon through. I used foam tape behind the star and along the top of the manger for added depth. A simple, but pretty Christmas card that's inexpensive, easy to mass produce and mail, always a bonus during this busy time of year!
Check out this QuicKutz Nativity die (and many others) at Creating Memories in Time for all your paper crafting needs!


Thursday, October 28, 2010

Let It Snow Card with QuicKutz Dies


My quest to get more Christmas cards made continues with my die-cut snowflake featured here atop another of my favorite
QuicKutz dies, Nameplate. The snowflake consists of two of three dies on the QK Sparkles die, covered with Stickles for "ice" and topped off with a ZVA Creative pearl. These QK dies and ZVA Creative pearls are available for purchase at Creating Memories in Time.
Navy Offray polyester ribbon is laced through the Nameplate tag and tied in a double knot. My right edge is highlighted with navy suede paper punched with Fiskars Apron Lace border punch and DP is by Bella Press. Okay, on to my next Christmas card featuring more QuicKutz dies, so stop back soon!

Don't forget to visit our CMIT Blog here for more crafting inspiration!


LinkWithin

Blog Widget by LinkWithin