Showing posts with label Eyelets/Grommets. Show all posts

Saturday, May 3, 2014

Sew, Sometimes I Craft Without (#10) . . .

paper . . . and this is the result of one recent session.
Using Doll Tag Clothing's pattern from Freebie Friday @ Pixie Faire on FB, I cut these adorable shorts from two coordinating fat quarter fabrics from my stash. If you're a sewist of doll clothes, you do not want to miss Freebie Friday, which begins with voting for your favorite of four patterns each Wednesday and culminates on Friday AM with the winning free pattern link. You'll not only receive a fabby pattern each week, but an introduction to Pixie Faire's talented designers!
Felicity & I think this pattern is sooo cute and she popped the shorts over her hot pink swimsuit -- it's nearly 100 degrees here today, but thankfully mid-80's are forecast to return mid-week.

This pattern is so easy, well written and goes together quickly with minimal effort -- I'm giving it 5 Stars on my review and recommend it very highly! Cording run through small lime eyelets from my paper crafting stash finish off the 'faux' tie, 'sew' you see my two favorite pastimes mesh well!

Saturday, October 13, 2012

My Sheri Crafts #096: Halloween

Our My Sheri Crafts' Challenge this week is: Halloween -- create anything your spooky little heart desires for this holiday! Several years ago I created a double-sided Halloween decor piece (here) that I was inspired to do by a piece of 6x6 Making Memories' paper. It was sooo fun that I've fashioned another using Spellbinders' Labels Twenty-three, Martha Stewart's latest Halloween mat stack and some Hobby Lobby bottle caps. For these decor pieces, the sky's the limit with the plethora of Halloween papers, dies and embellishments available.  It can be really unique and FUN -- make it 'sweet' for the younger ones or 'spooky' for the older crowd -- even personalize it, if you'd like!
I chose two different 'bird' papers to cut with my Grand Labels Twenty-three die from the MS stack and a piece of Tim Holtz grunge paper to sandwich inside, as I wanted to be sure the piece had the strength to hold up well when hanging and to support the bottle caps! I cut/embossed, sanded and distressed my paper with Black Soot ink and used a combination of Scor-Tape and Glue Dots to secure my 'sandwiched' pieces. Next I punched holes in the top/bottom and added 1/8" black eyelets, all with my beloved Crop-a-dile. From my stash I then attached different framed spooky mirrors @ center front & back. To build my double-sided 'boo', I first ran 3 bottle caps through my Grand Calibur using the cutting plate and adapter plate, which works like a 'charm' to flatten them! Again using my Crop-a-Dile, I easily punched 1/8" holes in the bottle caps. Circles die cut/emossed/sanded from the reverse side of one 'bird' scrap piece using Spellbinders' Standard Circles Large were then glue-dotted to the caps and glittered letters spelling 'boo' were added. "Eek" would work also! Tim Holtz jump rings were used to attach the bottle caps @ the bottom so they dangle/move and TH ball chain completes the hanger @ the top.

I hope you'll join us @ My Sheri Crafts this week by creating/posting your own Halloween concoction(s) to share with us!

Sunday, October 23, 2011

Halloween Fun at the Laboratory


Having created some "adult" Halloween decor fun here lately, I'm entering this both at PaperPlay Challenges (use black) and CCEE1142 (fall scene or fall-related) challenge.

Utilizing Spellbinders' Grand Large Labels, I cut various black & cream CS & book paper DP, and added the skull Flourish Sticker (Recollections). The matching flourish is my "shelf", attached with pop dots to hold my various ghoulish bottles & jars (Martha Stewart Epoxy Stickers), pop-dotting some for dimension also!

I created my Lab label with various JustRite Times New Roman alphas (25 & 50 pt.), adding some dripping blood/spots with a $1 stamp in Tim Holtz Fired Brick. For hanging, I used Tim Holtz Ball Chain, fed through black eyelets set into each corner.

Rather than also create a separate card, I'm simply attaching another cream CS Large Label die cut to the back onto which I stamped my "Happy  Halloween 2011" sentiment and we've signed our names. Hope it brings a smile when it reaches its destination!

Dies Used: Spellbinders LF-168 Grand Large Labels 
(#s 1, 3 & 4) and S4-168 Large Labels (#5)

Tuesday, February 2, 2010

PTI's Birthday Bash Challenge #6


Papertrey Ink's 3rd Anniversary bash is well under way, so stop by Nichole's blog & check out all the fun!!! For my 6th challenge card I chose Tiffany Pastor's fun birthday greetings sentiment. I wanted a masculine card so chose PTI's Ocean Tides CS and coordinating Green Tea Leaves DP, eyelets, button and twine. It's now dark here, so my photograph isn't great, but I'll upload a clearer one tomorrow.
Paper: PTI's SS White & Ocean Tides CS; Green Tea Leaves DP
Sentiment: Tiffany Pastor's Download
Tools/Accessories: PTI's Holiday Mix Vintage button; MM's Slot Tool & ribbon; Crop-a-Dile; Copic #BG000; eyelets & twine from stash


Thursday, August 28, 2008

Summer Sunshine & Flowers

Here's my entry for the Arty Girls "Summer" challenge. I finally put to use this darling "dream" expoxy sticker and bias tape, both items from a RAK I received back in March from my BBGF (best blogging girlfriend) Gwen and a card shape she first shared with our Designing Divas group awhile back! We both have things we've had for quite awhile & not used, but with our new SBS22 group, maybe that will soon change!!!
Paper: The Paper Company's Mandarin cardstock; DCWV DPs
Embellishments: Making Memories Grommets; Joanns Twill Tape & Expoxy Sticker; Michaels Silk Flower

Wednesday, August 27, 2008

Making Memories with Cuttlebug & Mr. Bones

Recently purchased this fun Halloween paper by Pebbles and my friend, Ilene, brought over her new Cuttlebug holiday folder and made me the white background. Sorry I don't know the name of this particular folder, but beware (no Halloween pun intended) if you go to check them out, you'll want them all! They even have new card border folders I haven't even seen yet -- I'm afraid to look! ;-)
Paper: The Paper Company's Mandarin Cardstock; Pebbles Spooky Characters/Dots double-sided cardstock; black & white cardstock from stash
Stamp: Making Memories Spellbound Collection acrylic stamp set
Ink: Tsukineko's Brilliance Moonlight White pigment ink
Embellishments: Darice Eyelets; White Embossing Powder
Tools: Crop-a-Dile; Spellbinders Wizard

Sunday, August 17, 2008

Mini Scrapbook Purse in Black & White

I thought my Mother-in-law would enjoy this little birthday purse. I'm just sad I didn't have enough of her fabric to include any of the flowers used in her card (see my previous post). This is the pattern I've previously used from Susan Mast, whose link is here. I'm planning to make another purse yet this week & Susan kindly helped me find the paper for it!
Paper: Luxe Designs Chick Flick Cardstock; Swiss Dots from stash
Embellishments: Blue Moon Beads; Petaloo Silk Flowers; brads, ribbons, button, vellum saying, chipboard from stash
Tool: Crop-a-dile II


Wednesday, July 9, 2008

Happy 20th Birthday Waterfall Card

Another fun, interactive waterfall card, as in my baby boy card 10 posts back on June 6th, but this one has 5 pieces that eventually spell out "happy" & slides out to reveal birthday with the 20th enclosed in the circle around the "y", shown in photo below. Another card for this Stampendous Stamp set is in my 5-26-08 post. This one (using the same background paper Designing Diva Judy used when she introduced us to this technique) is for a relative's upcoming birthday. I'm getting better about not waiting until the last minute to do my cards--finally! Just hope she doesn't check out my blog before then! ;-) I even know what I'm making for our Designing Diva's get-together later this month & actually have most of the pieces assembled already! Woo-hoo! Better be careful or I'll lose my procrastinator's crown, huh?!!!
Another darling way to do this waterfall card is vertically, if you have a vertical stamp to put on the pull-out piece. That tutorial is here: http://www.splitcoaststampers.com/resources/tutorials/waterfall_card. Very cute variation, I think! You'd then want your fold to be at the top for the card to open at the bottom, whereas with this horizontal style, you have a choice to have it open @ either the left side or bottom. Otherwise, you can just use that tutorial & orient your pieces horizontally instead! Either way, it's a very fun card to create, so enjoy!!!
Paper: DCWV DP & solid cardstock
Stamps: Technique Tuesday's Wild Vines (still a special favorite!) & Stampendous Circle Talk Birthday
Ink: Tsukineko's VersaColors: Lavendar, Lime, Canary, Baby Blue & Marigold & VersaFine Black
Embellishments: Darice Eyelets/Washers; Yellow Stickles; ribbon from stash
Tools: Crop-a-dile; SU's Horizontal Slot Punch


Friday, June 6, 2008

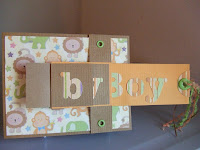
Baby Boy Waterfall Card

Our Designing Diva's group member, Judy, shared a darling flowered waterfall card with us in May, so I decided to do one for a baby shower. I used DCWV's Nana's Kids' cardstock and cut out the letters with my Sizzix Sidekick. As you pull the slider out it spells out "Baby" and eventually "Boy" underneath. A little trickier with the glued on letters than if I stamped them, but I still like the outcome. These cards are really fun; you should try one!
It just dawned on my that this card qualifies for the card challenge using "die cuts" over @ http://papertakeweekly.blogspot.com/ so I'm amending my post to reflect that this is my entry!
Papers: All DCWV: Nana's Kids & Brown cardstock
Embellishments: Making Memories fibers; WeRMemoryKeepers eyelets
Tools: Sizzix Sidekick; Crop-a-dile

Tuesday, April 29, 2008

Bookmarks for Improved Readers

My SBS8 Sister Kelly, http://kelleast.blogspot.com/, needs bookmarks to reward students who have improved their reading skills, so I made some brown/pink flowered ones for the girls. I used Making Memories Cosmoplitan Collection cardstock and patterned them after tutorials on http://technostamper.blogspot.com/by Mary Jo and by Dawn @
http://dawnsstampingthoughts.typepad.com/ using flowered eyelets instead. Hope the girls like them!
For the boys I used their school colors of red & blue, but instead of white I cut silver holographic sticker paper on my Wishblade to read, "Way to Go!" and made an arrow at the top. I was trying to find something that they'd hopefully like and actually use!
Reading well is truly one important key to success in life, so I hope these teens will continue to improve their skills for a brighter future!
Papers: Making Memories Cosmopolitan Collection; Red/Navy Linen cardstocks
Embellishments: Flower Eyelets from my stash
Tools: COD; Xyron Wishblade


Thursday, April 17, 2008

Diamond Father's Day Card for Heroes


I thought the geometrical designs of this paper and this card shape would complement each other. I'd also purchased these expoxy letters at Target's Dollar Spot a while back, thinking they may work on a male card. Hopefully the little bit of a swirl on the letters won't offend anyone's masculinity!

Papers: DCWV's Extreme Paper Stack; black and grey cardstocks
Embelllishments: WeRMemoryKeepers Eyelet, Noteworthy Stickers

Thursday, March 20, 2008

Spring Flowers for a Friend Diamond Card

First of all, I want to thank my BBGF (Best Blogging Girlfriend) Gwen (http://www.mycraftydaysoff.blogspot.com/) for this darling card & DP, which she so sweetly shared when we got together with our Stamp Group last Saturday. She's famous for these 5" diamond cards & had shared another one, but then said if we wanted an extra we could take it. Well, DUH, of course I wanted another - who wouldn't!!! ;-) I was playing with my 1/4" punch making the notched edge I'd seen on Barb's blog (www.barbstamps.com/ - under techniques) & decided it matched nicely with this DP! Then I decided to use my COD to punch holes in this sweet little felt flower I'd gotten @ Joann's in a pkg. of 24 for $1 -- what a bargain! They are quite thick & the COD punched the holes easily! I then added the large eyelet to the flower and fashioned Friend from some left-over letters on an old sheet of rub-ons -- a bit time-consuming, but it worked.
Paper: The Paper Company Mandarin Cardstock
Embellishments: Felt Flowers from Joann's $1 Spot; WeRMemory Keepers Eyelet; left-over rub-ons
Tools: 1/4" SU punch; Crop-a-Dile

Wednesday, February 13, 2008

Madly in Love With You, Valentine!

A card for "guess who" -- he's my one & only!!! Hopefully, he'll continue to "not look" at my blog until tomorrow!!! Normally he sees most everything I make long before the intended recipient, so doesn't feel a need to look @ my blog.
This card was easily cut on my Wishblade from a file so beautifully created by Mary @ http://mamawslegacy.wordpress.com/. She very generously shares her cutting files there for free. Thanks, Mary!!! When I saw this I just knew it was perfect for "him"!!!
Paper: Silver Metallic text; red cardstock
Embellishments: Making Memories silver eyelet; other brad/eyelet from my HUGE stash!
Glue: Elmer's Craft Bond Multi-Purpose Spray Adhesive
Tools: Crop-a-Dile; "Old Blue" Wishblade!

Sunday, January 20, 2008

Ribboned Heart Valentine's Card

After struggling creatively for days, I dug deep into my supplies and came up with two punches and my fiber friend shapes template, which resulted in this little card. Once I recalled I could use my edge punch to make paper ribbon, my dilemma was solved!

Paper: Grey ribbed cardstock; Jewel Metallic Ruby text; white with silver flecked cardstock
Tools: MarvyUchida heart punch; Fiskars heart border punch; Timeless Touches Fiber Friend Shape template
Embellishments: Kreinik Silver Metallic thread; Making Memories Silver heart eyelet

Wednesday, December 26, 2007

Retro Peace Christmas Card

My daughter needed a Christmas card for a dear friend and she knew this 70's look would be perfect for the occasion. It always amazes me to see how our minds perceive completely diverse ways to use embellishments! She used the Making Memories large grommets, but didn't mount them into the card, instead leaving the unset "ornaments" hanging at the ends of the fibers. I think this card turned out to be one of the best she's ever designed and her designer's eye has definitely come up with some very unique cards over the years! She always amazes me!!!

Paper: DMD's Adhesive Mats "Carefree Autumn"; Cream Linen
Stamp: Penny Black
Embellishments: Making Memories Color Grommets; WeRMemoryKeepers Large Eyelets; Trimtex Picture Perfect Fibers; Koss Pastels; Ribbon
Tools: WeRMemoryKeepers Crop-A-Dile; Martha Stewart 1" Round Punch

Monday, December 17, 2007

Another Christmas Treat Box/Basket


Because the holiday is fast approaching, I made this basket a bit simpler by just folding my paper squares in half inside & out, rather than cutting them in half diagonally. I only used a second paper on the inside & it looks fine! I added mixed nuts in the shell, candy canes & various chocolates, wrapped it with cellophane, added a red bow, cute snowman tag & it's ready for delivery!

Paper: Provo Craft Holiday Slab V
Stamp & Punch: Stampin'Up's Terrific Tags Punch Box
Ink: Ranger's Distress Ink - Peeled Paint; Tsukineko's VersaColor - Cardinal
Glitter: PSX's Sparkles - Diamond

Thursday, December 6, 2007

Christmas Treat Box/Basket


The tutorial for this box, another wonderful creation by Beate, is available @: http://www.splitcoaststampers.com/resources/tutorials/treat_box/. I've shown it both empty and with mixed nuts and candy in it, but it needed some candy canes for added pizazz! It's more time-consuming than the ones we made for Halloween & takes a lot of gluing, but it's such a great size for many fillers. One

solution would be to use a double-sided card stock to make it quicker and it would require less paper cutting, piecing and gluing. You could line it with cellophane, then add cookies, candy, caramel corn, or potpourri; or simply add bath products for the ladies or golf balls/tees for the guys -- I think it has infinite possibilities! The ribbon can be tied tightly or loosely to suit your needs on this project, depending on what treats you wish to add inside.


Paper: Provo Craft Holiday Slab V; solid 12" cardstock

Embellishments: Eyelets: 8; Ribbon: 24" inches

Tuesday, October 9, 2007

Slit Punch Tutorial Cards

This first card was sent to our dear friends in MN as a thank you for their wonderful hospitality when we visited them during our summer vacation in August. They have an awesome home with breathtaking views right on Lake Minnetonka. This card was inspired by Julia Stainton's Slit Punch Tutorial and uses the same DS Stampin'Up papers and stamps she used. I was amazed to see that she had used the papers I'd just ordered when I found her tutorial explaining the scalloped edge with a punch I'd had for quite awhile. How exciting to have a new technique for a tool you already own! The card design is unique too, in that it opens below the scallops & holds a gift card in the bottom inside pocket -- perfect for my needs! The green/blue/brown card was my creation to share with our card group in September and uses Bohemia DS papers by My Minds Eye (one of my favorites) I found at Hobby Lobby while vacationing. I love that you can do so many things with these scallops: leave plain, add jewels, punch small holes only or add rivets or brads -- the possibilities limited only by our imaginations! An awesome card with a unique opening rather than the "same old/same old" as Gwen so aptly pointed out!

Purse Mini Scrapbook

My crafty friends & I took a class at our friend, Deva's, house last Saturday taught by a talented lady, Susan Mast, http://www.masterscrapbookdesigns.com/. We made these darling little purse mini scrapbooks. Very feminine, totally girly, wonderfully useful! When opened, the purse spills out to reveal six pages for your photos or journaling. I plan to send mine to a dear friend with included photos of us, once I get the photos tweaked and cropped. What girlfriend wouldn't want one of these?!!! They're perfect for "girls" of any age from pre-tweens to great-grandmothers!!! Really fun, quite easy to make and a blast to embellish! I'll embellish the inside with more flowers, beads, buttons, ribbon, once I've decided on the photos. I'm totally new to scrapbooking, so this is a small start to what I know will be an exciting new adventure. I'm looking forward to scrapping my own grandchildren's pix one day!

LinkWithin

Blog Widget by LinkWithin