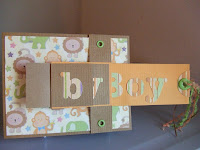
Another fun, interactive waterfall card, as in my baby boy card 10 posts back on June 6th, but this one has 5 pieces that eventually spell out "happy" & slides out to reveal birthday with the 20th enclosed in the circle around the "y", shown in photo below. Another card for this Stampendous Stamp set is in my 5-26-08 post. This one (using the same background paper Designing Diva Judy used when she introduced us to this technique) is for a relative's upcoming birthday. I'm getting better about not waiting until the last minute to do my cards--finally! Just hope she doesn't check out my blog before then! ;-) I even know what I'm making for our Designing Diva's get-together later this month & actually have most of the pieces assembled already! Woo-hoo! Better be careful or I'll lose my procrastinator's crown, huh?!!!
Another darling way to do this waterfall card is vertically, if you have a vertical stamp to put on the pull-out piece. That tutorial is here: http://www.splitcoaststampers.com/resources/tutorials/waterfall_card. Very cute variation, I think! You'd then want your fold to be at the top for the card to open at the bottom, whereas with this horizontal style, you have a choice to have it open @ either the left side or bottom. Otherwise, you can just use that tutorial & orient your pieces horizontally instead! Either way, it's a very fun card to create, so enjoy!!!
Paper: DCWV DP & solid cardstock
Stamps: Technique Tuesday's Wild Vines (still a special favorite!) & Stampendous Circle Talk Birthday
Ink: Tsukineko's VersaColors: Lavendar, Lime, Canary, Baby Blue & Marigold & VersaFine Black
Embellishments: Darice Eyelets/Washers; Yellow Stickles; ribbon from stash
Tools: Crop-a-dile; SU's Horizontal Slot Punch