Sunday, January 4, 2015

Sew, Sometimes I Craft Without (#19) . . .

paper, so I wanted to share a darling 18-inch doll Half-Zip Pullover I made. This pattern is by Matilda's Closet, as is my Too Cute to be Ugly Sweater in my previous blog post. 

I was the lucky random winner of her contest, so there WILL be more sewing posts in the near future!  `)  For this pattern, I used fleece and rib knit on the cuffs.  Just LOVE how it turned out!  Her patterns are awesome, easy to follow and sold through Pixie Faire, where you'll find a plethora of fabulous doll patterns for many popular dolls of various types/sizes.

For all you doll sewists out there unfamiliar with Pixie Faire OR anyone who wants to learn to sew, doll clothes are an easy way to start, especially if they're larger dolls (such as 18").  A great way to begin is to go to the Pixie Faire website for several FREE easy patterns she offers, PLUS every Wednesday, PF posts four patterns to vote for your FAV and on Friday, the most-voted-for pattern is FREE!  Sooo, IF you want to learn to sew or already do but need great patterns either free or at a great price, what are you waiting for?  PF also gives you Pixie Perks w/each purchase and before long, you'll earn Pixie Rewards to use on future purchases @ their site -- can't beat it! ;)

Tuesday, December 30, 2014

Sew, Sometimes I Craft Without (#18) . . .


paper . . . and I've done that by sewing this18" doll Too Cute to be Ugly Sweater for May from a pattern by Matilda's Closet available for purchase @ Pixie Faire!  I used pale pink fleece for the sweater and brown fleece for my gingerbread girl.  Her dress and trim are made of felt and the tiny bow from narrow ribbon.

The pattern is easy and goes together quickly, once you've decided whether you want to use a snowman, Santa or gingerbread boy (or girl)!  The pattern includes all the pieces needed to make whichever you wish -- or all three/four. I may just have to make my 18" Gotz Henry (May's twin) a gingerbread boy sweater too?!

If you're able to finish one prior to midnight (MST) December 31st, you can enter yours here on Facebook for a chance to win a $25 Pixie Faire Gift Card -- who wouldn't want to win???!!!  ;)

Saturday, November 22, 2014

My Sheri Crafts Challenge #147: Oh Christmas Tree

For our final challenge before taking a holiday break, we're asking you to create a Christmas card which MUST include a tree!


In my never-ending attempts to create pretty, but simple-to-mail cards for the holiday that are Post Office friendly, I created a card for this challenge! You see, most of my cards make my husband fret and worry that they'll never arrive or instead arrive in a plastic bag containing torn shreds of a formerly lovingly hand-made, signed and addressed personal card -- because that's happened once or twice. One dear friend saved his lovingly handmade birthday card and brought it from several states away to share w/us on a trip to AZ -- all contained in a plastic bag after being painstakingly put back together as best his wife could so that they could even begin to tell what it had possibly once actually looked like -- LOL!!!

Sooo, today's clean and simple card is one of those basically flat, unobstructed and easy-to-mail cards that my Hubby prefers and will likely go to one of our children.  I used Rubber Stampede's
"Evergreen" from 2001 stamped in Papertrey Ink's Ripe Avacado.  After first coloring just the trunk with a Tombow Mocha marker, I used a stamp positioner to stamp it onto my oval die cut. Then I inked it up in green and stamped again, following that with gold Stickles.  A piece of ribbon from Target's $1 bin ties through my Spellbinders' Grommet Tag, which I stamped with Papertrey Ink's Painted Poinsettias stamp set.

Sooo, create your very own simple or not-so-simple Christmas tree card and join in @ My Sheri Crafts Challenge!  ;)

Saturday, November 8, 2014

My Sheri Crafts #146: It's Turkey Time


For today's new challenge, we're simply asking you to include a turkey.  I created my little turkey basically following directions I found here.
Using Spellbinders' Classic Inverted Circles, Large and Small, I die cut my felt 'feathers' in orange, green, brown & yellow felt, along with a circle in brown.  I layered them onto a cardboard circle and added a second cardboard circle 'sandwich ' using foam tape to attach my pipe cleaner legs (after coloring the white pipe cleaner brown).

Two pompoms in beige/brown were used for the head, yellow felt for the beak, red felt for the wattle and wiggly eyes complete his face and finish off this simple Thanksgiving Day decoration.  I think they'd be perfect for table place settings!

Looking forward to seeing your "Turkey Time" projects @ My Sheri Crafts soon!!!

Monday, October 27, 2014

Papertrey Ink: Painted Poinsettias in Neutral Shades

Just playing around today with my new PTI Painted Poinsettias and inks I recently purchased.  Wanted to take Nichole Heady's suggestion in the set's included 'tips' to try unconventional colors. Always a few on my list I know will appreciate non-traditional shades more than reds/greens.

I had neutral colors in mind, but added a hint of soft pink to my flower by embossing the stamp's petal layer in Desert Tapestry EP.  LOVE how it turned out!

From there I first stamped my sentiment in PTI's Classic Kraft ink, then VersaMark ink, offsetting it just a bit so when I heat embossed the Kraft would still show.  Like the effect that technique gave and how it ties in with my petals. My leaves were cut from PTI's Fine Linen CS and then the 'shading' inked in VersaMark and heat set. Next, the veins were stamped in Classic Kraft.

Finishing it off are a few Hero Arts sequins I've had forever (found when adding shelving in my craft closet) and a baker's twine bow from The Twinery.

I'm entering my card @ Christmas Card Challenges for Challenge #48 -- Anything Goes.

Saturday, October 25, 2014

Papertrey October Blog Hop Challenge

After a much too long hiatus from PTI's Blog Hop, I'm jumping back into the fun today with Painted Poinsettias paired with Holiday Double Cuts dies. Nichole had me @ poinsettia, but  when I saw these fabulous Double Cuts, I knew I had to place a much overdue order.  I seriously needed ink pads and it's pure bliss being surrounded by stacks of luscious colors today!

I finally settled on the 2nd color recipe of Pure Poppy, Raspberry Fizz, Hawaiian Shores and New Leaf.  After much deliberation, I actually worked in Hawaiian Shores in two areas -- can you tell what they are?

The leaf veins are pretty obvious, but my flowers' veins not so much!  To create the leaves without adding a non-palette color, I die cut the leaves from Vintage Cream CS, inked the whole leaf stamp in New Leaf, stamped off once, then huffed and stamped my BG.  Next I stamped just the vein using Hawaiian Shores -- I rather like them this way.

Gold or silver for the holidays is always nice, so I used Danielle Flanders' gold-dipped leaves from a recent MIM, gold on my flower center and gold paper for backing 'Merry'.  A sprinkle of red sequins finishes this holiday card.

It was an early-to-rise day @ our house, so not sure I can make it through the whole hop today, but I will soon, as I'm anxious to drink in all the inspiration I know awaits there!  ;)

My Sheri Crafts Challenge #145: Black Magic

Our newest challenge:  'Black Magic' requires we create a Halloween project -- simple & timely, huh?!!!  ;)

For my entry, I chose an altered book cover, as I wanted to do something other than a card.  Luckily, I stumbled upon Lindsey's Altered Halloween Books here and followed her directions -- sooo fun!!!

I also luckily found my RIP metal piece at the local 99-cent store, meant to be a necklace originally.  I removed the plastic chain and hot glued my grave marker down to the book cover.  My letters were some from many years ago in a pack of unfinished chipboard pieces, so I added those at top & bottom for my 'title' and two decorative pieces from cut from Spellbinders' Twisted Metal Tags and Accents to add to each side of my grave marker.

Once my Mod Podge had dried, I painted on Adirondack Pitch Black Acrylic Paint and once that dried used Viva Decor's Inka Gold to run over my pieces. The red eyes were part of the piece when purchased, so I simply scraped the paper towel away and left them there in all their gory 'glory' -- Hee!

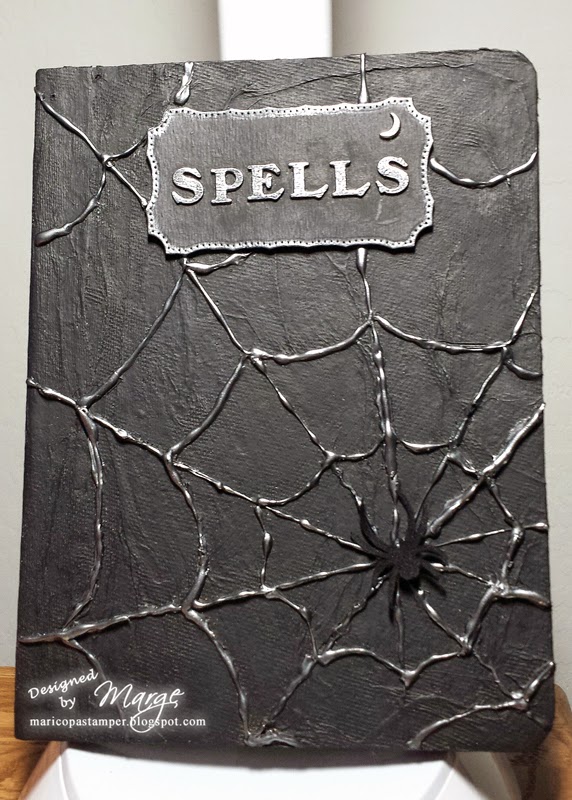
My second book started out as an inexpensive journal with lightweight cardboard covers. I simply covered it first in a layer of paper towel and then painted & scrunched it up a bit. When dry, I added my spider web using hot glue, along with more letters mounted onto a Spellbinders' Resplendent Rectangles die. For this one, I kept it simple by adding Inka Gold in Graphite over the web, lettering and label edge.  A felt spider and a small silver moon finish it off.

Hope you'll create a Halloween project and join us this week for my spooky good fun @ My Sheri Crafts! ;)

Saturday, October 11, 2014

My Sheri Crafts Challenge #144: Autumn Abundance

My turn to choose the challenge at My Sheri Crafts this time around.  Now that it's finally fall (almost here in AZ too), I chose to focus on autumn, asking you to use Fall items seen in 'abundance':  leaves, acorns, fruits, pumpkins, gourds, etc.


I chose a bright striped fall BG paper from Bo Bunny's Apple Cider collection and ended up using some felt from my stash to cut my leaves and acorns using Spellbinders' dies.  Since I couldn't really emboss the felt very well I used a brown Sharpie to enhance the leaves veins.  My gem sentiment is one more from my stash that I grabbed @ Michaels years ago for a dime!  Gonna miss those great little word stickers when they're all gone -- sigh!  I backed it with a piece of burlap ribbon with gold thread and fringed the edges. Just a simple fall card that can be used for many occasions.

Hope you'll join us for this simple challenge @ My Sheri Crafts!

Wednesday, October 8, 2014

Sew, Sometimes I Craft Without (#17) . . .

. . . paper, using fabric instead.  So today I'm featuring some awesome dance/swim fabrics that I whipped up into the most adorable 'retro' swimsuits using Lee & Pearl's fabulous pattern sold here for instant download @ only $3.99!  Lee & Pearl have several great patterns and if you sign up for their free newsletter, you'll receive a free pattern.  Every so often in subsequent newsletters you'll get a free 'tweak' to one of their patterns that adds more unique ways to utilize a  purchased pattern -- really creative and FUN!
EDITED to add: Just read on Lee & Pearl's FB post that they'll be giving a different FREE pattern for newsletter sign-up beginning in Jan., 2015, which means: IF you sign up before then you'll receive Pattern #1051: Ballet Basics for 18" Dolls FREE before it makes way for the new pattern, and becomes part of their store inventory, BUT if you sign up before Jan., 2015, you'll receive the Ballet Basics pattern immediately PLUS their new free pattern in January -- how sweet is that?!  Hurry & sign up!

I just LOVE these suits and a retro high-waisted bikini is included in this same pattern which I still need to make. Either can be sewn with or without the ruffled back, of course, giving you lots of fun options for a small price! Know what I want to do with the bikini, but just been having TOO much pattern fun to get to it -- yet!

After I'd completed the yellow suit I actually found a wonderful fold-over elastic @ Hobby Lobby which is 5/8" on spools in their "Trims" aisle and is often half-price, a great deal @ $1.50 for 4 yards! In fact, I see it is 1/2 price today online, so may be also in store as it was when I purchased mine.

I found white with smaller dots (in both black & grey), which I think will look more in-scale for these 18" dolls.  They even have a chevron FOE and LOTS of solid colors. That's where I found the silver FOE on the blue suit and LOVE that it coordinates so well with the palm trees in the fabric and compliments that bright silver ruffle!

On a shopping trip to our SAS Tempe fabric outlet I found not only the blue fabric, but the black/white/grey plaid used as a ruffle on the yellow suit as well.  I've since come up with several ideas for utilizing it, including as a main swimsuit fabric and as a fold-over top on my yoga pants seen in this post!  Since I had to buy quite a large piece, but only for $5.99/yd., I'm thrilled I've found several ways to use it.  Also have quite a lot of the blue palm tree fabric, but it'll be more of a challenge to use up, I'm sure -- just couldn't resist it for our blue-eyed Kirsten doll!

Now I'm thinking I'll cut the front just a bit lower and then make Polynesian pareu's, large t'shirts, swim cover-ups, skirts for my non-ruffled suits!


Monday, October 6, 2014

Sew, Sometimes I Craft Without (#16) . . .

. . . paper and today I have a free, quick and ADORABLE little knit dress to show you that I downloaded from Jen @ Wren*Feathers' site! Stop by and check it out, plus her many fabulous patterns for sale @ her Etsy shop:  www.etsy.com/shop/jenwrenne.

I'd picked up this sweet little Rayon print knit for $1 @ Joann's a while back. It had been very poorly/crookedly cut, so it was only a small piece, but when I saw Jen's adorable dress, I just had to sew it!

It was sooo quick, easy and I was amazed that it fit  Molly, my older American Girl!  I simply cut the pattern exactly as drawn and used a 1/4" seam, but the rayon is so soft and silky and has 5% stretch, so that may be why?  Regardless, I just LOVE how cute it turned out.

I used a 2.0 double needle and added red stitching @ the neckline, sleeves and hem. I may have to make a red sweater or jacket to throw over this little gem for fall?!

LinkWithin

Blog Widget by LinkWithin