Major technical difficulties here today, but haven't missed a JustRite Friday Challenge in forever, so didn't want to start this time!
Details to follow; going to see IF I can get this posted -- sorry!!! Be back soon?!!!
Hmmm, looks like InLinkz is on a different time than me, as it has already closed -- oh well, I'll give myself "E" for effort -- kinda how my whole day went!!! ;0(
My card uses Authentique "Blissful" 6x6 paper pad, Samantha Walker's Botanical Swirls and Accents for my main focal image and her coordinating JustRite stamp set by the same name, as well as Spellbinders' Bitty Blossoms for my three flowers!!!
OK -- I'm going to go 'cry in my beer' since I missed getting this posted -- oh, wait, I hate beer and never drink it -- guess I'll just cry into my tissue instead -- LOL!!!
Maricopa is a community just south of Phoenix, AZ partially surrounded by raw desert and American Indian tribal land where wild horses still roam free and John Wayne worked his sprawling Red River Ranch and Cattle Company in bygone days. My husband photographed this horse sculpture near our subdivision’s entrance.
Wednesday, October 31, 2012
Saturday, October 27, 2012
My Sheri Crafts #97: Fall Colors
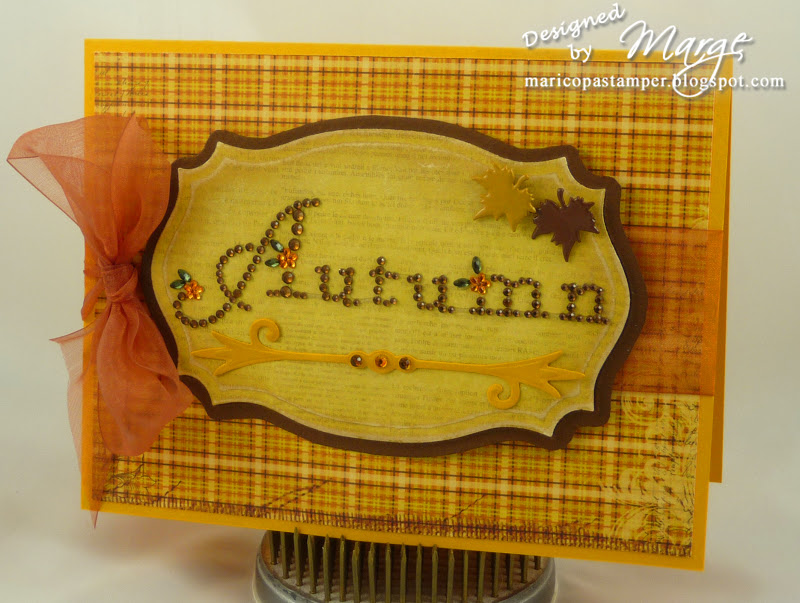
For this week's challenge at My Sheri Crafts we'd like for you to create a card/project using Fall colors and three embellishments -- easy-peasy!!! I chose a plaid paper from Bo Bunny's 6x6 Apple Cider collection for my BG and adhered to an orange CS base. I then decided on a straw-colored page of text from the same pad for my gem sentiment, a sweet little bargain earlier this year from Michaels outdoor clearance bin, which I recall was $.09! A sheer bow is tied around the center.
Next, I die-cut the text paper with Spellbinders' Labels Twenty-five, embossed/sanded/finished it off with a bit of Antique Linen distress inking along the edges. I embossed the same die once again on heavy-weight Bazzill brown CS, cutting around the outermost edge for a textural layer behind my straw piece. My Autumn gem sentiment was then attached, after coloring the flower petals orange (they were yellow), to bring out the orange in my plaid paper. After adding two metal leaves from my stash to the top corner, I cut an accent die from Spellbinders' Twisted Metal Tags and Accents for additional interest, embossed/distressed it and added three gems to the center, attaching it below the sentiment.
Now it's your turn to visit all our Design Team's inspiration and then create and post your own creation @ My Sheri Crafts -- can't wait to see them all!
Tuesday, October 16, 2012
JustRite Friday Challenge #083 - "Three's Company"
Lots going on around my house and with family lately, so I've struggled to find quality crafting time and to concentrate when I do! I LOVE the challenge at JustRite this week: Three's Company -- use at least 3 coordinating patterns in your project. Judging from the numerous entries, I'm NOT alone. HOORAY -- always a fun challenge and so very inspiring!
Echo Park's This & That paper pad was in my mind from the beginning -- especially this beautiful floral paper that particularly grabbed my attention. I paired it with another paper from the same pad for die cutting my Spellbinders' Labels Eight, as well as the green dots & diagonal stripes from their Soda Fountain collection. I started with the sentiment frame from JustRite's Grand Sentiments clear set (LOVE it!), which I used exclusively today. I cut the center out with a Labels Four die and used diagonal stripes paper to stamp my sentiment. The flourish was added to another Labels Eight partial cut for visual interest below my sentiment frame.
Finishing it all off are items pulled from my stash to make the stick pin, layered flower and bow, as well as a few gems to embellish my frame.
Echo Park's This & That paper pad was in my mind from the beginning -- especially this beautiful floral paper that particularly grabbed my attention. I paired it with another paper from the same pad for die cutting my Spellbinders' Labels Eight, as well as the green dots & diagonal stripes from their Soda Fountain collection. I started with the sentiment frame from JustRite's Grand Sentiments clear set (LOVE it!), which I used exclusively today. I cut the center out with a Labels Four die and used diagonal stripes paper to stamp my sentiment. The flourish was added to another Labels Eight partial cut for visual interest below my sentiment frame.
Saturday, October 13, 2012
My Sheri Crafts #096: Halloween
Our My Sheri Crafts' Challenge this week is: Halloween -- create anything your spooky little heart desires for this holiday! Several years ago I created a double-sided Halloween decor piece (here) that I was inspired to do by a piece of 6x6 Making Memories' paper. It was sooo fun that I've fashioned another using Spellbinders' Labels Twenty-three, Martha Stewart's latest Halloween mat stack and some Hobby Lobby bottle caps. For these decor pieces, the sky's the limit with the plethora of Halloween papers, dies and embellishments available. It can be really unique and FUN -- make it 'sweet' for the younger ones or 'spooky' for the older crowd -- even personalize it, if you'd like!
I chose two different 'bird' papers to cut with my Grand Labels Twenty-three die from the MS stack and a piece of Tim Holtz grunge paper to sandwich inside, as I wanted to be sure the piece had the strength to hold up well when hanging and to support the bottle caps! I cut/embossed, sanded and distressed my paper with Black Soot ink and used a combination of Scor-Tape and Glue Dots to secure my 'sandwiched' pieces. Next I punched holes in the top/bottom and added 1/8" black eyelets, all with my beloved Crop-a-dile. From my stash I then attached different framed spooky mirrors @ center front & back.
To build my double-sided 'boo', I first ran 3 bottle caps through my Grand Calibur using the cutting plate and adapter plate, which works like a 'charm' to flatten them! Again using my Crop-a-Dile, I easily punched 1/8" holes in the bottle caps. Circles die cut/emossed/sanded from the reverse side of one 'bird' scrap piece using Spellbinders' Standard Circles Large were then glue-dotted to the caps and glittered letters spelling 'boo' were added. "Eek" would work also! Tim Holtz jump rings were used to attach the bottle caps @ the bottom so they dangle/move and TH ball chain completes the hanger @ the top.
I hope you'll join us @ My Sheri Crafts this week by creating/posting your own Halloween concoction(s) to share with us!
I chose two different 'bird' papers to cut with my Grand Labels Twenty-three die from the MS stack and a piece of Tim Holtz grunge paper to sandwich inside, as I wanted to be sure the piece had the strength to hold up well when hanging and to support the bottle caps! I cut/embossed, sanded and distressed my paper with Black Soot ink and used a combination of Scor-Tape and Glue Dots to secure my 'sandwiched' pieces. Next I punched holes in the top/bottom and added 1/8" black eyelets, all with my beloved Crop-a-dile. From my stash I then attached different framed spooky mirrors @ center front & back.
To build my double-sided 'boo', I first ran 3 bottle caps through my Grand Calibur using the cutting plate and adapter plate, which works like a 'charm' to flatten them! Again using my Crop-a-Dile, I easily punched 1/8" holes in the bottle caps. Circles die cut/emossed/sanded from the reverse side of one 'bird' scrap piece using Spellbinders' Standard Circles Large were then glue-dotted to the caps and glittered letters spelling 'boo' were added. "Eek" would work also! Tim Holtz jump rings were used to attach the bottle caps @ the bottom so they dangle/move and TH ball chain completes the hanger @ the top.I hope you'll join us @ My Sheri Crafts this week by creating/posting your own Halloween concoction(s) to share with us!
Friday, October 5, 2012
Masculine Birthday Card: Motorcycle
This detailed motorcycle cut file perfectly fit my needs for a young man's birthday card and cut sooo beautifully on my Boss Kut Gazelle! The amazing file is free and available in several formats for every available digital cutter on Bird's blog here. There are tons of free cutter files -- you won't believe all you'll find there, so go check it out!!!
Be forewarned that this file has many tiny pieces, but I think it was well worth the effort to put it all together and I hope the young man we're sending it to enjoys it!
I kept it very simple by merely attaching my motorcycle to a fabulous piece of wood grain paper from My Mind's Eye's Howdy Doody 6x6 paper pad and layering with orange and black. My Papertrey Ink sentiment (from Inside and Out: Birthday) is stamped onto a Spellbinders Labels Seven die cut and metal brads were added to accent the card corners. No frills, ribbons or lace needed today!!!
Wednesday, October 3, 2012
JustRite Friday Challenge #082: Be Supportive
For the current JustRite Friday Challenge we are to 'be supportive'. I chose to use this gorgeous Bo Bunny "Gabrielle Collection" paper featuring an angel. When I chose it I was planning to make a sympathy card, but my focus changed. This has has been an extremely emotional and hectic week for us, as
our DD and her loving BF announced their engagement -- to say I'm thrilled, so proud and so excited is putting it mildly!!!
Thus, I kept this card pretty simple as my week has flown by while anticipating the announcement and having difficulty concentrating on much else! My supportive sentiment is from the FABULOUS new JustRite Amazing Paper Grace "Just the Right Words' clear stamp set -- LOVE this and have wanted a set like this for a long time now! As you'll see if you check out this set, there are so many ways to make it 'your own' -- LOVE that!
My sentiment is stamped onto another new JustRite FAV of mine, their Antique Labels One Dies -- just a huge fan of this shape! I used some Smooch Spritz Pralines and Cream mist on my white doily to antique it, as well as on my sentiment while it was still in the die. Next I hand died my Hug Snug seam binding with Copics, tied my bow, added a Tim Holtz button and a small beaded angel stick pin and pearls to complete my card.
Hope you are able to join us next week @ JustRite's Friday Challenge and that my life slows down just enough that I can get my project done earlier, but I'm not holding my breath on that one -- LOL! It's a wonderful thing though to be 'happily busy'!!! ;~)
Thus, I kept this card pretty simple as my week has flown by while anticipating the announcement and having difficulty concentrating on much else! My supportive sentiment is from the FABULOUS new JustRite Amazing Paper Grace "Just the Right Words' clear stamp set -- LOVE this and have wanted a set like this for a long time now! As you'll see if you check out this set, there are so many ways to make it 'your own' -- LOVE that!
My sentiment is stamped onto another new JustRite FAV of mine, their Antique Labels One Dies -- just a huge fan of this shape! I used some Smooch Spritz Pralines and Cream mist on my white doily to antique it, as well as on my sentiment while it was still in the die. Next I hand died my Hug Snug seam binding with Copics, tied my bow, added a Tim Holtz button and a small beaded angel stick pin and pearls to complete my card.
Hope you are able to join us next week @ JustRite's Friday Challenge and that my life slows down just enough that I can get my project done earlier, but I'm not holding my breath on that one -- LOL! It's a wonderful thing though to be 'happily busy'!!! ;~)
Saturday, September 29, 2012
My Sheri Crafts Challenge #95: It's Picking Time!
Time for another My Sheri Crafts Challenge -- it's 'picking time', so we're asking you to include a pumpkin or apple on your project. I took 'artistic license' and went with my 'pumpkin' in the form of a jack-o-lantern face on my burlap silverware (or plastic ware) holders -- Hee!!!

My first glimpse of the original idea for these with a gorgeous flower was here on Pinterest -- of course! Since I'd recently purchased a bunch of burlap in several colors (can you say 'new obsession'?), I just had to modify these to work for either a dinner table or an outdoor get-together with plastic ware, especially if you're doing something around Halloween for a child's or even adult's party. Thanks, sweet friend, for that clever idea -- add a little fun to a party and keep it simple when it comes to clean-up!
Then, inspiration struck as I was writing this post and it was back to the 'drawing board', as I had the idea for the apple -- great for back-to-school with any number of items tucked inside other than silverware -- pencils, pens, ruler, bookmark, large candy bar -- I'm sure many Moms, most children and certainly all teachers could think of dozens of ideas?! Might be a cute/inexpensive idea for the upcoming fall/Christmas/winter holidays!!! NOW my head is spinning again and I don't even have any school-age children!!!
DIRECTIONS:
Cut burlap 14 1/2" long by 4" wide
Fold over 1 1/2" and zigzag stitch about 1/2" from raw edge (forgot
this on cream holder, but no big deal)
Fold bottom up 5 1/4" from last fold
Stamp with paint (I slipped bottom of holder under my craft mat at fold and stamped, then just wiped paint off mat where it bled through fabric -- easy/peasy!)
Once paint is dry, zigzag stitch up right side from bottom edge, in about 3/8 to 1/2", across top and down left side
Pull long threads from top/both sides for fringe
NOTE: These are not washable, spot clean only, but burlap is sooo inexpensive and once you have the measurements, which I've included here, they are sooo quick/easy to whip up!
To create my orange/tan holder, I cut 1 piece from each color and layered tan atop orange and made per above directions. For my face, I merely cut pieces of craft foam for stamps and attached to acrylic block with 1/2" wide strips of Scor-Tape, squirted on a dollop of black craft paint, smoothed it out a bit with a sponge brush and stamped, beginning with the mouth, then nose & eyes for easy lining up -- simple/easy/non-perfectionistic!
Apple was stamped using . . . an apple, of course! Found a Pink Lady that had a tiny spoiled spot, so perfect for my needs! Cut in half, spread my red paint with a sponge brush, stamped (had to do a little touch-up as my cut wasn't perfectly 'flat'), cut a Spellbinders's leaf from craft foam, and took the actual stem, held with a tweezers, dipped in brown paint, and added a bit of touch-up to the stem. If I can do it, you CAN TOO!
Hope you enjoy making these and hope you'll come up with an idea for a project for My Sheri Crafts to share with us too -- look forward to seeing your crafty pumpkin/apple idea -- hmmm, now another idea just hit me -- time to cut more burlap!!! ;-)

My first glimpse of the original idea for these with a gorgeous flower was here on Pinterest -- of course! Since I'd recently purchased a bunch of burlap in several colors (can you say 'new obsession'?), I just had to modify these to work for either a dinner table or an outdoor get-together with plastic ware, especially if you're doing something around Halloween for a child's or even adult's party. Thanks, sweet friend, for that clever idea -- add a little fun to a party and keep it simple when it comes to clean-up!
Then, inspiration struck as I was writing this post and it was back to the 'drawing board', as I had the idea for the apple -- great for back-to-school with any number of items tucked inside other than silverware -- pencils, pens, ruler, bookmark, large candy bar -- I'm sure many Moms, most children and certainly all teachers could think of dozens of ideas?! Might be a cute/inexpensive idea for the upcoming fall/Christmas/winter holidays!!! NOW my head is spinning again and I don't even have any school-age children!!!
DIRECTIONS:
Cut burlap 14 1/2" long by 4" wide
Fold over 1 1/2" and zigzag stitch about 1/2" from raw edge (forgot
this on cream holder, but no big deal)
Fold bottom up 5 1/4" from last fold
Stamp with paint (I slipped bottom of holder under my craft mat at fold and stamped, then just wiped paint off mat where it bled through fabric -- easy/peasy!)
Once paint is dry, zigzag stitch up right side from bottom edge, in about 3/8 to 1/2", across top and down left side
Pull long threads from top/both sides for fringe
NOTE: These are not washable, spot clean only, but burlap is sooo inexpensive and once you have the measurements, which I've included here, they are sooo quick/easy to whip up!
To create my orange/tan holder, I cut 1 piece from each color and layered tan atop orange and made per above directions. For my face, I merely cut pieces of craft foam for stamps and attached to acrylic block with 1/2" wide strips of Scor-Tape, squirted on a dollop of black craft paint, smoothed it out a bit with a sponge brush and stamped, beginning with the mouth, then nose & eyes for easy lining up -- simple/easy/non-perfectionistic!
Apple was stamped using . . . an apple, of course! Found a Pink Lady that had a tiny spoiled spot, so perfect for my needs! Cut in half, spread my red paint with a sponge brush, stamped (had to do a little touch-up as my cut wasn't perfectly 'flat'), cut a Spellbinders's leaf from craft foam, and took the actual stem, held with a tweezers, dipped in brown paint, and added a bit of touch-up to the stem. If I can do it, you CAN TOO!
Hope you enjoy making these and hope you'll come up with an idea for a project for My Sheri Crafts to share with us too -- look forward to seeing your crafty pumpkin/apple idea -- hmmm, now another idea just hit me -- time to cut more burlap!!! ;-)
Monday, September 24, 2012
Sew, Sometimes I Craft Without . . .
. . . PAPER -- shocking, huh?!!! LOL!
I got a new sewing machine and decided that to learn all it's fabulous functions, I'd sew AG Doll clothes. I'm safekeeping my grown DD's dolls until she has room to take them -- IF I can bear to give them up then, that is? Hee!!! These are truly fabulous dolls IF you have a special 8-11 year old little lady in your life -- or you never had a special doll in your childhood -- just sayin'!!! ;-)
I found THIS ADORABLE free pattern created by Amanda online. NOTE: there are actually TONS of free doll patterns out there if you just Google AG dolls! When I saw this darling fabric at Joanns, I HAD to grab it!
Amanda stresses in her post that the dress is very snug and how to sew it to fit your doll. Not sure if there's much difference in the newer AG dolls and our original Pleasant Company dolls from the early 90's, but when I got my dress nearly done & tried it on Kirsten, there was no way it would go over her arms/shoulders. Knowing I wanted mine to be shorter in length anyway, I decided to cut 1 1/4" from the top of the skirt, which gave me more width for my back seam. I then stitched the bodice/skirt together and stitched the back skirt seam just 4 1/2" up from the hem edge, leaving a 5 1/2" opening to the neckline. This allowed me to sew a 7" centered zipper into the back and it's PERFECT! I still did a 1/2" hem, doubling my fabric over.
I actually used an old zipper I'd removed/replaced in a skirt I repaired. It was missing it's 'pull tab', so I came up with my own by using a paper crafty wire safety pin and some beads -- not sure I'm crazy about it, but for now it works, which is all that matters and Kirsten doesn't mind! I have a brand-new 7" zipper from WalMart and think it was only $1.22, so it's not expensive to add one to a doll dress, really.
Because this print had the fun red hearts in it and wanting to practice with my machine's special stitches, I used plain white fabric and stitched the little hearts in red thread on the sleeve bands -- too fun!!! Now I'm thinking Kirsten needs a little red shrinky-dinky heart necklace -- the fun never ends when you love to craft -- LOL!
Do go check out Amanda's post and see the DARLING print she made her dress from & leave her some love!!! ;-)
I got a new sewing machine and decided that to learn all it's fabulous functions, I'd sew AG Doll clothes. I'm safekeeping my grown DD's dolls until she has room to take them -- IF I can bear to give them up then, that is? Hee!!! These are truly fabulous dolls IF you have a special 8-11 year old little lady in your life -- or you never had a special doll in your childhood -- just sayin'!!! ;-)
I found THIS ADORABLE free pattern created by Amanda online. NOTE: there are actually TONS of free doll patterns out there if you just Google AG dolls! When I saw this darling fabric at Joanns, I HAD to grab it!
Amanda stresses in her post that the dress is very snug and how to sew it to fit your doll. Not sure if there's much difference in the newer AG dolls and our original Pleasant Company dolls from the early 90's, but when I got my dress nearly done & tried it on Kirsten, there was no way it would go over her arms/shoulders. Knowing I wanted mine to be shorter in length anyway, I decided to cut 1 1/4" from the top of the skirt, which gave me more width for my back seam. I then stitched the bodice/skirt together and stitched the back skirt seam just 4 1/2" up from the hem edge, leaving a 5 1/2" opening to the neckline. This allowed me to sew a 7" centered zipper into the back and it's PERFECT! I still did a 1/2" hem, doubling my fabric over.
![]() |
| Back View |
Because this print had the fun red hearts in it and wanting to practice with my machine's special stitches, I used plain white fabric and stitched the little hearts in red thread on the sleeve bands -- too fun!!! Now I'm thinking Kirsten needs a little red shrinky-dinky heart necklace -- the fun never ends when you love to craft -- LOL!
Do go check out Amanda's post and see the DARLING print she made her dress from & leave her some love!!! ;-)
Tuesday, September 18, 2012
JustRite Friday Challenge #081: Charm Me

I began by stamping the round dotted frame from JustRite's Charmed cling set and my bee onto shrink plastic, die cutting with JustRite's Custom Charm Dies, then shrinking with my heat gun. LOVE how cute it turned out and the bonus with these wonderful charm dies is you don't have to remember to punch a hole before shrinking -- LOL! Spellbinders So Trendy M-Bossabilities folder made me think 'honeycomb', so I embossed and then sanded Core'dinations paper for the bottom section. Also from Botanical Butterflies, this fabulous sentiment is stamped and die cut with JustRite's Custom Antique Labels One Dies, a new FAV now! For my flowers and leaves I used Spellbinders' Bitty Blossoms dies and die cut my leaves from stiffened burlap and edged with a Copic Marker.
Thanks for stopping by to visit today and please leave me a comment to let me know your thoughts on my card!
Saturday, September 15, 2012
My Sheri Crafts Challenge #094: My Family
The challenge this week @ My Sheri Crafts is to create a family-themed project or card for a family member. My original idea had to be scrapped as my die cutting machine is 'ill' and out for repairs! :`( Sooo glad it's still under warranty and should soon be back and cutting like 'new' again!
Since my SIL just had major surgery and is home recovering, a Get Well Soon card for her fit the bill perfectly.
I began with Heartfelt Creations China Fragments' Tea Cup stamp set that coordinates with Spellbinders' Nested Tea Cup dies I won last fall. LOVE both these stamps and dies, which were cut from white CS, colored with Copics to coordinate with Authentique's Delightful floral PP. The cup is aged with Black Soot distress ink and popped onto a doily spritzed with Smooch Spritz Pralines & Cream. Want2Scrap's clear rhinestone 'steam' swirls from the cup's rim. A Lace Doily Accents border edges the left side. My sentiment from Little Paper Shop is stamped onto a JustRite Custom Antique Labels One Die that's accented on each end with halves of a decorative die from Lacy Doily Motifs, then laced with Martha Stewart ribbon tied into a bow to finish this card!
Hope it brightens my Sister-in-Law's day when she receives it and that you'll be inspired to create a family-themed project to post @ My Sheri Crafts now!
Since my SIL just had major surgery and is home recovering, a Get Well Soon card for her fit the bill perfectly.
I began with Heartfelt Creations China Fragments' Tea Cup stamp set that coordinates with Spellbinders' Nested Tea Cup dies I won last fall. LOVE both these stamps and dies, which were cut from white CS, colored with Copics to coordinate with Authentique's Delightful floral PP. The cup is aged with Black Soot distress ink and popped onto a doily spritzed with Smooch Spritz Pralines & Cream. Want2Scrap's clear rhinestone 'steam' swirls from the cup's rim. A Lace Doily Accents border edges the left side. My sentiment from Little Paper Shop is stamped onto a JustRite Custom Antique Labels One Die that's accented on each end with halves of a decorative die from Lacy Doily Motifs, then laced with Martha Stewart ribbon tied into a bow to finish this card!
Hope it brightens my Sister-in-Law's day when she receives it and that you'll be inspired to create a family-themed project to post @ My Sheri Crafts now!
Subscribe to:
Posts (Atom)