Our newest challenge: 'Black Magic' requires we create a Halloween project -- simple & timely, huh?!!! ;)
For my entry, I chose an altered book cover, as I wanted to do something other than a card. Luckily, I stumbled upon Lindsey's Altered Halloween Books here and followed her directions -- sooo fun!!!
I also luckily found my RIP metal piece at the local 99-cent store, meant to be a necklace originally. I removed the plastic chain and hot glued my grave marker down to the book cover. My letters were some from many years ago in a pack of unfinished chipboard pieces, so I added those at top & bottom for my 'title' and two decorative pieces from cut from Spellbinders' Twisted Metal Tags and Accents to add to each side of my grave marker.
Once my Mod Podge had dried, I painted on Adirondack Pitch Black Acrylic Paint and once that dried used Viva Decor's Inka Gold to run over my pieces. The red eyes were part of the piece when purchased, so I simply scraped the paper towel away and left them there in all their gory 'glory' -- Hee!
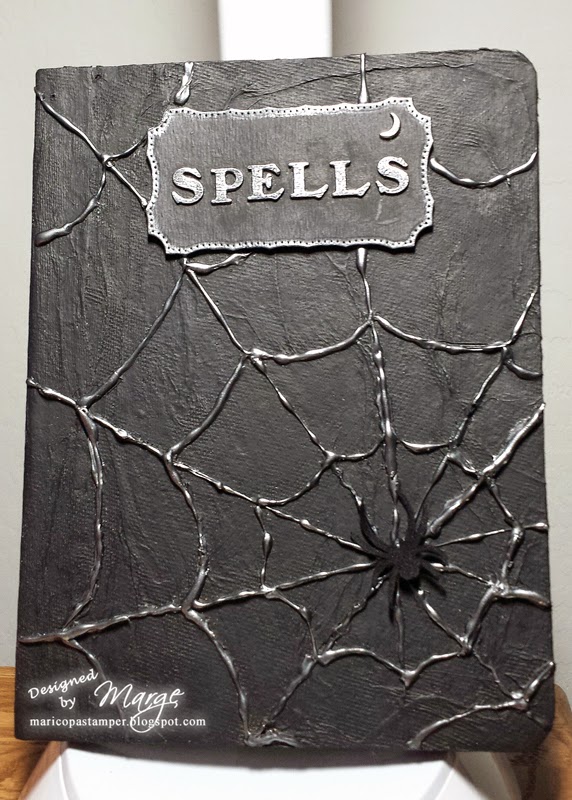
My second book started out as an inexpensive journal with lightweight cardboard covers. I simply covered it first in a layer of paper towel and then painted & scrunched it up a bit. When dry, I added my spider web using hot glue, along with more letters mounted onto a Spellbinders' Resplendent Rectangles die. For this one, I kept it simple by adding Inka Gold in Graphite over the web, lettering and label edge. A felt spider and a small silver moon finish it off.
Hope you'll create a Halloween project and join us this week for my spooky good fun @ My Sheri Crafts! ;)
Maricopa is a community just south of Phoenix, AZ partially surrounded by raw desert and American Indian tribal land where wild horses still roam free and John Wayne worked his sprawling Red River Ranch and Cattle Company in bygone days. My husband photographed this horse sculpture near our subdivision’s entrance.
Showing posts with label Halloween. Show all posts
Saturday, October 25, 2014
Saturday, October 13, 2012
My Sheri Crafts #096: Halloween
Our My Sheri Crafts' Challenge this week is: Halloween -- create anything your spooky little heart desires for this holiday! Several years ago I created a double-sided Halloween decor piece (here) that I was inspired to do by a piece of 6x6 Making Memories' paper. It was sooo fun that I've fashioned another using Spellbinders' Labels Twenty-three, Martha Stewart's latest Halloween mat stack and some Hobby Lobby bottle caps. For these decor pieces, the sky's the limit with the plethora of Halloween papers, dies and embellishments available. It can be really unique and FUN -- make it 'sweet' for the younger ones or 'spooky' for the older crowd -- even personalize it, if you'd like!
I chose two different 'bird' papers to cut with my Grand Labels Twenty-three die from the MS stack and a piece of Tim Holtz grunge paper to sandwich inside, as I wanted to be sure the piece had the strength to hold up well when hanging and to support the bottle caps! I cut/embossed, sanded and distressed my paper with Black Soot ink and used a combination of Scor-Tape and Glue Dots to secure my 'sandwiched' pieces. Next I punched holes in the top/bottom and added 1/8" black eyelets, all with my beloved Crop-a-dile. From my stash I then attached different framed spooky mirrors @ center front & back. To build my double-sided 'boo', I first ran 3 bottle caps through my Grand Calibur using the cutting plate and adapter plate, which works like a 'charm' to flatten them! Again using my Crop-a-Dile, I easily punched 1/8" holes in the bottle caps. Circles die cut/emossed/sanded from the reverse side of one 'bird' scrap piece using Spellbinders' Standard Circles Large were then glue-dotted to the caps and glittered letters spelling 'boo' were added. "Eek" would work also! Tim Holtz jump rings were used to attach the bottle caps @ the bottom so they dangle/move and TH ball chain completes the hanger @ the top.
I hope you'll join us @ My Sheri Crafts this week by creating/posting your own Halloween concoction(s) to share with us!
Friday, February 24, 2012
Halloween Wine Charms
My dear friend, best known as 'Sassy', has retired & moved out of
state, so she demanded (uhhh, I mean 'sassily requested') I make these
Halloween Wine Charms for her. LOL! Nothing like a bit of Fall in Winter
(or AZ's Spring), huh? Another dear friend had a surprise going-away party for her, so I decided to get these made for her gift.
These are a combination of Spellbinders' dies and die cuts done with my fabulous new Boss Kut Gazelle machine. {I am such a lucky girl -- explanation here!!! ;~)} The shapes cut with my Gaz are the ghost, spider, pumpkin and bat. One advantage to cutting these with the Gaz is that you can make them a bit larger as they do shrink to about 1/3 of their original size.
I've added beads to these (and need to do the same with my own Christmas charms) to better help party participants recognize their wine glass and just because I love the splash of color, especially with so much black for these Halloween ones. Besides, I always set my glass down and then can't remember where I put it -- LOL -- not that I really party often. My drink of choice here in the desert is bottled water (sorry landfill!) -- I'm rarely seen without it. Since I'm most often at home crafting, it's safer to close the lid tight & have an unbreakable plastic bottle when I'm rushing around my craft room with my 'weapon of choice': sharp scissors, heat tool, etc. -- you crafty ladies understand, right?!
Hopefully, Sassy will think of me when she uses these little charms this Fall! Thanks for stopping by today and let me know if you like my little charmers -- they were really FUN to make!!!
Monday, October 31, 2011
Happy Halloween!!!
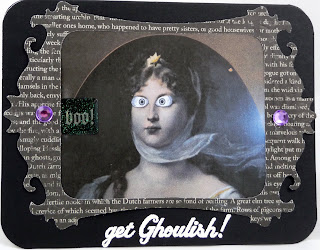
Happy Halloween to all my crafty friends!!! I'm posting a couple of my final Halloween cards for this year that were sooo easy, as I just fell in love with this DCWV Ghosts & Goblins Matstack paper. In fact I used several of these patterns for my Halloween banner.
These two particular mats didn't need much else added to create these fun cards -- a Recollections' photograph on the front that morphs into a vampire (as seen on the photo on the orange card if you compare the two) and a bat for a fun ghoulish finish and Happy Halloween greeting inside! In retrospect, I wish I'd done a bit of distressing around the edges. I'll have to remember that next time!
Hope you all have a safe and spooky-fun holiday with family and friends!
Sunday, October 23, 2011
Halloween Fun at the Laboratory
Having created some "adult" Halloween decor fun here lately, I'm entering this both at PaperPlay Challenges (use black) and CCEE1142 (fall scene or fall-related) challenge.
Utilizing Spellbinders' Grand Large Labels, I cut various black & cream CS & book paper DP, and added the skull Flourish Sticker (Recollections). The matching flourish is my "shelf", attached with pop dots to hold my various ghoulish bottles & jars (Martha Stewart Epoxy Stickers), pop-dotting some for dimension also!
I created my Lab label with various JustRite Times New Roman alphas (25 & 50 pt.), adding some dripping blood/spots with a $1 stamp in Tim Holtz Fired Brick. For hanging, I used Tim Holtz Ball Chain, fed through black eyelets set into each corner.
Rather than also create a separate card, I'm simply attaching another cream CS Large Label die cut to the back onto which I stamped my "Happy Halloween 2011" sentiment and we've signed our names. Hope it brings a smile when it reaches its destination!
Dies Used: Spellbinders LF-168 Grand Large Labels
(#s 1, 3 & 4) and S4-168 Large Labels (#5)
Monday, October 17, 2011
JustRite Friday Challenge #060: Sketch
The challenge issued at JustRite this week is to use the given sketch. I chose to do a Halloween card, as I need to quickly get mine done for timely mailing -- where has the 1st half of October already disappeared to? YIKES!
I began with a Bazzill scalloped card, cutting the scallops off the sides and embossing the bottom edge with a veritically-striped embossing folder, distressing the edges and embossed area with black ink.You may have noticed I'm pretty smitten with Spellbinders' Labels Twenty-One, especially for masculine cards, and so it appears here on my post again today! I first cut using solid black CS, then trimmed that down, using just the center pieces for a narrow border behind my word paper's circular edges.
Next I added some ghoulish Recollections' stickers I picked up recently at Michaels with grown-up recipients in mind. Utilizing my Myriad Pro 50 pt. Uppercase font, I discovered it fits the border edge of my 3 1/4" Round Stamper. By carefully inking/stamping, as the letters don't fit snugly, it worked well for me to stamp "Beware!" above the curve of my Labels die cuts -- LOVE that and I'll use this trick again!
Finishing off my card, I flattened a bottle cap in my Spellbinders' Wizard, punched a 1" scrap of DP to glue inside, then topped it off with a Martha Stewart epoxy bottle sticker. I'm quite happy with how this ghoulish card turned out!
Saturday, October 15, 2011
My Sheri Crafts Challenge #71 - It's the Great Pumpkin!
At My Sheri Crafts the challenge is to create a project with a pumpkin on it -- Halloween related or not -- it's entirely up to you. How easy it that?! We'd LOVE to have you join us!
My glow-in-the-dark pumpkin decor piece was created using Spellbinders' Fleur de Lis Squares for the BG and featuring one of SB's Jack 'O Lantern dies as the focal point. I die cut the largest square from Kraft CS and distressed those lovely edges.
The next smaller square was cut from black CS and then for the fun part, I used 1/2" glow-in-the-dark tape to cut just the fancy edges again. Then it was simple to just tape them to my black square. Sadly, I used the last of this tape that I've had for many years, but I'll definitely be looking for more and in a wider format. I'd LOVE it in sheets too, as it cut so easily with these dies! I also used it for my Jack 'O Lantern's eyes/mouth, as you can see in these next two photos.
My hubby is a much better photographer than I, so he helped me capture the "glow"! ;~) I also have some glow-in-the-dark embossing powder (also really old) that I'm going to try to see if it will still glow. A little eerie/spooky Halloween FUN added to a project!!!
Products Used:
CS/DP: Papertrey Ink: Kraft CS (BG, stem, nose), Ripe Avacado; Bazzill Black; Making Memories' Spook Alley (orange DP for Jack)
Ink: Tim Holtz Distress: Antique Linen
Dies: Spellbinders: Fleur de Lis Squares and Jack 'O Lanterns
Miscellaneous: Glow-in-the-Dark Tape and 1/4" black ribbon from my stash
My glow-in-the-dark pumpkin decor piece was created using Spellbinders' Fleur de Lis Squares for the BG and featuring one of SB's Jack 'O Lantern dies as the focal point. I die cut the largest square from Kraft CS and distressed those lovely edges.
(Taken with a black light shining into Photo Tent) |
My hubby is a much better photographer than I, so he helped me capture the "glow"! ;~) I also have some glow-in-the-dark embossing powder (also really old) that I'm going to try to see if it will still glow. A little eerie/spooky Halloween FUN added to a project!!!
(Taken in total darkness) |
Products Used:
CS/DP: Papertrey Ink: Kraft CS (BG, stem, nose), Ripe Avacado; Bazzill Black; Making Memories' Spook Alley (orange DP for Jack)
Ink: Tim Holtz Distress: Antique Linen
Dies: Spellbinders: Fleur de Lis Squares and Jack 'O Lanterns
Miscellaneous: Glow-in-the-Dark Tape and 1/4" black ribbon from my stash
Sunday, October 2, 2011
JustRite Friday Challenge 059: Fall Festival
Awaiting the arrival of more fonts/stamps from JR's current Super Sale, I die cut each pennant from different Halloween-patterned papers and varied my CS colors for my Lacey cuts. Then adding Frilly Velvet Ribbon (Hobby Lobby) to each pennant's top edge, I taped with 1/8" Scor-Tape, punched and set eyelets with my Crop-a-Dile II.
'Halloween' was created using JR's 95-pt. TNR Upper Case Font in the center of their “Damask” 1-Letter Borders. Because I LOVE the decorative touch these borders add, I alternated each of the three across my nine pennants! They were stamped with VersaMark Ink, heat embossed with "Halloween" EP (black EP/orange glitter) onto Vintage Cream CS (Papertrey Ink), die cut with Spellbinders' Lacey Circles and mounted with foam squares. After stringing the pennants together with black hemp twine, I tied a Bazzill bosher and fun fiber trims to each end. It's all ready for my recipient's Halloween decorating (if I can bear parting with it)?!
Sunday, October 31, 2010
Happy Halloween
Hope everyone has a ghoulishly-good time tonight for Halloween. My cards took their sweet time arriving this year (6 days after I mailed them???), but finally made it to my kids/their friends/roommates yesterday, just in the nick of time -- sigh -- just glad they arrived. I had fun playing with these images downloaded from The Graphics Fairy here. I'd have liked to link these sooner, but didn't want to spoil the surprise for my intended recipients. Karen has tons of great downloads, so be sure to stop by soon & peruse her site!!! Thanks, Karen, for making my Halloween card making ghoulishly fun this year!!! I embellished the downloaded images with Spellbinders Classic Frame, suede, Bazzill and Making Memories papers and stickers and gems from my stash.
Wednesday, September 29, 2010
JustRite Friday Challenge 037 (2nd Entry): Sketch
I'd been thinking of doing this Spellbinder's Halloween Graveyard Scene using several embossing powders, so decided I'd try it, not knowing how/if I could make it work?!
So for my 2nd JustRite entry this week, I die cut my graveyard scene in Spellbinders silver craft foil and colored the crow with Copic C9. Next I used my Embossing Pen on just the bottom "earth" area and sprinkled and heated my embossing powder. Then I just did the smaller sections one at a time with the desired EPs until done, added a bit more Copic greys/browns to finish off the edges and attached it to my card front.
I wanted to feature Mr. Bones against my harvest moon, kind of the "dead man in the moon", so stamped my JustRite 15-pt. TNR "Come if you dare" sentiment on gold Vellum, embossed in black EP and mounted that on a Spellbinders' Classic Circle die cut from orange Bazzill.
A spattering of Amuse twinkle stars in the night sky and my eerie scene is complete, so "Come if you DARE"!!! My husband said for a totally different look, I could use a witch, so I guess I have his permission to buy Spellbinders "Witches Brew" dies next-- LOL!
Wednesday, October 28, 2009
Simple Halloween Card & Dotted Spider
Decided to do a very simple last-minute Halloween card & get three in the mail today, all the while praying they'll all get to their destinations by Saturday. Had a blast last year doing Halloween cards and 3-D items, but for some reason the "spirits" just didn't move me this year--LOL!!! I did add a cute little "Spidey" inside each card (minus the candy) and thought it would be fun to add a new twist -- I ran the scalloped circles through my Wizard with the Dotted Swiss embossing folder and really liked the outcome. Simple pleasures!!!
Paper, Tag & bat brad: Making Memories DP; white CS (stash)
Stamp (inside) & Both Ribbons: Martha Stewart
Embellishment: SU's Black Hemp Twine
Spider: SU's Photo Corners & Scalloped Circle Punch; Dotted Swiss embossing folder
Sunday, August 30, 2009
Spellbound, But Still Chic
Because I tend to do better with non-cutesy cards, I fell in love with Papercrafts Mag's online bonus project, Chic Halloween Card by Cari Fennell, so thought I'd CASE it! A friend had also liked it & came to craft with me today, but it turns out I had used up all of my stash of this particular MM's Spellbound paper! Boo Hoo! Never fear -- friend to the rescue! She'd brought her whole (huge) Halloween paper stash & had 1 sheet of this fabulous double-sided paper left, so shared with me -- thanks, Ilene!!! I changed the card just a tad, using a MM's vinyl bat sticker and different rhinestones, but I just love how it turned out!!! Cari had me @ tulle; love how it looks on this card!!!
Paper: MM's 2008 Spellbound Halloween Line (double-sided)
Stamp: MM's 2008 Spellbound Arcylic Stamps
Ink: PTI's Palette True Black
Embellishments: MM's Vinyl Stickers (2007); black tulle & gems (stash)
Tools: Spellbinders Wizard & Scalloped Circle Nestie
Finished Size: 5 1/2" x 4 1/4"
Wednesday, November 12, 2008
Witchy-Witch
Though Halloween is long gone until
next year, I realized I never posted this card I made in a rush the day before Halloween. When my sweet friend Kelly sent me a RAK with SU shoe verses, I just had to quickly make a card for my friend Ilene, who dresses up as a witch every Halloween & just got new "witch" shoes & my BBGF (best blogging GF) Gwen, who never fails to comment on my posts in spite of working many long hours every week! Luckily they both live locally, so their cards arrived on Halloween Day! I've had this witch since I first began stamping back in '95 & still love her! I added Lavendar Spica for a bit of glitz, though it's hard to see in a photo!
Cardstocks: Black, Orange & white from stash
Stamps: Witch (unknown); verse: SU's Humor in High Heels
Ink: VersaFine Onyx Black
Other: Tombow Markers; Spica Lavendar pen; Martha Stewart Ribbon
Tools: Spellbinder's Wizard & Long Rectangle Nestabilities
Thursday, October 30, 2008
Halloween Crafting 2008
I made some Halloween decorations for my kids to use in their respective homes this holiday. The door hanger was for my DD's roommate (couldn't leave her out) and the witchy went to them for their apartment also. I made the cat for my son's GF for her apartment (because she has a cat) & the skeleton for my son. He said he and his roommates had the perfect spot for it & they were just decorating their house when it came. It's made of metal and I found it marked down to $1.49 @ Michaels -- couldn't believe the price! I would normally have made him something too, but knew this was perfect for him! Of course they each received a card from me also, among the many that I'd previously made and posted here! Beware of all the spooks & ghouls out there & have a Happy Halloween everyone!!! ;-)
Papers and Paints: Making Memories
Rubons: K & Company
Ribbons: Martha Stewart
Wednesday, October 22, 2008
New Holiday Rubber Stamp Idea
As my dear friend, Gwen, and I are discussing what we're making for a Christmas card on email tonight, my brother coincidentally sends me an email, saying: "Due to increasing age, forgetfulness, and my decreasing ability to send cards on time here is my card to cover every Holiday" with the accompanying photo! Too funny!!! Gwen & I both had the idea it should be posted here! Enjoy!!!
Gwen thinks someone needs to make this into a stamp -- we could spend our time making cards for every occasion BUT a national holiday then & save a lot on postage, huh?!!! I like the frig posting idea too!!! LOL!!! Aren't email and the Internet wonderful -- what did we ever do before we had them?!!!
Spooky Halloween Decoration
I found all the Halloween stuff on sale @ Michael's yesterday, so decided this would be for ME! LOL!!! I got other fun stuff to make & send my kids and I'll post those once I know they've received them, so as to not spoil their surprise!
It was so fun/easy to cover this with various scraps from my stash! I discovered I like using Elmer's Rubber Cement, because if I make a mess, it just rubs off, whereas with Mod Podge I always have a splotch I can't remove on the front of my project! I'll be stocking up on Rubber Cement next trip! Wish I'd have found more than one of these, but sadly this was the last @ the particular Michael's where I shopped! Maybe I'll be lucky & find more before they're gone at another store(?)!!!
Paper: Making Memories, Pebbles, Inc. & K & Company Halloween papers
Ribbon: Martha Stewart
Embellishments: Making Memories brad & sticker
Monday, October 20, 2008
Rest Your Bones
I promised my DD that I'd send her something I made for
Halloween, so this is the little creation I came up with. I based it on the dotted paper that had this shaped design on it from 2007's Making Memories 6" x 6" paper pad. I simply glued it to a piece of cardboard & then added K & Company glitter stickers and MM's Glitter Pebble Sticker on one side. For the other side, I used MM's Spellbound Die-cut Pumpkin paper and my embossing pen & glow-in-the-dark embossing powder inside the pumpkins' faces so they'll glow in the dark. I then used Halloween embossing powder on the chipboard letters, hung them from the bottom point & added a ring and orange chain for hanging.
Papers: Making Memories Halloween Papers (2007 & 2008)
Embellishments: K & Company Glitter Stickers; Making Memories Glitter Pebble Stickers; Chipboard letters; glitter & glow-in-the-dark embossing powders
Sunday, October 19, 2008
Halloween Treat Basket
My friend, Ilene, was visiting today & working on a Christmas Treat Basket, so I decided to do a Halloween basket. Last year I made 2 for Christmas gifts and they can found under my Treat Holders label on the right. Again, the directions for making this treat holder can be found here on Splitcoaststampers awesome site! I liked both sides of this cardstock, so decided to keep it very simple and not add any patterned paper squares. I used a metal ring (actually a very large hoop earring I got for this very purpose at the $1 store last year) and added some chipboard buttons from last year and tied various Halloween ribbons around the ring! Pretty simple & it's ready for trick or treaters. Now I'll have to go hide the candy again or my DH will eat it all long before the 31st!!! Bet parents are glad it's a Friday night this year!
Paper: Making Memories Brocade Orange Spellbound Cardstock
Embellishments: Making Memories Chipboard Buttons (2007); Martha Stewart Ribbons (2007); black eyelets; silver hoop earring
Tools: Crop-a-dile II; Scor-It
Tuesday, October 7, 2008
Spooky Tree Halloween Card with Inkadinkadoo
My Spooky Tree card was based on the one on Inkadinkadoo's website here. I adjusted mine & added the narrow orange ribbon, as well as the Spica orange glitter on the tree & border leaves since I didn't have the beautiful K&Company papers they used. The glitter is probably impossible to see in my photo, but it is there! Love that little witch flying over the tree!
Paper: Scrap Works Formal Affair DP; black cardstock from stash
Stamps: Inkadinkadoo
Ink: Tsukineko's VersaFine Onyx Black
Ribbon: Martha Stewart
Tools: Spica Pen; Spellbinder's Wizard & Oval Nesties; Fiskars edge punch
Paper: Scrap Works Formal Affair DP; black cardstock from stash
Stamps: Inkadinkadoo
Ink: Tsukineko's VersaFine Onyx Black
Ribbon: Martha Stewart
Tools: Spica Pen; Spellbinder's Wizard & Oval Nesties; Fiskars edge punch
Monday, September 29, 2008
SBS 22 September Blog Hop Challenge Card
Here's my entry for the first-ever SBS22 Blog Hop Challenge. It was fun to create, but did prove to be a bit of a challenge for me because I realized AFTER I had my squares all stamped, embossed & run through the Wizard that it would not fit on a 6" square card and still allow any of my colorful background paper to show! Necessity being the Mother of Invention (not to mention lack of time or the inclination to start over), I took creative license and made it 6 1/4" square! Yep, I cheated on my first-ever challenge!!! ;-} Since I had a couple of cardstocks larger than 12" square to cut a larger base AND a 6 1/2" black envelope to mail it in, I decided to just go with it! Rules were meant to be "bent" anyway - right?!!! LOL!!!
Paper: Strathmore Bristol Vellum (card base); SEI's Eerie Alley Nightmare Square DP; SU's cardstock (squares)
Stamps: Making Memories Spellbound Clear Acrylic
Ink: ColorBox's Raven Black; Tsukineko's Moonlight White Brilliance
Tools: Wizard Diecutting Machine & Square Nesties
Embelllishments: Clear & White Embossing Powders
Subscribe to:
Posts (Atom)