My turn to choose the challenge at My Sheri Crafts this time around. Now that it's finally fall (almost here in AZ too), I chose to focus on autumn, asking you to use Fall items seen in 'abundance': leaves, acorns, fruits, pumpkins, gourds, etc.
I chose a bright striped fall BG paper from Bo Bunny's Apple Cider collection and ended up using some felt from my stash to cut my leaves and acorns using Spellbinders' dies. Since I couldn't really emboss the felt very well I used a brown Sharpie to enhance the leaves veins. My gem sentiment is one more from my stash that I grabbed @ Michaels years ago for a dime! Gonna miss those great little word stickers when they're all gone -- sigh! I backed it with a piece of burlap ribbon with gold thread and fringed the edges. Just a simple fall card that can be used for many occasions.
Hope you'll join us for this simple challenge @ My Sheri Crafts!
Maricopa is a community just south of Phoenix, AZ partially surrounded by raw desert and American Indian tribal land where wild horses still roam free and John Wayne worked his sprawling Red River Ranch and Cattle Company in bygone days. My husband photographed this horse sculpture near our subdivision’s entrance.
Showing posts with label Fall. Show all posts
Saturday, October 11, 2014
Saturday, October 27, 2012
My Sheri Crafts #97: Fall Colors
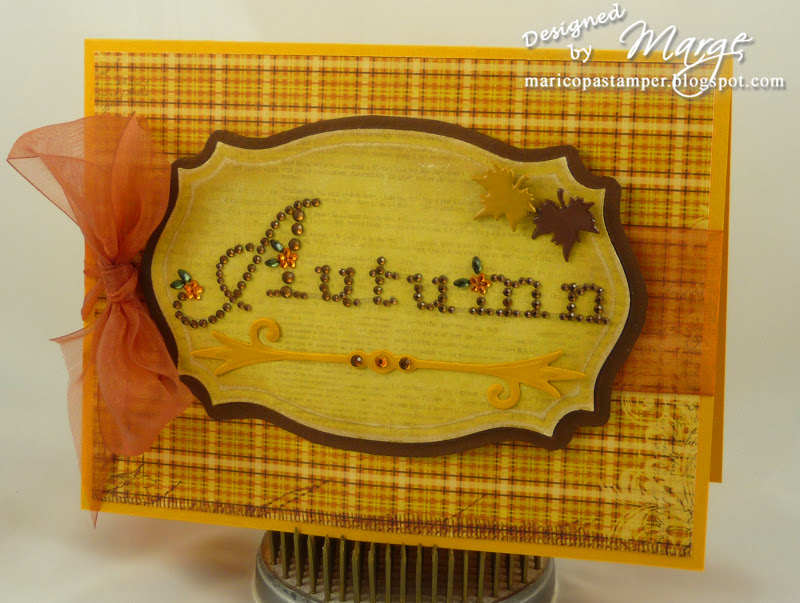
For this week's challenge at My Sheri Crafts we'd like for you to create a card/project using Fall colors and three embellishments -- easy-peasy!!! I chose a plaid paper from Bo Bunny's 6x6 Apple Cider collection for my BG and adhered to an orange CS base. I then decided on a straw-colored page of text from the same pad for my gem sentiment, a sweet little bargain earlier this year from Michaels outdoor clearance bin, which I recall was $.09! A sheer bow is tied around the center.
Next, I die-cut the text paper with Spellbinders' Labels Twenty-five, embossed/sanded/finished it off with a bit of Antique Linen distress inking along the edges. I embossed the same die once again on heavy-weight Bazzill brown CS, cutting around the outermost edge for a textural layer behind my straw piece. My Autumn gem sentiment was then attached, after coloring the flower petals orange (they were yellow), to bring out the orange in my plaid paper. After adding two metal leaves from my stash to the top corner, I cut an accent die from Spellbinders' Twisted Metal Tags and Accents for additional interest, embossed/distressed it and added three gems to the center, attaching it below the sentiment.
Now it's your turn to visit all our Design Team's inspiration and then create and post your own creation @ My Sheri Crafts -- can't wait to see them all!
Saturday, October 13, 2012
My Sheri Crafts #096: Halloween
Our My Sheri Crafts' Challenge this week is: Halloween -- create anything your spooky little heart desires for this holiday! Several years ago I created a double-sided Halloween decor piece (here) that I was inspired to do by a piece of 6x6 Making Memories' paper. It was sooo fun that I've fashioned another using Spellbinders' Labels Twenty-three, Martha Stewart's latest Halloween mat stack and some Hobby Lobby bottle caps. For these decor pieces, the sky's the limit with the plethora of Halloween papers, dies and embellishments available. It can be really unique and FUN -- make it 'sweet' for the younger ones or 'spooky' for the older crowd -- even personalize it, if you'd like!
I chose two different 'bird' papers to cut with my Grand Labels Twenty-three die from the MS stack and a piece of Tim Holtz grunge paper to sandwich inside, as I wanted to be sure the piece had the strength to hold up well when hanging and to support the bottle caps! I cut/embossed, sanded and distressed my paper with Black Soot ink and used a combination of Scor-Tape and Glue Dots to secure my 'sandwiched' pieces. Next I punched holes in the top/bottom and added 1/8" black eyelets, all with my beloved Crop-a-dile. From my stash I then attached different framed spooky mirrors @ center front & back.
To build my double-sided 'boo', I first ran 3 bottle caps through my Grand Calibur using the cutting plate and adapter plate, which works like a 'charm' to flatten them! Again using my Crop-a-Dile, I easily punched 1/8" holes in the bottle caps. Circles die cut/emossed/sanded from the reverse side of one 'bird' scrap piece using Spellbinders' Standard Circles Large were then glue-dotted to the caps and glittered letters spelling 'boo' were added. "Eek" would work also! Tim Holtz jump rings were used to attach the bottle caps @ the bottom so they dangle/move and TH ball chain completes the hanger @ the top.
I hope you'll join us @ My Sheri Crafts this week by creating/posting your own Halloween concoction(s) to share with us!
I chose two different 'bird' papers to cut with my Grand Labels Twenty-three die from the MS stack and a piece of Tim Holtz grunge paper to sandwich inside, as I wanted to be sure the piece had the strength to hold up well when hanging and to support the bottle caps! I cut/embossed, sanded and distressed my paper with Black Soot ink and used a combination of Scor-Tape and Glue Dots to secure my 'sandwiched' pieces. Next I punched holes in the top/bottom and added 1/8" black eyelets, all with my beloved Crop-a-dile. From my stash I then attached different framed spooky mirrors @ center front & back.
To build my double-sided 'boo', I first ran 3 bottle caps through my Grand Calibur using the cutting plate and adapter plate, which works like a 'charm' to flatten them! Again using my Crop-a-Dile, I easily punched 1/8" holes in the bottle caps. Circles die cut/emossed/sanded from the reverse side of one 'bird' scrap piece using Spellbinders' Standard Circles Large were then glue-dotted to the caps and glittered letters spelling 'boo' were added. "Eek" would work also! Tim Holtz jump rings were used to attach the bottle caps @ the bottom so they dangle/move and TH ball chain completes the hanger @ the top.I hope you'll join us @ My Sheri Crafts this week by creating/posting your own Halloween concoction(s) to share with us!
Saturday, September 29, 2012
My Sheri Crafts Challenge #95: It's Picking Time!
Time for another My Sheri Crafts Challenge -- it's 'picking time', so we're asking you to include a pumpkin or apple on your project. I took 'artistic license' and went with my 'pumpkin' in the form of a jack-o-lantern face on my burlap silverware (or plastic ware) holders -- Hee!!!

My first glimpse of the original idea for these with a gorgeous flower was here on Pinterest -- of course! Since I'd recently purchased a bunch of burlap in several colors (can you say 'new obsession'?), I just had to modify these to work for either a dinner table or an outdoor get-together with plastic ware, especially if you're doing something around Halloween for a child's or even adult's party. Thanks, sweet friend, for that clever idea -- add a little fun to a party and keep it simple when it comes to clean-up!
Then, inspiration struck as I was writing this post and it was back to the 'drawing board', as I had the idea for the apple -- great for back-to-school with any number of items tucked inside other than silverware -- pencils, pens, ruler, bookmark, large candy bar -- I'm sure many Moms, most children and certainly all teachers could think of dozens of ideas?! Might be a cute/inexpensive idea for the upcoming fall/Christmas/winter holidays!!! NOW my head is spinning again and I don't even have any school-age children!!!
DIRECTIONS:
Cut burlap 14 1/2" long by 4" wide
Fold over 1 1/2" and zigzag stitch about 1/2" from raw edge (forgot
this on cream holder, but no big deal)
Fold bottom up 5 1/4" from last fold
Stamp with paint (I slipped bottom of holder under my craft mat at fold and stamped, then just wiped paint off mat where it bled through fabric -- easy/peasy!)
Once paint is dry, zigzag stitch up right side from bottom edge, in about 3/8 to 1/2", across top and down left side
Pull long threads from top/both sides for fringe
NOTE: These are not washable, spot clean only, but burlap is sooo inexpensive and once you have the measurements, which I've included here, they are sooo quick/easy to whip up!
To create my orange/tan holder, I cut 1 piece from each color and layered tan atop orange and made per above directions. For my face, I merely cut pieces of craft foam for stamps and attached to acrylic block with 1/2" wide strips of Scor-Tape, squirted on a dollop of black craft paint, smoothed it out a bit with a sponge brush and stamped, beginning with the mouth, then nose & eyes for easy lining up -- simple/easy/non-perfectionistic!
Apple was stamped using . . . an apple, of course! Found a Pink Lady that had a tiny spoiled spot, so perfect for my needs! Cut in half, spread my red paint with a sponge brush, stamped (had to do a little touch-up as my cut wasn't perfectly 'flat'), cut a Spellbinders's leaf from craft foam, and took the actual stem, held with a tweezers, dipped in brown paint, and added a bit of touch-up to the stem. If I can do it, you CAN TOO!
Hope you enjoy making these and hope you'll come up with an idea for a project for My Sheri Crafts to share with us too -- look forward to seeing your crafty pumpkin/apple idea -- hmmm, now another idea just hit me -- time to cut more burlap!!! ;-)

My first glimpse of the original idea for these with a gorgeous flower was here on Pinterest -- of course! Since I'd recently purchased a bunch of burlap in several colors (can you say 'new obsession'?), I just had to modify these to work for either a dinner table or an outdoor get-together with plastic ware, especially if you're doing something around Halloween for a child's or even adult's party. Thanks, sweet friend, for that clever idea -- add a little fun to a party and keep it simple when it comes to clean-up!
Then, inspiration struck as I was writing this post and it was back to the 'drawing board', as I had the idea for the apple -- great for back-to-school with any number of items tucked inside other than silverware -- pencils, pens, ruler, bookmark, large candy bar -- I'm sure many Moms, most children and certainly all teachers could think of dozens of ideas?! Might be a cute/inexpensive idea for the upcoming fall/Christmas/winter holidays!!! NOW my head is spinning again and I don't even have any school-age children!!!
DIRECTIONS:
Cut burlap 14 1/2" long by 4" wide
Fold over 1 1/2" and zigzag stitch about 1/2" from raw edge (forgot
this on cream holder, but no big deal)
Fold bottom up 5 1/4" from last fold
Stamp with paint (I slipped bottom of holder under my craft mat at fold and stamped, then just wiped paint off mat where it bled through fabric -- easy/peasy!)
Once paint is dry, zigzag stitch up right side from bottom edge, in about 3/8 to 1/2", across top and down left side
Pull long threads from top/both sides for fringe
NOTE: These are not washable, spot clean only, but burlap is sooo inexpensive and once you have the measurements, which I've included here, they are sooo quick/easy to whip up!
To create my orange/tan holder, I cut 1 piece from each color and layered tan atop orange and made per above directions. For my face, I merely cut pieces of craft foam for stamps and attached to acrylic block with 1/2" wide strips of Scor-Tape, squirted on a dollop of black craft paint, smoothed it out a bit with a sponge brush and stamped, beginning with the mouth, then nose & eyes for easy lining up -- simple/easy/non-perfectionistic!
Apple was stamped using . . . an apple, of course! Found a Pink Lady that had a tiny spoiled spot, so perfect for my needs! Cut in half, spread my red paint with a sponge brush, stamped (had to do a little touch-up as my cut wasn't perfectly 'flat'), cut a Spellbinders's leaf from craft foam, and took the actual stem, held with a tweezers, dipped in brown paint, and added a bit of touch-up to the stem. If I can do it, you CAN TOO!
Hope you enjoy making these and hope you'll come up with an idea for a project for My Sheri Crafts to share with us too -- look forward to seeing your crafty pumpkin/apple idea -- hmmm, now another idea just hit me -- time to cut more burlap!!! ;-)
Friday, February 24, 2012
Halloween Wine Charms
These are a combination of Spellbinders' dies and die cuts done with my fabulous new Boss Kut Gazelle machine. {I am such a lucky girl -- explanation here!!! ;~)} The shapes cut with my Gaz are the ghost, spider, pumpkin and bat. One advantage to cutting these with the Gaz is that you can make them a bit larger as they do shrink to about 1/3 of their original size.
I've added beads to these (and need to do the same with my own Christmas charms) to better help party participants recognize their wine glass and just because I love the splash of color, especially with so much black for these Halloween ones. Besides, I always set my glass down and then can't remember where I put it -- LOL -- not that I really party often. My drink of choice here in the desert is bottled water (sorry landfill!) -- I'm rarely seen without it. Since I'm most often at home crafting, it's safer to close the lid tight & have an unbreakable plastic bottle when I'm rushing around my craft room with my 'weapon of choice': sharp scissors, heat tool, etc. -- you crafty ladies understand, right?!
Hopefully, Sassy will think of me when she uses these little charms this Fall! Thanks for stopping by today and let me know if you like my little charmers -- they were really FUN to make!!!
Monday, November 14, 2011
JustRite Friday Challenge #062: Give Thanks
For this JustRite Friday Challenge to make and give or send a thank you card or gift I kept my card fairly CAS to let the sentiment and fall frame take center stage!My sentiment (Baroque Nested Frames) and frame (Give Thanks Nested Frames) are die cut using JustRite's Nested Frames and Nested Sentiment custom dies that are so fun to work with! I used the small additional die flower piece to back the cream frame and then cut an additional orange frame from a slightly larger Nested Frames' die to back the whole piece before mounting it over my ribbon. I LOVE that this adds just a smidge of border color in the background -- so many possibilities with these awesome custom dies.
My cream layer's border was cut/embossed with a combination of Spellbinders' Classic Bracket and Classic Ric Rac Edgeabilites and I ran machine stitching just above them. The little acorn accent piece was cut from shrink plastic (Spellbinders' retired die) and colored with Copic markers before shrinking.
I'm so happy you stopped by today and hope you'll make and send a thank you card to someone too. It's always so nice to discover a card in my mailbox and this card will be mailed right after our Thanksgiving celebration.
Sunday, October 2, 2011
JustRite Friday Challenge 059: Fall Festival
Awaiting the arrival of more fonts/stamps from JR's current Super Sale, I die cut each pennant from different Halloween-patterned papers and varied my CS colors for my Lacey cuts. Then adding Frilly Velvet Ribbon (Hobby Lobby) to each pennant's top edge, I taped with 1/8" Scor-Tape, punched and set eyelets with my Crop-a-Dile II.
'Halloween' was created using JR's 95-pt. TNR Upper Case Font in the center of their “Damask” 1-Letter Borders. Because I LOVE the decorative touch these borders add, I alternated each of the three across my nine pennants! They were stamped with VersaMark Ink, heat embossed with "Halloween" EP (black EP/orange glitter) onto Vintage Cream CS (Papertrey Ink), die cut with Spellbinders' Lacey Circles and mounted with foam squares. After stringing the pennants together with black hemp twine, I tied a Bazzill bosher and fun fiber trims to each end. It's all ready for my recipient's Halloween decorating (if I can bear parting with it)?!
Saturday, September 17, 2011
JustRite Friday Challenge 058: Frugal Friday Sponsored by Spellbinders
The JustRite Frugal Friday challenge: "create an inexpensive gift idea (anything but a card), using something you have recycled and reused from around your house".My tin originally held Mixed Nuts from Costco. I chose a Fall theme using the 3 1/4" round leaf border from Backyard Birds, colored with Copic Markers, and "The Beauty of Fall" sentiment from Nature Nested Sentiments and Verse stamped onto my oak leaf (a retired Spellbinders' die which includes the acorns) for decorating the lid.
Note: I used thick CS for the acorns and misted with water before embossing to get a deep impression. My leaves were distressed with Antique Linen Distress Ink. The veins were distressed while still in the die.
I covered my container with Papertrey's Autumn Abundance DP, adding a border along the top edge cut with Spellbinders' Banner Basics Three, slightly offsetting the edges using solid CS and DP to add dimension. Another pair of oak leaves and acorns were added to the side and my sweet treat is all ready for my intended recipients! Below is my drab empty clean container before I had fun decorating and filling it!
Thanks so much for coming by today -- I'm anxious to see what fabulous ideas JustRite stampers come up with for frugal gifting (something we can ALL use in today's economy)!
Friday, October 15, 2010
My Sheri Crafts Challenge #26: In Stitches
Just received my Wreath for All Seasons stamp set and tag won during the September release from Papertrey Ink and wanted to play with a fall version for My Sheri Crafts Challenge. I used Summer Sunrise and Burnt Sienna inks on my Dark Chocolate vine. Adding my sentiment, reinforcement and edging in Dark Chocolate also, I then stitched 2 rows along the bottom edge and again along the edge of this gorgeous Venise Lace I got today from Hobby Lobby! My original intent was to add some fibers to the tag, but I liked this lace so well, I just stayed with it for my simple, bright fall card!
Papers, Stamps, Inks, Tag Die: All PTI
Embellishments: Venise Lace: Hobby Lobby; thread: my stash
Tools: Spellbinders' Wizard, Singer Sewing Machine; WeRMemoryKeepers: Corner Rounder
Wednesday, October 6, 2010
JustRite Friday Challenge 038: Fall 3D Project
Using JustRite's Baroque Nested Frames and Nature Nested Sentiments and Verse, I stamped my tri-color frame, name, and sentiment on heavy cream CS, trimmed them close all around, folded in half and rounded the corners. Then I added my 3D pumpkins at the left edge. To create them I cut 5 Spellbinders' pumpkins for each and folded each one in half, glued each half to the next until I reached the final 2 halves. After cutting a brown stem for each pumpkin, I glued the stems on & glued the last 2 sections to the front & back of the place card. Quite simple, but a fun addition for this year's festivities.
Paper: Papertrey Ink's Vintage Cream CS; Bazzill's Orange & Brown CS
Stamp: JR's Baroque Nested Frames & Nature Nested Sentiments and Verse; 25-pt. TNR Font
Inks: VersaColor's Marigold, Bark & Bamboo
Friday, September 24, 2010
My Sheri Crafts Challenge #23: Autumn
For My Sheri Crafts "Autumn" Challenge this week, I covered a tin box I've had in my stash for awhile using one of my favorite fall papers: Basic Grey's Mellow 6 x 6 pad. I loved it so much after I first used it that I ran out & bought a second pad!
I chose a tree paper to cover the top and then used 4 solids and the stripe in this line for my pennants and brownish-green solid for trim and to cover the box edges. I cut/embossed my pennants from the largest Spellbinders' star die from a small scrap for each "flag". Baker's twine is used to "hang" my pennant, across the border strip and along the lid's edge. To complete my fall theme, I used alphabet charms for my "Happy Fall" sentiment. Now all I need is to visit my local grocery for some goodies to tuck inside and a matching tag or small card & I have a fun little gift for a friend/neighbor -- thanks My Sheri Crafts for the inspiration! ;-)
Paper: Basic Grey's Mellow 6 x 6 Paper Pad
Ink: PTI's Chamomile (on flags all edges)
Embellishments: Making Memories' Small Antique Copper Alpha Charms; The Twinery's Baker's Twine
Friday, September 10, 2010
My Sheri Crafts Challenge #21: Labor Day
Paper: PTI's Vintage Cream,Plum Pudding, Lavender Moon CS & Friends 'Til the End DP
Stamps: PTI's Autumn Abundance
Ink: Memento's Rich Cocoa
Embellishments: Bazzill Basics Ribbon
Tools: Spellbinders' Wizard, Circle /Inverted Scalloped Circle and Ribbon Tag dies; Various Copic Markers; Central Pneumatic Air Compressor
Tuesday, August 24, 2010
JustRite Friday Challenge 032: Colors of Fall
For this week's JustRite challenge I chose to Copic color the poppy from Plant a Little Love, stamping it several times, then cutting & layering it. The main image is surrounded by the full border from this set, plus I decided to try something "not for the faint of heart" -- I cut one of the little swirly leaf images from the border to use in the scallops of my Spellbinders' Big Scalloped Circles LG. Proceed at your own risk, but I do like the bonus of being able to use that little swirly leaf singly now. For accent I Copic colored several clear gems orange -- one of my FAV uses for Copics (now for sale @ JustRite). Originally I planned to do a bow at the edge, but instead ended up wrapping three swirly shapes from Spellbinders' Doodle Parts along my ribbon edge, as they just seemed to tie in so well.
Thanks for visiting here today. It was 116.8 degrees in Maricopa this afternoon and just after I posted this our AC quit -- may be a warm night -- YIKES!
Thursday, November 5, 2009
Give Thanks Card
Just a simple Thanksgiving card today, as I'm struggling to find my mojo -- seems to have gone missing AGAIN--hate when that happens & I have no good reason for it! My friend Ilene loaned me her Holiday Limited Edition Nesties to try to jumpstart my creativity. I got a bit carried away with my sponge & distress inks on the edges of my pumpkin here and then was at a loss as to what else to do. Do you ever have that problem? I didn't want to waste any more of this lovely Basic Grey Mellow DP, so I finally just stopped after adding the sentiment, leaving the inside blank so I could write a message on it IF I decide to use this card. I'm taking a break & hope to try another card
later today--wish me luck, as I obviously NEED it!!!
Paper: Bazzill scalloped CS; Basic Grey Mellow DP
Stamps: Fiskars Turkey Lurkey
Ink: PTI's Dark Chocolate; Rangers' Old Paper & Vintage Photo Distress Inks
Embellishments: Brown Ric Rac & waxed floss (colored with Copic E57; buttons from stash
Tools: Spellbinders' Wizard & Pumpkin Dies
later today--wish me luck, as I obviously NEED it!!!Paper: Bazzill scalloped CS; Basic Grey Mellow DP
Stamps: Fiskars Turkey Lurkey
Ink: PTI's Dark Chocolate; Rangers' Old Paper & Vintage Photo Distress Inks
Embellishments: Brown Ric Rac & waxed floss (colored with Copic E57; buttons from stash
Tools: Spellbinders' Wizard & Pumpkin Dies
Wednesday, September 9, 2009
TEBBDB Challenge #3

For this TEBB challenge we were to use paper piecing. I had made this Inkadinkado Mega Happy card hurriedly last fall from these fabulous Basic Grey Mellow designer papers. Though I loved the design, I knew it "needed more". This time I added hemp twine along the top scored line, a torn inked edge at the bottom and stamped the fall leaves and an acorn. The card uses PTI's Kraft CS and a piece of orange CS from my stash (source unknown) and PTI's Dark Chocolate, Summer Sunrise & Cognac inks. I like my result much better this time!
Saturday, August 29, 2009
JustRite Apple Orchard: Copic Creations Challenge 10

As I work on my coloring "skills" (a debatable term!) with my tiny stash of Copics, the current challenge at Copic Creations is to use Reds/Pinks. I have much to learn & reds are the most difficult colors I've yet tried, but the only chance at becoming better is to practice. We all have to begin @ the beginning, huh?!!! Again, my lack of Kindergarten and art classes notwithstanding, I do find coloring to be very enjoyable & relaxing! I used JustRite's Autumn Blessings basket of apples and a new favorite layout I first discovered on the fabulously talented Jak's blog here! So if I'm brave enough to post my beginning ventures into Copic coloring, why don't you also & maybe you'll be the lucky winner of the fabulous prize they're offering in this challenge! I know I'm hoping to win as I'll either improve or at the very least, have fun trying!!!
Paper: PTI's White CS; Basic Grey's Mellow DPs
Stamp: JustRite Autumn Blessing; PTI's Everyday Classics
Ink: Memento's Rich Cocoa & Lady Bug
Embellishments: Ribbon (source unknown); Burgundy Stickles
Tools: Fiskars Upper Crest Punch; Spellbinders Wizard & Circle Nesties
Finished Card: 5 1/2" x 4 1/4"
Saturday, November 8, 2008
Happy Fall Card II
Papers: PaperTrey Ink's Kraft cardstock & pumpkin cardstock from stash; Basic Grey's Mellow 6" x 6" cardstock pad
Stamps: Stampendous Mega Happy & Seasonal Swirls acrylic sets
Ink: PTI's Dark Chocolate Hybrid Ink
Tools: Scor-It Board
Thursday, October 16, 2008
Feeling Owly?!!!
If you're not familiar with Papertrey Ink, go here to check out Nichole Heady's blog & online store -- you will NOT be sorry! She & her design team are fabulous and PTI rolls out several new stamp sets & coordinating inks, papers, ribbons & accessories the 15th of every month! Between their ingenious designs & uniquely creative examples on their blogs, you'll be truly inspired! It's very hard not to "want it all" -- I know I do!!!
Paper: Bazzill cardstocks; SEI's Madera Island DP
Stamps: PTI's Wise Owl & Wise Owl Bellies; Wordsworth (branch/leaves)
Inks: VersaColor's Orange, Bark, Umber & Narcissus; ColorBox Dark Brown Fluid Chalk
Tuesday, October 7, 2008
Spooky Tree Halloween Card with Inkadinkadoo
Paper: Scrap Works Formal Affair DP; black cardstock from stash
Stamps: Inkadinkadoo
Ink: Tsukineko's VersaFine Onyx Black
Ribbon: Martha Stewart
Tools: Spica Pen; Spellbinder's Wizard & Oval Nesties; Fiskars edge punch
Monday, October 6, 2008
Happy Thanksgiving Card with Inkadinkado
Paper: Speckled Kraft Cardstock
Stamps: Inkadinkado's Holiday Seasons Clear Stamps
Ink: Tsukineko's Pigments: Bamboo, Paprika & Brown
Tools: Spellbinders' Wizard & Long Rectangle Nesties
Subscribe to:
Posts (Atom)