Sunday, October 31, 2010

Merry Christmas Snowflake Card with QuicKutz Dies


This card was sooo much fun to make! After embossing my BG with a Cuttlebug embossing folder, I used the Sparkles die by QuicKutz for my snowflake and their Nameplate die. I cut the Nameplate die first in wool felt for added texture and again in red CS so I could use just the narrow red border this die also cuts.
I added a red button to both my snowflake and 3 small ones along the felt curve. Baker's twine is tied through the large button and holds the vellum sentiment strip in place atop my nameplate, making me think of a yummy Christmas candy cane. This is one of my favorite Christmas cards so far.
For all your QuicKutz die needs, see Creating Memories in Time for an unbelievable selection!

Oh, Holy Night Christmas Card with QuicKutz Dies


To create this Christmas Nativity scene I simply cut the center only using the QuicKutz 12" Nativity die. This beautiful die has the 3 Wise Men and a camel to the left of the manger and shepherds, a sheep and Mary's donkey to the right -- perfect for both scrapbooking and card making. I'm going to be featuring a card with just the Wise men here on my blog in the near future! I love to take different dies and "make them my own" by just using a part of the die or combining several to create a scene different from the obvious intended application.
My card uses Bazzill CS, lightweight metallic paper and Stickles for stars. I stamped
my sentiment on lightweight paper, backed it with CS for strength, rounded the corners and punched notches to thread my Offray ribbon through. I used foam tape behind the star and along the top of the manger for added depth. A simple, but pretty Christmas card that's inexpensive, easy to mass produce and mail, always a bonus during this busy time of year!
Check out this QuicKutz Nativity die (and many others) at Creating Memories in Time for all your paper crafting needs!


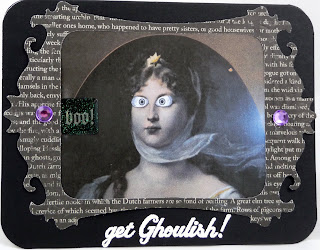
Happy Halloween


Hope everyone has a ghoulishly-good time tonight for Halloween. My cards took their sweet time arriving this year (6 days after I mailed them???), but finally made it to my kids/their friends/roommates yesterday, just in the nick of time -- sigh -- just glad they arrived. I had fun playing with these images downloaded from The Graphics Fairy here. I'd have liked to link these sooner, but didn't want to spoil the surprise for my intended recipients. Karen has tons of great downloads, so be sure to stop by soon & peruse her site!!! Thanks, Karen, for making my Halloween card making ghoulishly fun this year!!! I embellished the downloaded images with Spellbinders Classic Frame, suede, Bazzill and Making Memories papers and stickers and gems from my stash.


Thursday, October 28, 2010

Let It Snow Card with QuicKutz Dies


My quest to get more Christmas cards made continues with my die-cut snowflake featured here atop another of my favorite
QuicKutz dies, Nameplate. The snowflake consists of two of three dies on the QK Sparkles die, covered with Stickles for "ice" and topped off with a ZVA Creative pearl. These QK dies and ZVA Creative pearls are available for purchase at Creating Memories in Time.
Navy Offray polyester ribbon is laced through the Nameplate tag and tied in a double knot. My right edge is highlighted with navy suede paper punched with Fiskars Apron Lace border punch and DP is by Bella Press. Okay, on to my next Christmas card featuring more QuicKutz dies, so stop back soon!

Don't forget to visit our CMIT Blog here for more crafting inspiration!


Wednesday, October 27, 2010

Happy Holidays Card with QuicKutz Dies


The time has come for us procrastinators to get busy making our Christmas cards! I created this simple Happy Holidays card using several fabulous QuicKutz dies, including Window, Cookies (tree, cut in suede paper), Sign and the plate from the Cookies & Milk die set to cut the plaid rug under my tree. These dies and many more can be found at Creating Memories in Time. Also visit our CMIT Blog here for more crafting inspiration!
My Inkadinkado sentiment is stamped in Memento Inks, Lady Bug and Cottage Ivy, and the sign and window are aged with Ranger's Antique Linen. Red gems and star on my tree are from my stash.
I'm hoping to post a Christmas card almost daily, so please stop by again soon!

JustRite Friday Challenge 041: Hoiday Recipe Swap


JustRite's always fun weekly challenge is a Holiday Recipe Swap this week. I made this same card a couple months ago & my DD so loved it that I HAD to make another just for her. I decided I'd also make her a matching recipe holder/kitchen decoration. We both hope it will be in her new kitchen IF things work out as planned in the next few months when her current lease expires (fingers crossed)!
For the card and holder I
paper pieced and Copic colored my apron digi image from DZ Doodles, and popped it up on foam tape. For the apron, ric-rac trims and BG I used various Cosmo Cricket papers from Garden Variety, Material Girl and Early Bird 6 x 6 pads. The sentiment bubble was cut from Early Bird's label sheet for the card, but hand cut for the holder, as I didn't have another label and needed a smaller size, so she can fit a recipe card on the stand. I cut the recipe holder sheet from Spellbinders' Labels Eight and then embossed my cream CS with Labels Eight & hand cut to get a 1/8" edge behind my DP. I covered a wooden clothes pin for a clip with DP.
Both sentiments are stamped using JustRite's 25-pt. Times New Roman font with Memento Lady Bug ink (now also sold by JustRite). I then added veggies cut from Garden Variety. My CS is Papertrey Ink's Vintage Cream and the ric-rac trims cut with Papertrey Ink's ric-rac die. Buttons are Making Memories, tied with embroidery flos
s.
My holiday recipe to share:

Holiday Apple Cobbler

6 Lg. Apples – Peeled & Sliced

½ C Sugar

1 T Cinnamon (or more!)

1 ½ T Corn Starch

2 T Orange Juice

Toss above ingredients together.

1 C Butter (or margarine)

¾ C Packed Brown Sugar

½ C Sugar

3 C Flour

2 T Cinnamon (or more!)

Cut above ingredients together until crumbly.

Put apple mixture in casserole dish & place topping over.

Bake @ 350 degrees for 35 minutes or until bubbly.

Monday, October 25, 2010

Papertrey Ink October Blog Hop Challenge


Papertrey Ink's monthly blog hop challenge today is dedicated to those that celebrate winter holidays other than Christmas. I've created a very simple, masculine card for a Jewish friend -- hope he likes it!!! My card was made by cutting the Spellbinders' star die twice and then using scissors to modify my stars to create a six-pointed Star of David.
My card was made using Papertrey Ink's Silver CS and the star and label using Papertrey Ink's Enchanted Evening CS. My sentiment is made with the word "Happy" from PTI's Wreath for All Seasons and a JustRite alphabet to spell
"Chanukah", since I don't have a stamp for that. Couldn't be simpler! Can't wait to see what everyone else comes up with today!

Saturday, October 16, 2010

JustRite Friday Challenge 040: Colors of Fall


My original idea for this week's JustRite Friday Challenge changed many times, but in the end I'm pretty pleased with how it turned out! I wanted to use the Spellbinders' pumpkin die for my center cut-out. See the original card I based mine on here, along with Vicki Hook's tutorial. My first card made with her technique can be found here.
The pumpkin shape was a wee bit more challenging! After Copic coloring my pumpkins from Autumn Blessings, I added another die cut with my sentiment from Nature Nested Sentiments and Verse in Memento Rich Cocoa inside. Next, I created tendrils using thin wire stems from paper flowers, Copic colored the paper wraps brown. I added leaf ribbon and tendrils inside and out.
Thanks for your visit today & please come by again SOON!

JustRite Products Used: Stamps (see orange highlighted links); Memento Ink; Copic Markers
Paper: Bazzill

Friday, October 15, 2010

My Sheri Crafts Challenge #26: In Stitches


Just received my Wreath for All Seasons stamp set and tag won during the September release from Papertrey Ink and wanted to play with a fall version for My Sheri Crafts Challenge. I used Summer Sunrise and Burnt Sienna inks on my Dark Chocolate vine. Adding my sentiment, reinforcement and edging in Dark Chocolate also, I then stitched 2 rows along the bottom edge and again along the edge of this gorgeous Venise Lace I got today from Hobby Lobby! My original intent was to add some fibers to the tag, but I liked this lace so well, I just stayed with it for my simple, bright fall card!
Papers, Stamps, Inks, Tag Die: All PTI
Embellishments: Venise Lace: Hobby Lobby; thread: my stash
Tools: Spellbinders' Wizard, Singer Sewing Machine; WeRMemoryKeepers: Corner Rounder

Sunday, October 10, 2010

Creative Memories in Time: ATC Tuesday

Creating Memories in Time is hosting our first ATC card swap. Here is my first ATC. Stop by our blog and play along! Hope you enjoy our first ATC Tuesday and come back again the 2nd Tuesday of every month!!!

Materials:
Spellbinders - Graveyard Scene and Shapes dies; Witches Brew die; Standard Circle Die; Gold Premium Craft Foil
Tim Holtz: Vintage Photo Distress Crackle Paint
Copic Markers

Instructions:
1) Cut cardstock to 2 1/2" x 3 1/2"
2) Cut/Emboss die shapes from foil & CS; cut grave piece to 2 1/2" to fit card
3) Use rubbing alcohol to remove paint from foil for silver grave marker highlights
4) Color crow and plants with Copic markers
5) Cover bottom "dirt" area with crackle Paint & set aside to dry
6) Attach shapes to black CS

CMIT Blog Hop Winner!

I want to sincerely thank everyone who participated in our very first CMIT Blog Hop and send warm congratulations to our winner, Pam! I'm sure she'll derive many hours of fun creating with that huge bag of Prima flowers. You can see the full winner's post here.

Creative News Flash No 2 . . .

ATC Tuesday – Second Tuesday of Each Month

WHAT IS “ATC” TUESDAY???

Here’s the buzz…..The CMIT/CEM Design Team (Creating Memories In Time/Creating Everlasting Memories) will create ATC Trading Cards and publish them on the CMIT Blog
(http://cmitonlineblog.blogspot.com/) for everyone to see, we will provide instructions, and material list to duplicate the created ATC’s. We encourage you, our viewers, to play along. All you need to do is send us your very own ATC creation. Our design team will choose a winner, and a NICE prize will be sent to the “creative” person for each month's competition. The first ATC Tuesday will be October 12th, email all submissions to stampnterre@cox.net. Please provide your name, blog information (if you have one), and email address.

WHAT IS AN “ATC”???


ATC stands for Artistic Trading Cards….they are the size of a baseball card (2.5” x 3.5"}, come in many themes and people trade them as though they are trading cards. For our first ATC Tuesday you can choose any theme you like; from time to time I will publish a theme to be used so you can join in the ATC fun.

I've personally never made an ATC, so this is an exciting new venture for me, so be sure to check back on Tuesday to see what I come up with! AND I hope many of you will join us -- I can't wait to see what all you talented crafters create too!!!

Saturday, October 9, 2010

JustRite Friday Challenge 039: Give Thanks

This week's theme for the JustRite Friday Challenge is Give Thanks. I definitely need to get some thank-you cards in the mail, so this was a great opportunity to check some things off my ever-growing To-Do List while entering a challenge along the way -- LOVE it when it works out like that! This week I've used my new JustRite Baroque Nested Frames & Occasions Set, along with Basic Grey's Sultry DP. For embellishment, I've added wool felt cut with Spellbinders' Jumbo Scallop Border Petites -- one of the Honorable Mention prizes this week -- above my sentiment and along the bottom of my card, plus velvet brads. Thanks so much for your visit here today & come again soon!
Paper: Basic Grey's Sultry 6x6 Paper Pad; White CS from stash
Stamps: JustRite's Baroque Nested Frames & Occasions (sentiment & frame)
Ink: Memento's Rose Red & Bamboo Leaves
Embellishments: Creative Imaginations: Velvet Brads; Papertrey Ink: Wool Felt; ribbon from stash
Tools: Spellbinders' Wizard, Jumbo Scallop Border Petites & Rectangle Dies

Thursday, October 7, 2010

CMIT Blog Hop


The Creating Memories In Time’s Design Team would like to thank you for stopping by our blogs to check out our creativity. This blog hop is a two part hop; first in order to be eligible to win this fabulous bag of Prima Flowers


you must leave a creative comment on each of the following blogs:

Terre Fry http://terresscraptherapy.blogspot.com/

Heidi Blankenship http://embellished-dreams.blogspot.com/

Margarita Ybarra http://mycreationsbymy.blogspot.com/

Mary Pfaff http://crafty-cabin.blogspot.com/

Marge Robertson http://www.maricopastamper.blogspot.com/

CMIT Blog http://cmitonlineblog.blogspot.com/

The second part of this blog hop is to sign up as a follower of the CMIT Blog; we will be hosting challenges, contests, tutorials and a new program called ATC Tuesday so you will not want to miss what we are up to next. Stay tuned for more creative news flashes.

Blog hop contest will end on Saturday, October 9th at 12:00 Noon Arizona time. Once we have verified that both parts of the blog hop have been completed we will pick one lucky winner from one of 6 blogs. Thank you for stopping by and come back to see what we come up with next.

ATC Tuesday will begin on October 12th so come take a look at the CMIT blog to see what the design team creates; play along to win a prize.

I wanted to create a 5 1/2" x 4 1/4" Christmas card that would be relatively easy to mass produce and mail. I've simply stamped Santa on cream CS, die cut with Spellbinders' Lacey Squares, colored the leaves on his hat and added Stickles to the berries. Inking up the bottom edge only, I stamped the sentiment and postmark twice, die cutting each separately. The sentiment was threaded with 3/8" red velvet ribbon and through the green Lacey Square's corner loops. Lastly, I added dimensional tape to my postmark and attached it. For my card, I used the following products:
Paper: Die Cuts With a View's Green #1 CS; cream CS from stash
Embossing Folder: Provo Craft/Cuttlebug Winter Wonderland set
Stamp: Inkadinkado
Ink: Memento's Tuxedo Black
Dies: Spellbinders' Lacey Squares, Ribbon Tags Trio and Standard Circle
Embellishments: Copic Marker: YG63, E0000, E000 & R29; Stickles: Xmas Red; red velvet ribbon from stash

Wednesday, October 6, 2010

JustRite Friday Challenge 038: Fall 3D Project

Was afraid I'd not have enough time to take part in the JustRite Friday Challenge this week, but I managed to begin my simple Thanksgiving Place Cards for this year. I'm not sure at this point who'll attend, so I just worked out my idea and made one for my hubby & myself so far. Now it will be easy to complete the rest by next month!
Using JustRite's Baroque Nested Frames and Nature Nested Sentiments and Verse, I stamped my tri-color frame, name, and sentiment on heavy cream CS, trimmed them close all around, folded in half and rounded the corners. Then I added my 3D pumpkins at the left edge. To create them I cut 5 Spellbinders' pumpkins for each and folded each one in half, glued each half to the next until I reached the final 2 halves. After cutting a brown stem for each pumpkin, I glued the stems on & glued the last 2 sections to the front & back of the place card. Quite simple, but a fun addition for this year's festivities.
Paper: Papertrey Ink's Vintage Cream CS; Bazzill's Orange & Brown CS
Stamp: JR's Baroque Nested Frames & Nature Nested Sentiments and Verse; 25-pt. TNR Font
Inks: VersaColor's Marigold, Bark & Bamboo

Tuesday, October 5, 2010

My Sheri Crafts Challenge #25: Breast Cancer Awareness


I'd always intended to make one of these bra cards from years ago, so My Sheri Crafts Challenge to create a card for Breast Cancer Awareness this week was perfect! The bra cups are die cut from Spellbinders' scalloped circle dies, then folded in half and a portion snipped off each end to achieve the matching center of your bra. Ribbon is used both for straps, for an accent at the bra's center and on my sentiment tag.
Paper: Flower-embossed Handmade paper from stash; PTI's Smokey Shadow & White CS
Stamps: JustRite's 25-pt. TNR Font
Ink: PTI's Charcoal
Embellishments: Grosgrain Ribbon, pearlsm rub-0n from stash
Tools: Cuttlebug Emboss Plus 5 x 7 Embossed Tags; Spellbinders' Petite Scallop Circles

Saturday, October 2, 2010

Exciting News and Upcoming Blog Hop!!!

I have a very exciting announcement to make today: I was invited to join the Creating Memories in Time Design Team!!! I'm still in shock and very honored to have been asked to be a part of this talented group of amazingly creative women. I know I will learn a lot from each of them!

The Creating Memories in Time Design Team would like you to check out their creativity this Thursday, October 7th
for a fun and exciting creative blog hop. This blog hop has a two part hop fulfillment, and everyone that completes the two part hop fulfillment will be eligible in a drawing to win this fabulous 13" tall x 10" wide bag of Prima Flowers. HUNDRED AND HUNDRED OF FLOWERS . . . . . (Our international followers are eligible to participate in this hop and have the same chance to win this awesome bag of Prima Flowers in the drawing as our USA followers.)
Flowers and shipping costs are complimentary of CreatingMemoriesInTime.com/ and our Ebay Store (check our Ebay store for daily paper crafting bargains).


The first part of the Blog Hop is you must leave a creative comment on each of the following blogs:CMIT Blog http://cmitonlineblog.blogspot.com/

Terre Fry http://terresscraptherapy.blogspot.com/
Heidi Blankenship http://embellished-dreams.blogspot.com/

Margarita Ybarra http://mycreationsbymy.blogspot.com/

Mary Pfaff http://crafty-cabin.blogspot.com/

Marge Robertson
http://www.maricopastamper.blogspot.com/ (me)

The second part of this blog hop is to sign up as a follower of the CMIT Blog. We will be hosting challenges, contests, tutorials and a new program called ATC Tuesday, so you will not want to miss what we are up to next. Stay tuned for more creative news flashes.

LinkWithin

Blog Widget by LinkWithin